Dear Jane: H-6 – Pie Sale

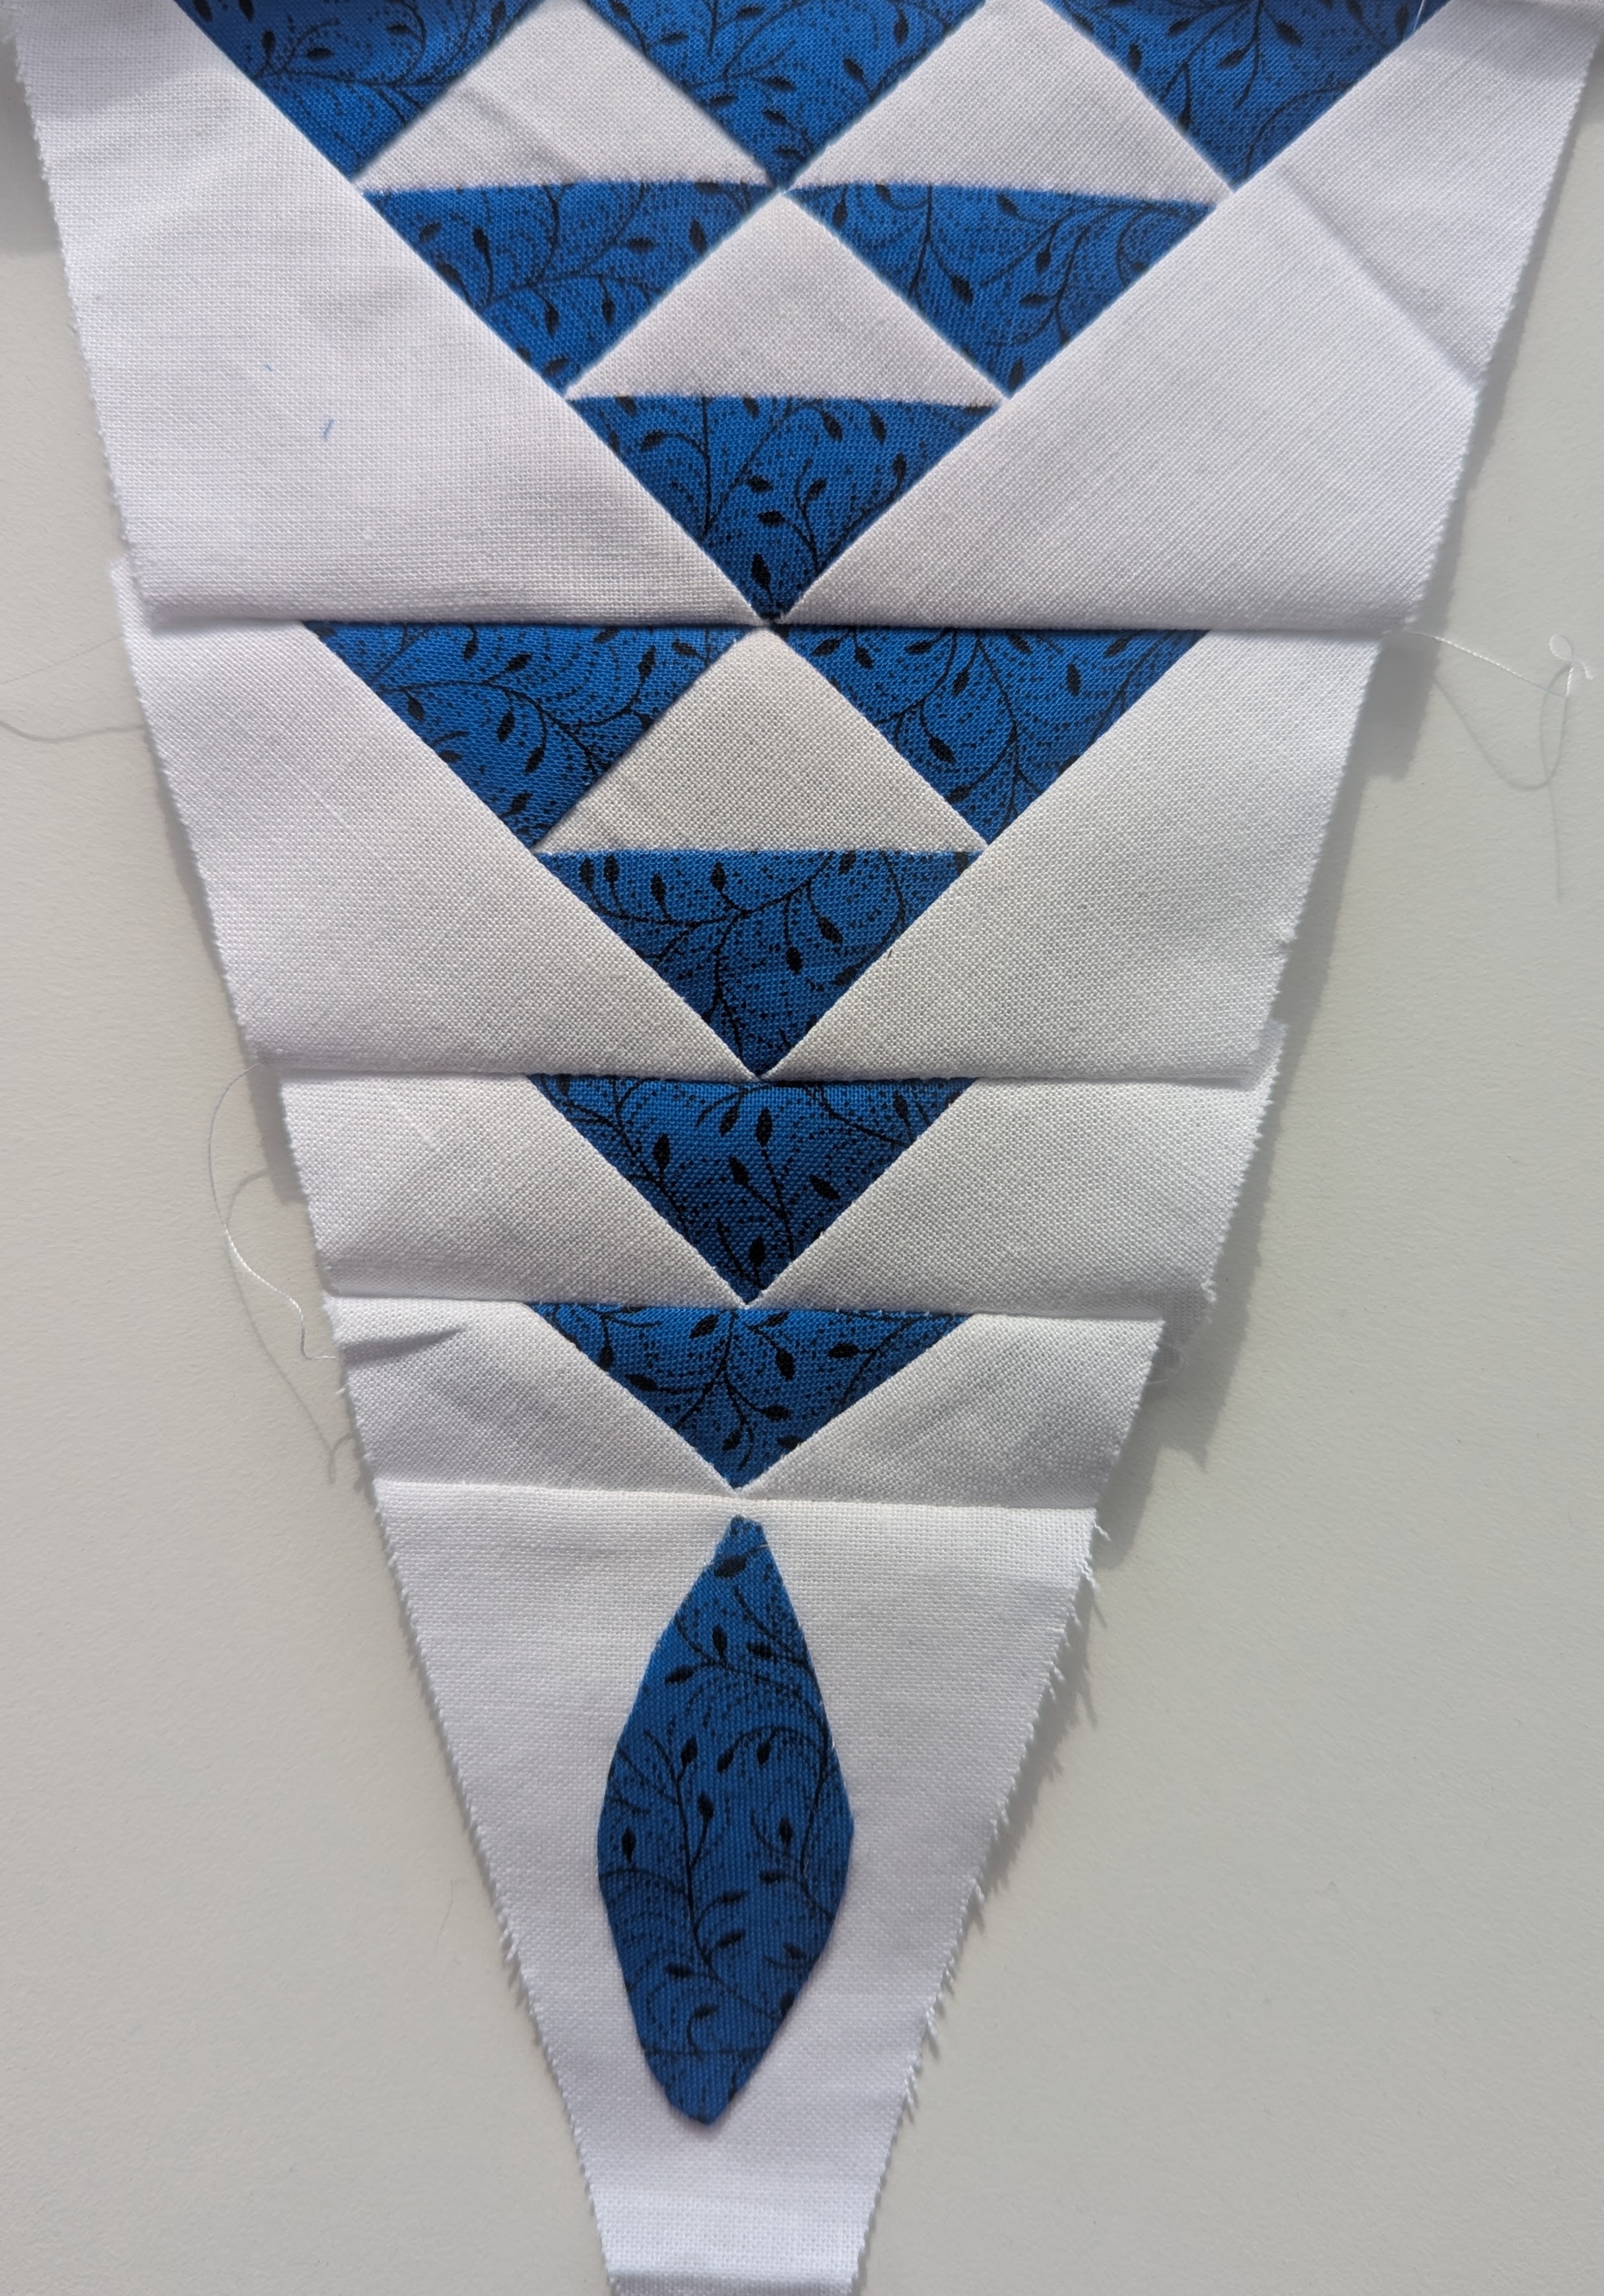
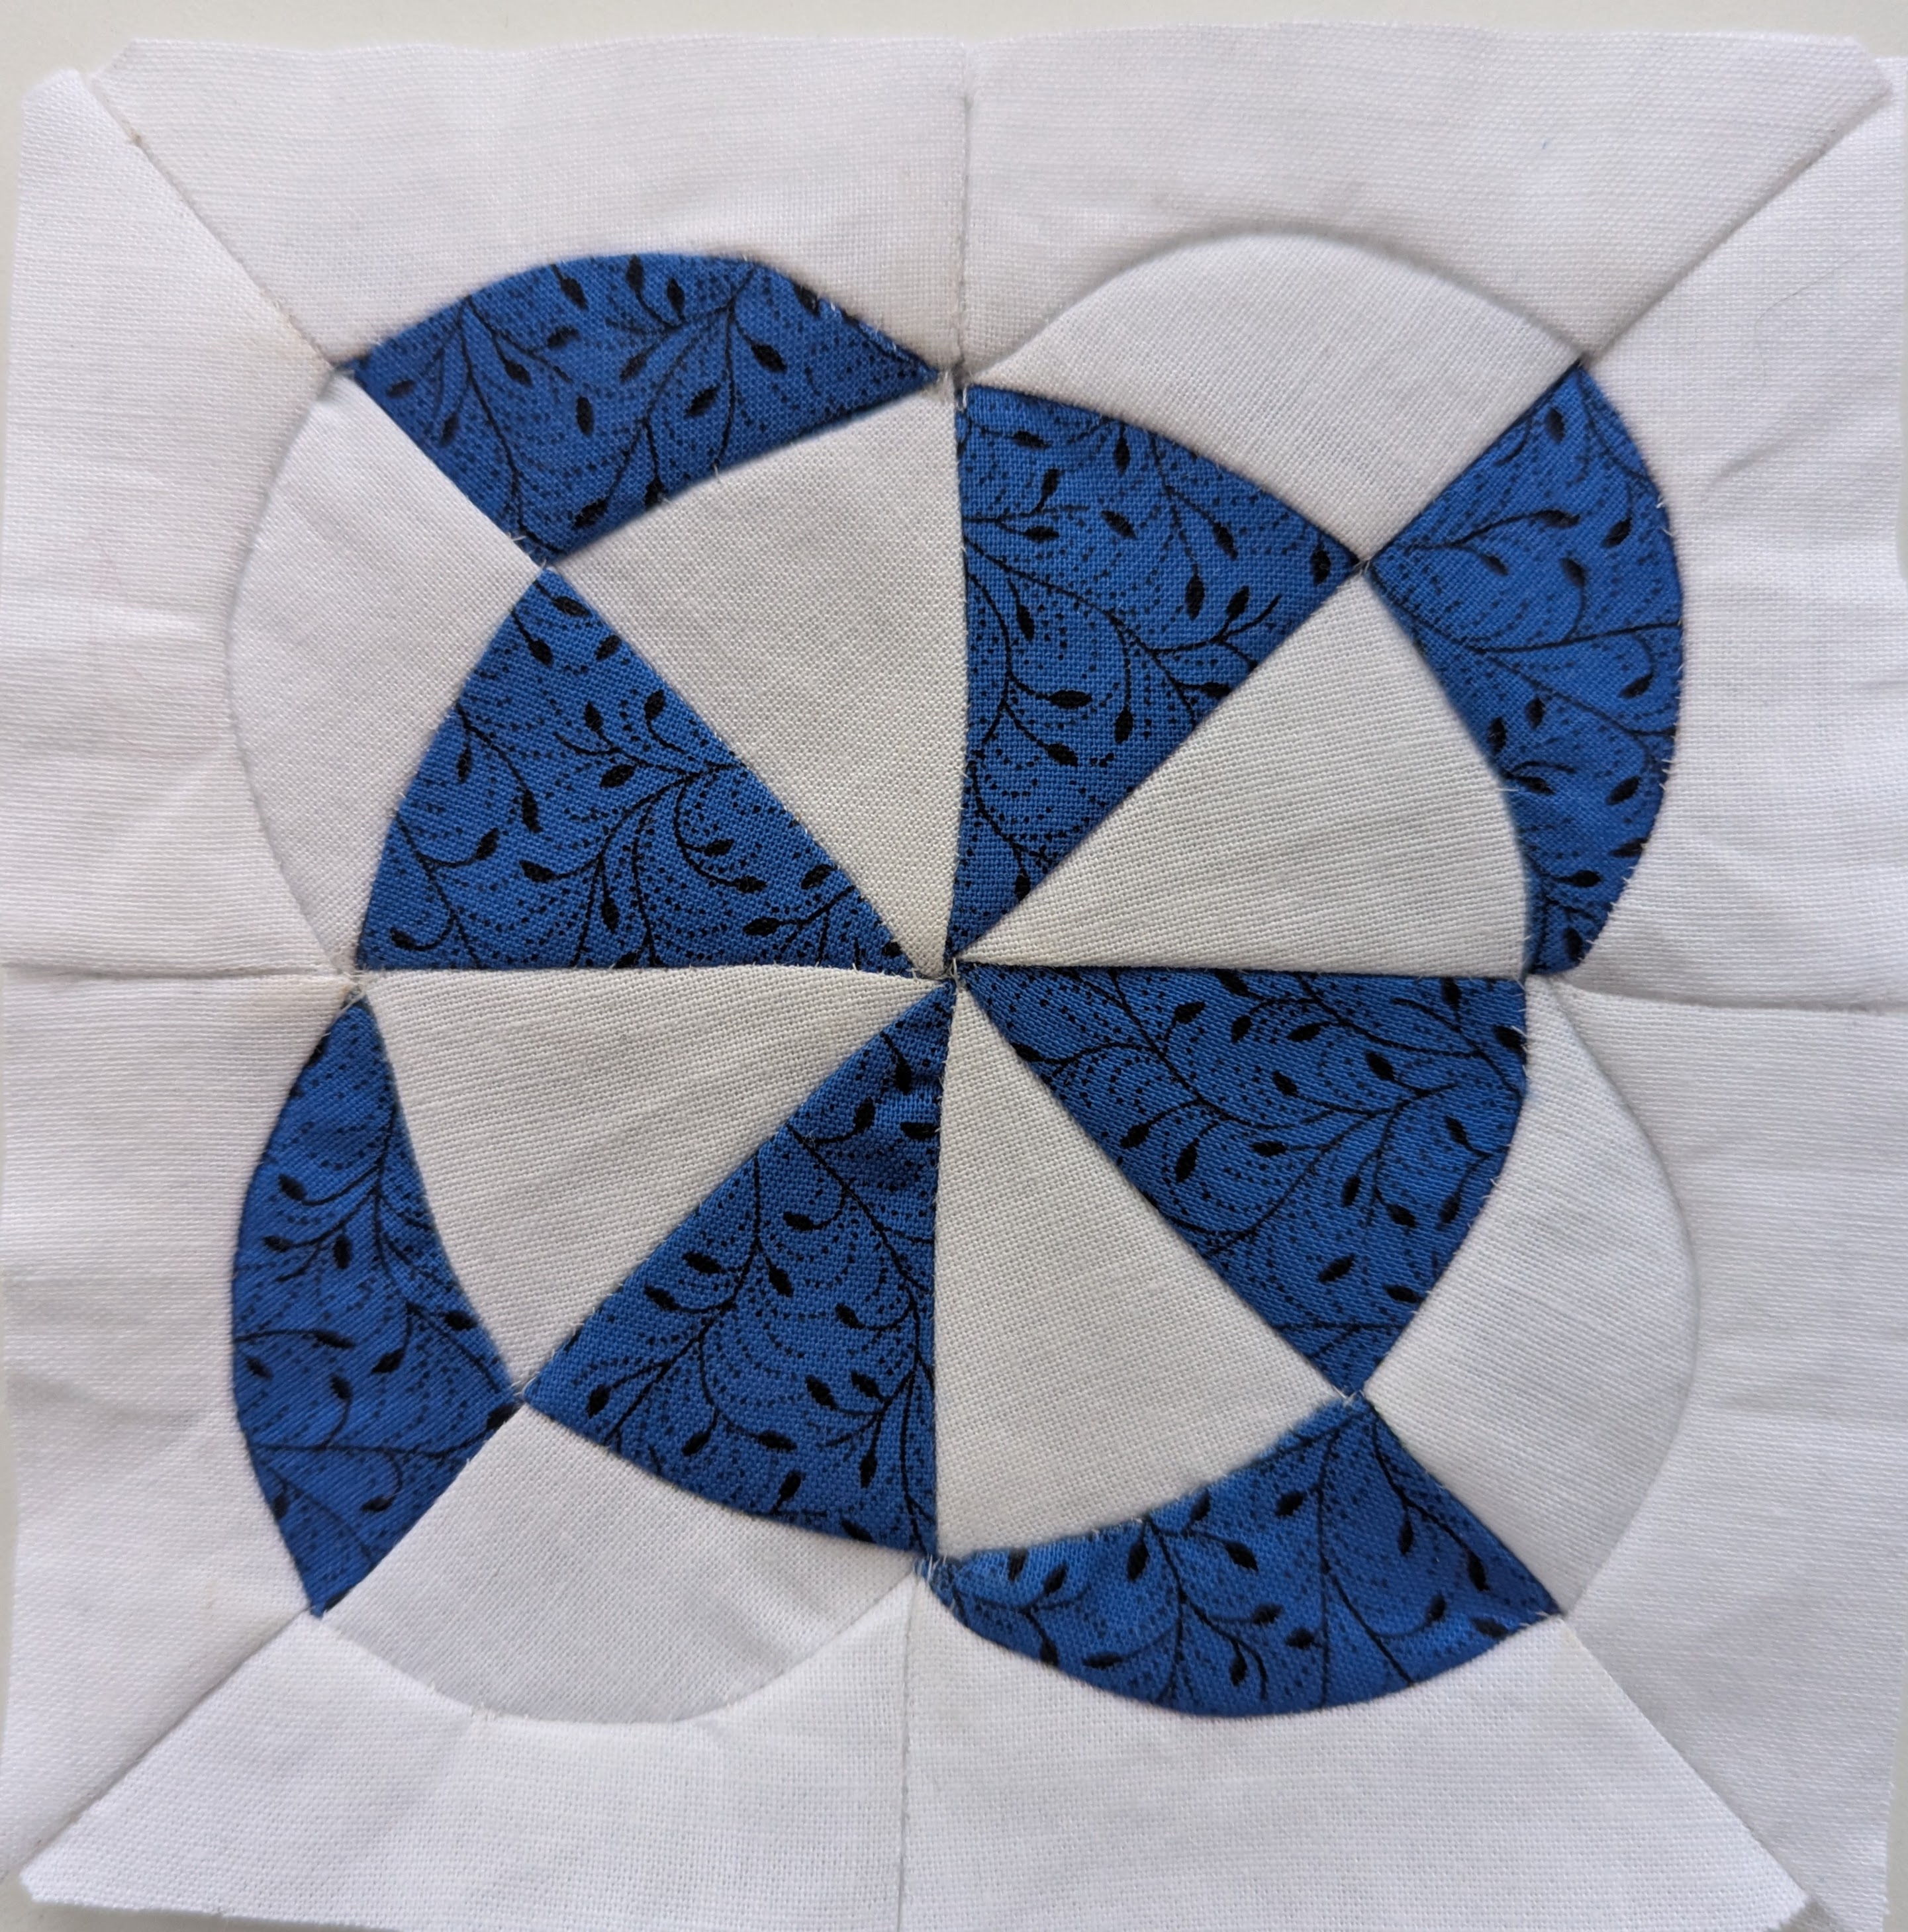
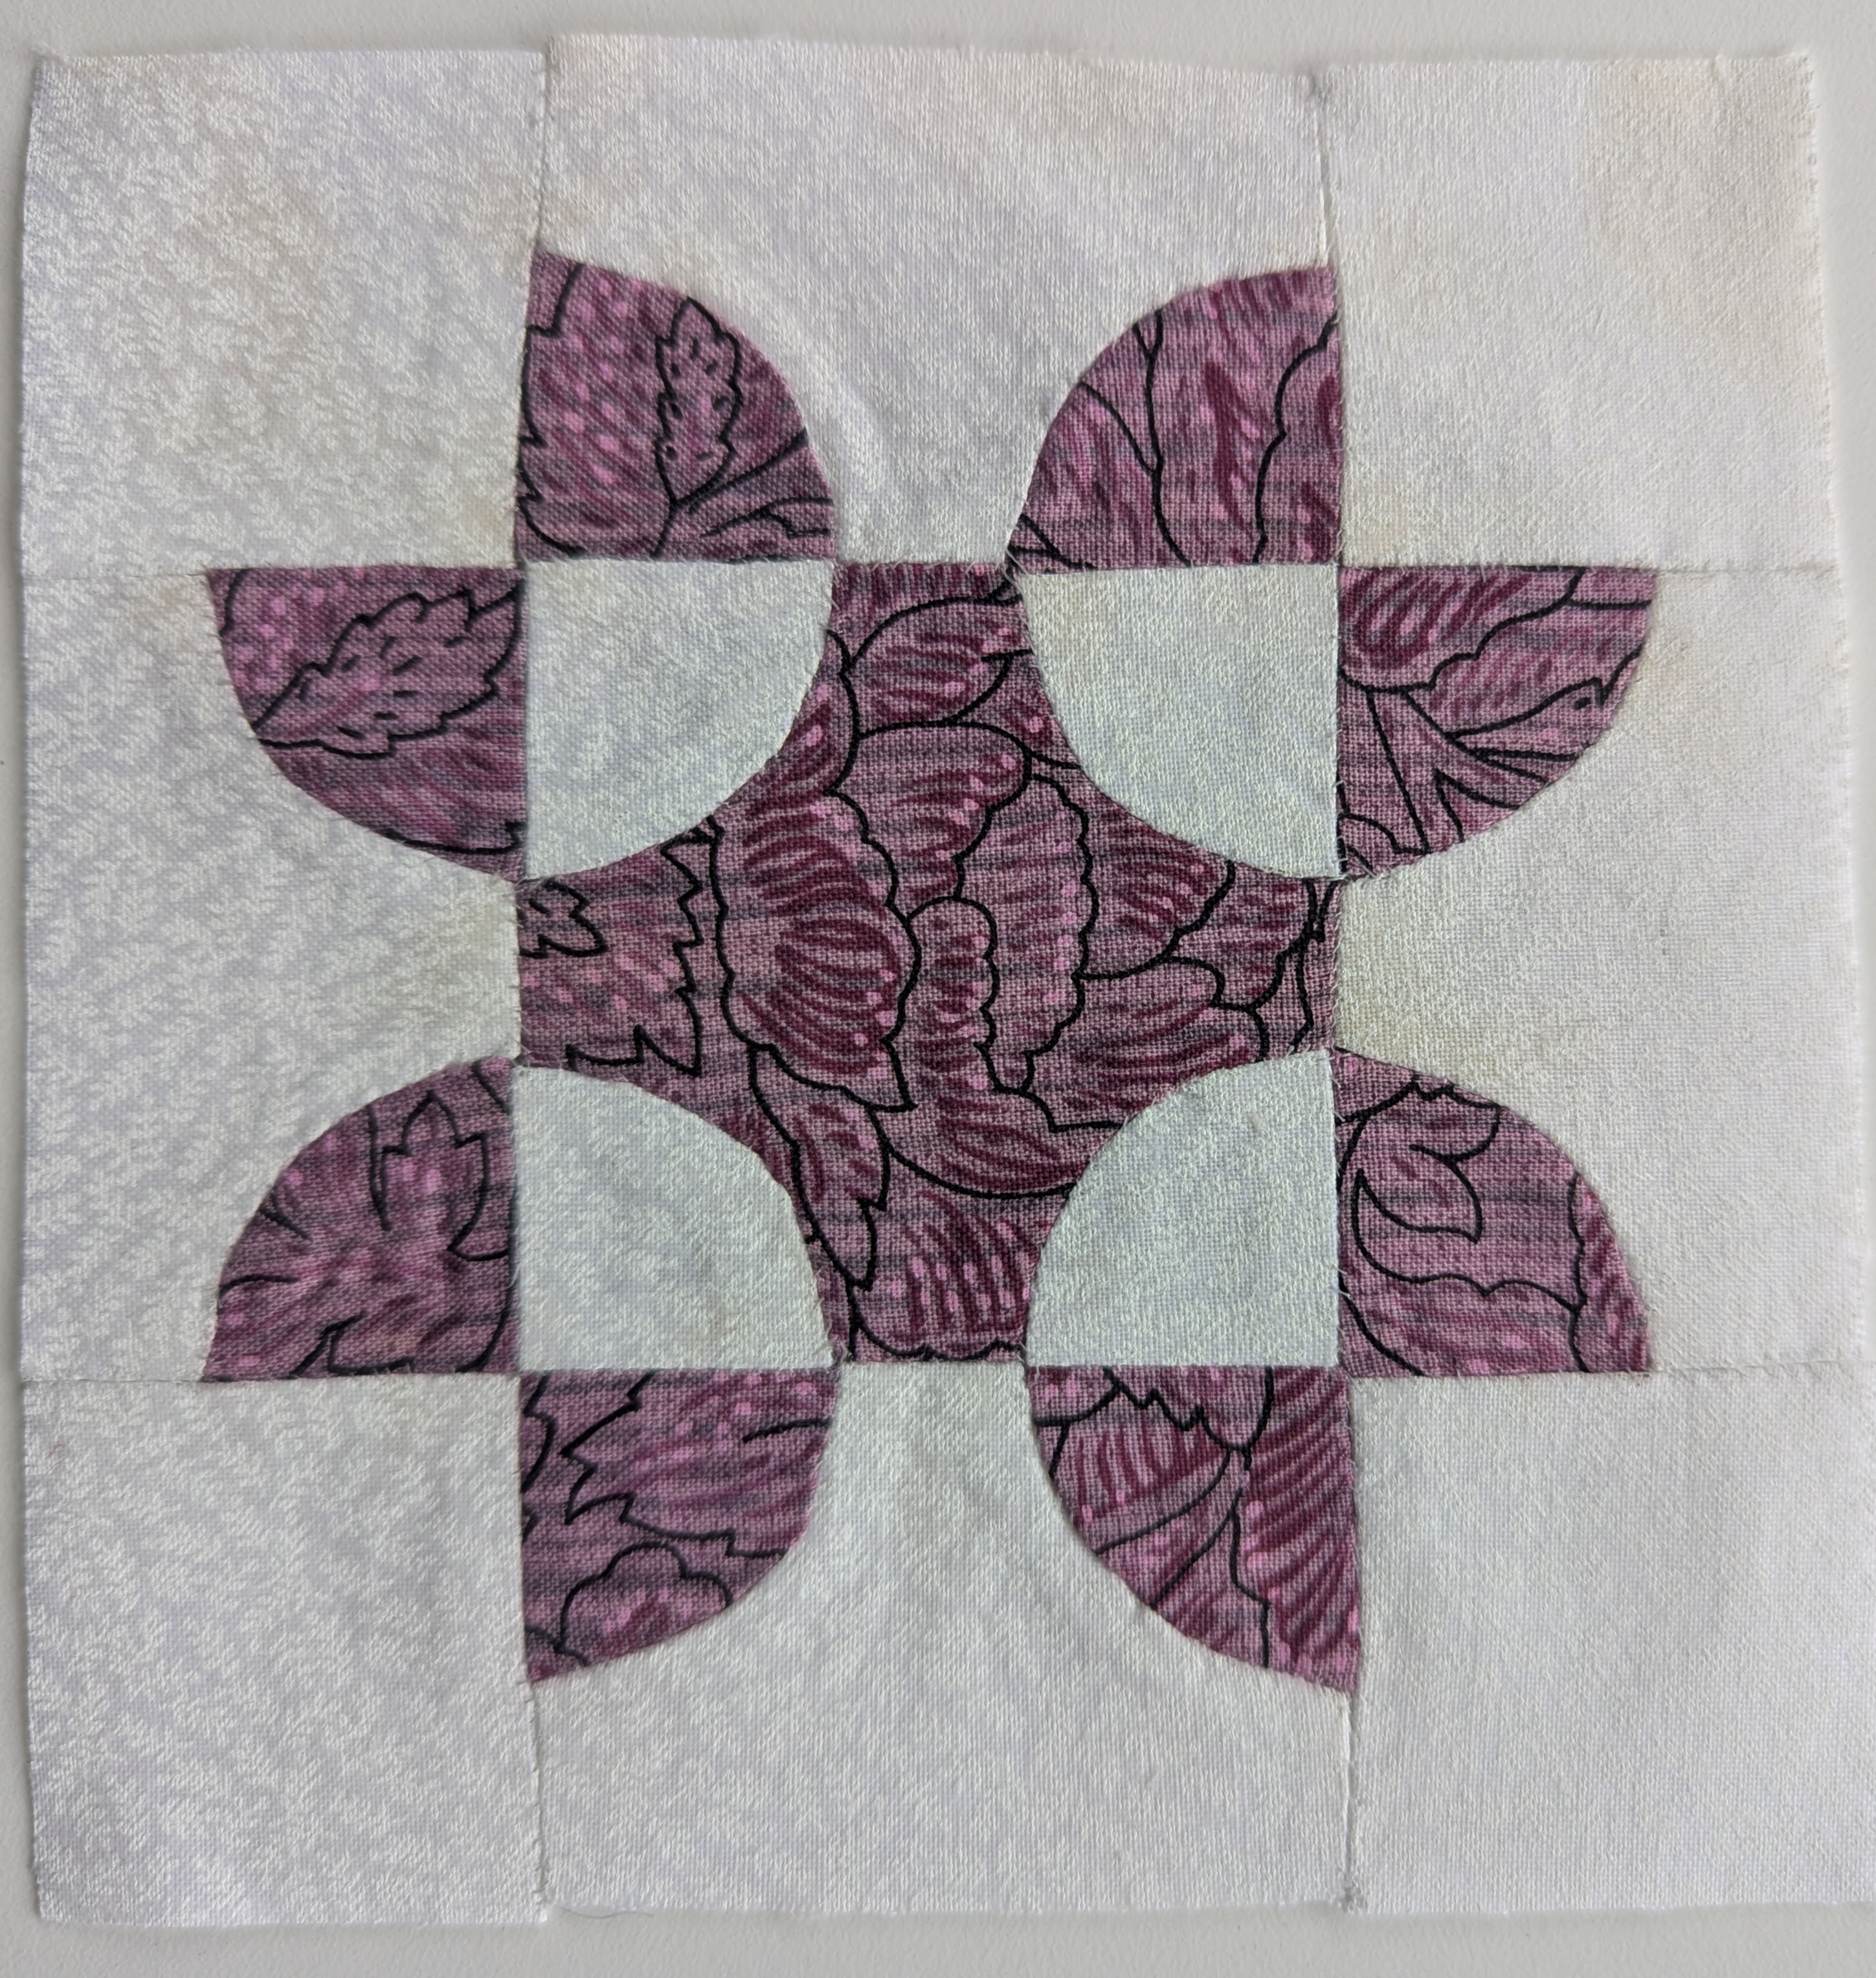
After my poor results from traditional piecing, using templates, I changed my process with this block.

I printed the templates on freezer paper, and then cut the paper with no seam allowance. I pressed the papers to the fabric, and then cut out, leaving a narrow seam allowance.

Using a washable glue stick, and two tiny straight screwdrivers, I folded all interior seams to the paper, glueing them down.

Then I used Invisifil thread to sew all the pieces together, using a tiny whip stitch.

I dropped the block in warm water to loosen/remove the glue, pulled out the papers, and let it air dry. It only took a little work with the iron to return the seam allowances to their “open” position, and produce a block that is nearly perfect in shape.

Successes:

  • Tiny screw drivers are a lot less expensive than the commercially-available Appliquick tools.
  • I left the exterior sides of pieces oversize, to trim down after sewing.
  • By cutting “on grain”, most curves were on the bias, and they were reasonably easy to fold down to glue.

Challenges:

  • The washable glue stick from my craft table is large, so application of glue was rather messy.
  • My Invisifil thread is so “silky” that it keeps pulling out of the needle.

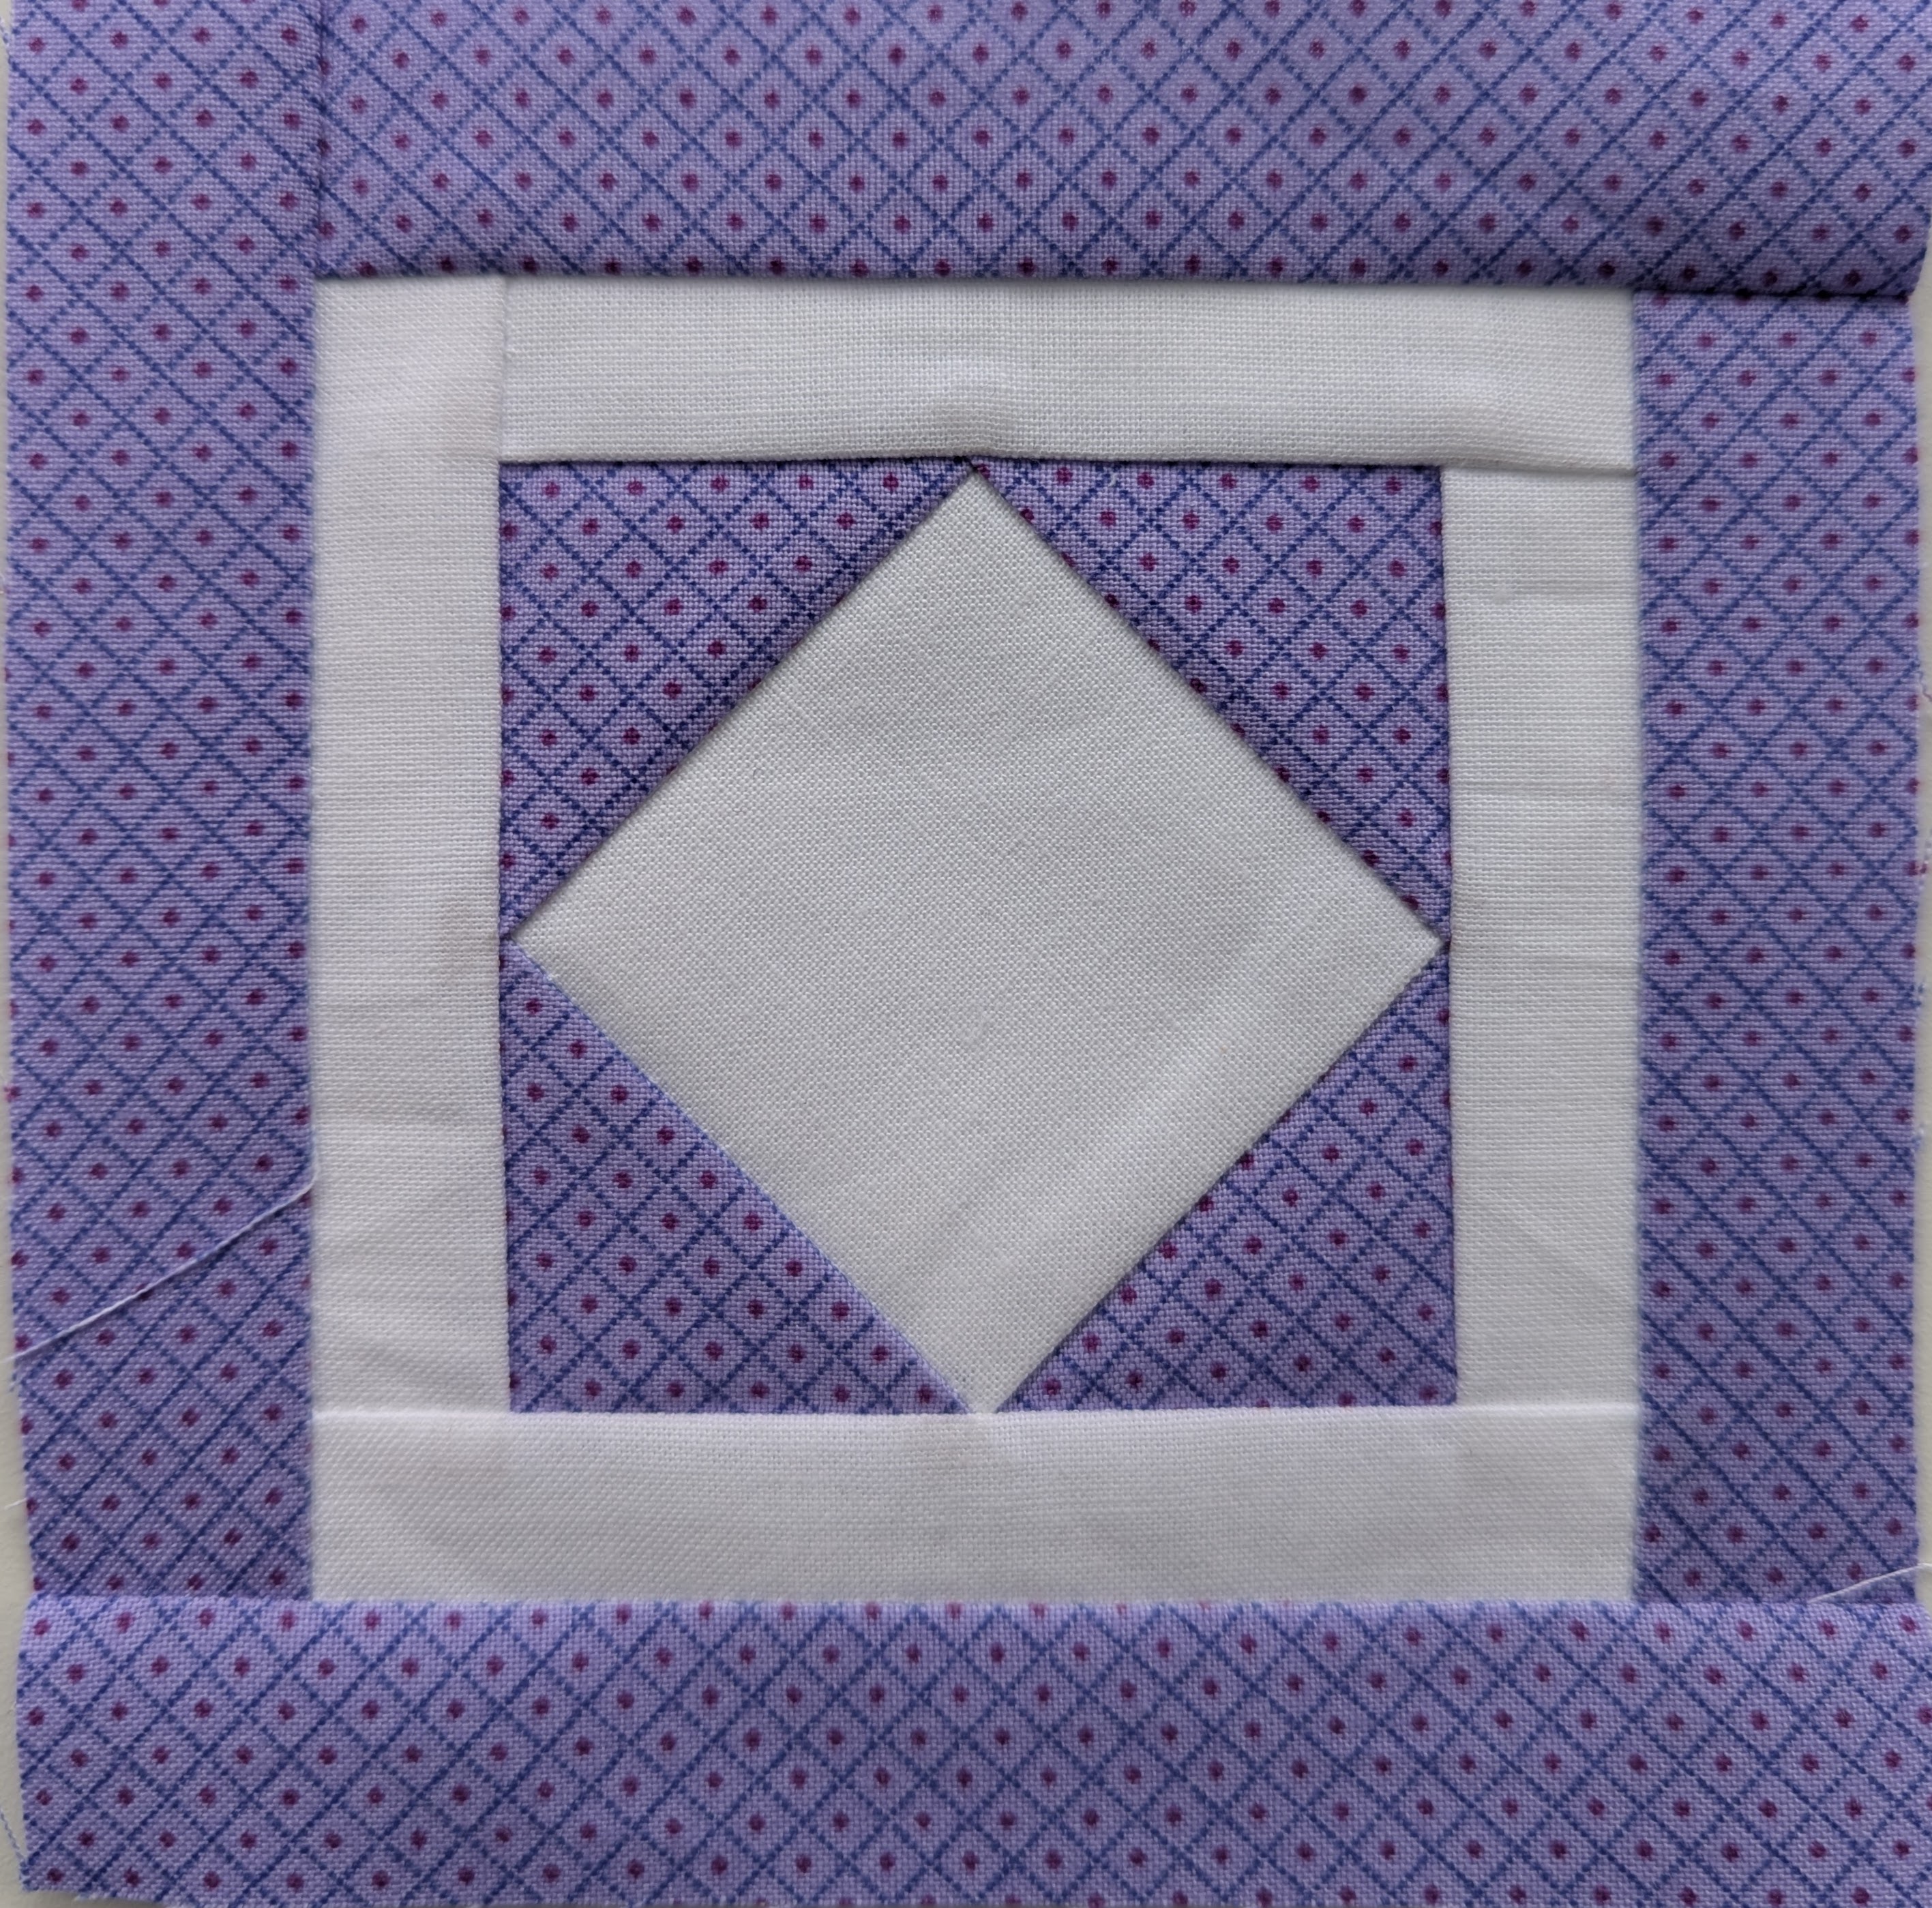
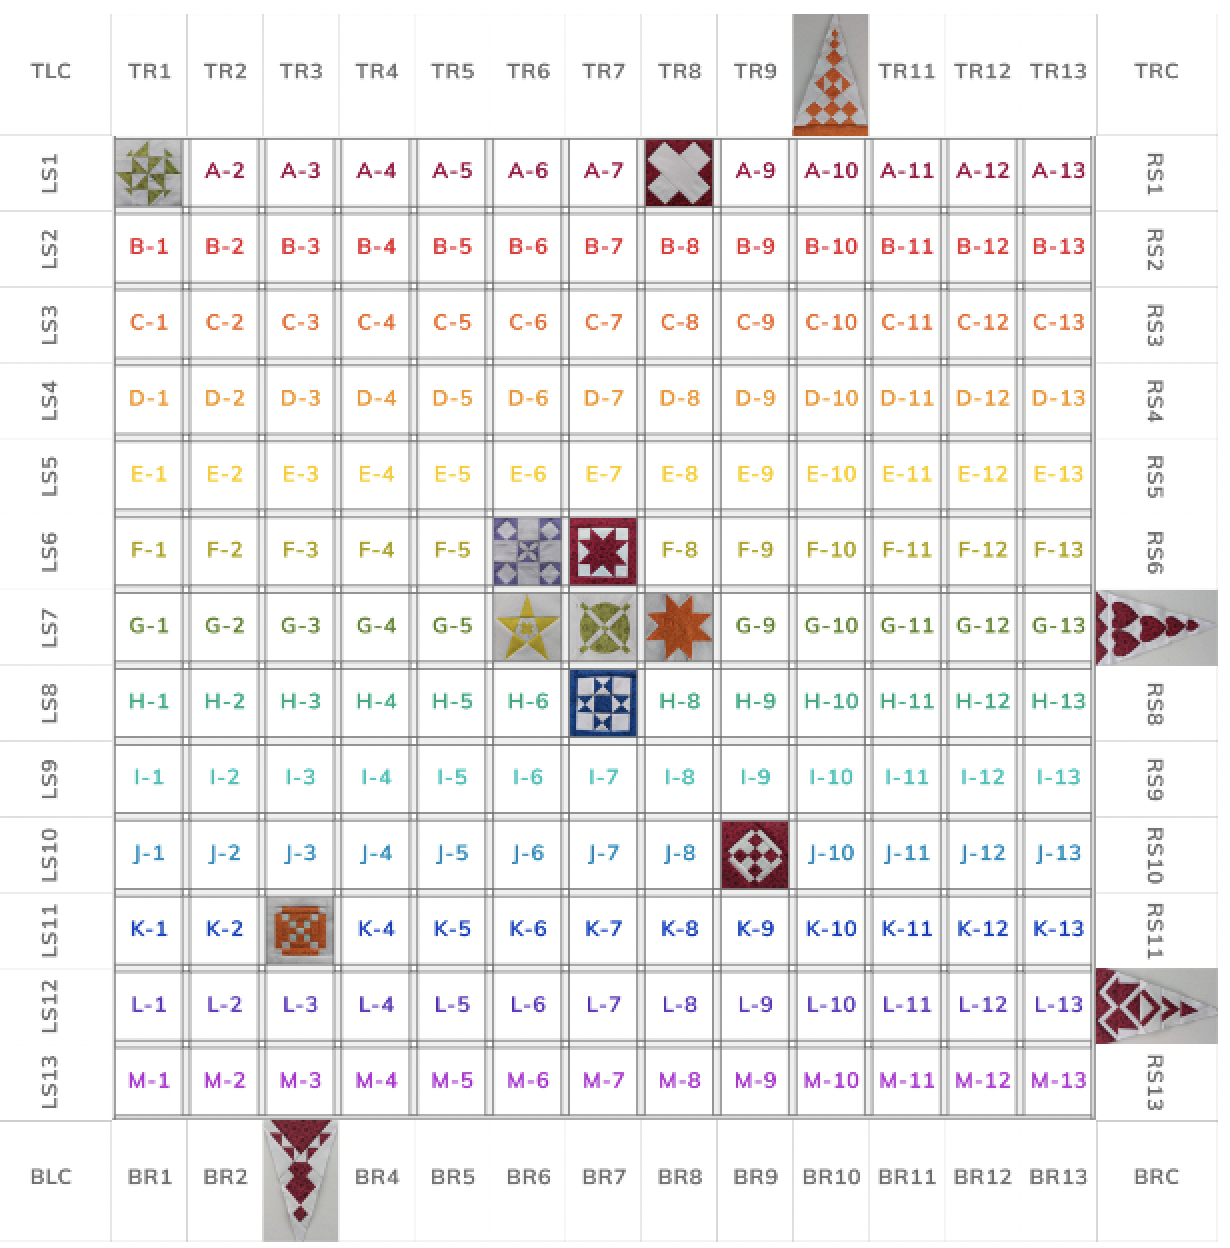
Here’s the quilt to date:

Dear Jane: LS-6 – Susie Q

This one took some time. I first thought I needed matching thread, so waited to get to a fabric store to buy some royal blue. Then I decided the my light gray Invisifil would look better, so then I could proceed with the applique.

Successes:

  • The Foundation Paper Piecing worked well, except at the top, where I didn’t leave enought fabric for the seam allowance.
  • I have added a strip of white, that I will remove when I apply the actual sashing at the end. It will keep the edges from deteriorating, and will maintain the size where the edges are on bias.
  • The Invisifil thread is beautiful for the needle-turn applique. I am feeling a little guilty that it’s not “cotton”, but the results are good.

Challenges:

  • I decided to try the fusible interfacing plus glue technique for the one piece of applique. It was much better than the last technique I used (interfacing layered, then turned inside out). Next try will be freezer paper and starch…..

Here’s the quilt’s progress:

Dear Jane: C-1 – Trooper Green’s Badge AND L-3 – Reflections Abound

Back to Foundation Paper Piecing for a hit of success! While Trooper Green’s Badge would have worked fine with rotary cut pieces, Reflections Abound would have been a challenge to cut and piece, with such narrow pieces.

Successes:

  • Crisp corners and points.
  • By pre-cutting according to the rotary cutting instructions, I am being very frugal with my fabric.

Challenges:

  • My only challenge I anticipate is that I might find myself left with the most difficult blocks at the end, with the fabrics that I dislike, and so my motivation might suffer.

Quilt Progress:

Dear Jane: C-5 – Eye of the Cyclone

This block took me several days to complete. It is the first block that is entirely hand-pieced. I could not figure out another way to manage the curves, in such short runs, so handwork was the solution. I  inadvertently mirrored many of the pieces, and had to cut out more fabric than anticipated to complete the block.

Successes:

  • The block ended up larger than needed, so I was able to trim down slightly.
  • It is done!

Challenges:

  • All the template pieces had be traced on to the back of the fabric. Since the white fabric has no obvious “good side”, it was difficult to keep them all organized, with correct side up.
  • While the centre wedges were easy to fit, the “cyclone” round has asymmetrical pieces,  that were easy to rotate incorrectly.
  • I used Invisifil thread that was difficult to see. And it was slippery, so required a longer tail to keep it in the needle. This allowed knots and twists to develop. And, since it was very fine and smooth, it had no “tooth” in the fabric, so I had to use a back stitch rather than a simple running stitch to ensure that the stitches remained tight.
  • I missed most of the details of the videos I was watching, since I had to concentrate closely, with reading glasses, to do the sewing.

Here’s the quilt so far:

Dear Jane: K-12 – Doris’ Dilemma

I’m actually working on a hand-pieced block that is testing my spatial abilities. So I decided to set it aside, and choose a simpler block that I could Foundation Paper Piece.

Successes:

  • This is ONE piece of paper, with triangles added to a central strip. VERY ease to piece.
  • I was able to use the rotary cutting instructions to cut the fabric, then the paper to do the actual sewing.

Challenges:

  • Despite pre-cutting, I seem to be a little short on the border. I will have to be careful when I add sashing to ensure that my blocks finish consistently at 4.5″

Here’s the quilt so far:

Dear Jane: F-6 – Deanie’s Daisies

This is Week 6 of the Dear Jane Stitch Along, and this group is continuing to work from the centre of the quilt top out. I was looking for a colour that would work next to the red and yellow, that I hadn’t used before. This purple may be a little light in tone, but I think it will work well as I add more blocks scattered throughout the layout.

Successes:

  • I did actually successfully make the petals in the middle, using light interfacing, sewing the shape, then cutting a slit and turning it inside out.
  • The Invisifil thread works beautifully to attach the applique.

Challenges:

  • I thought I could snowball the corners, but didn’t do the math correctly, and then actually cut off one of my triangles. So I then cut according to the rotary cutting instructions, and was able to sew the triangles on to the centre diamonds.
  • The sew and turn technique for applique is very difficult to do with these tiny pieces. The curved sides worked beautifully, but the sharp end points were lost.

So, for the next applique block, I think I will try cutting the template pieces out of fusible interfacing, and apply them to the back of the fabric. Then I will try using fabric glue to fold down the sides. 

And even though they would have been “fiddly”, I think that the four corner blocks would have been much more precise had I chosen to do Foundation Paper Piecing.

Here’s the updated quilt image: