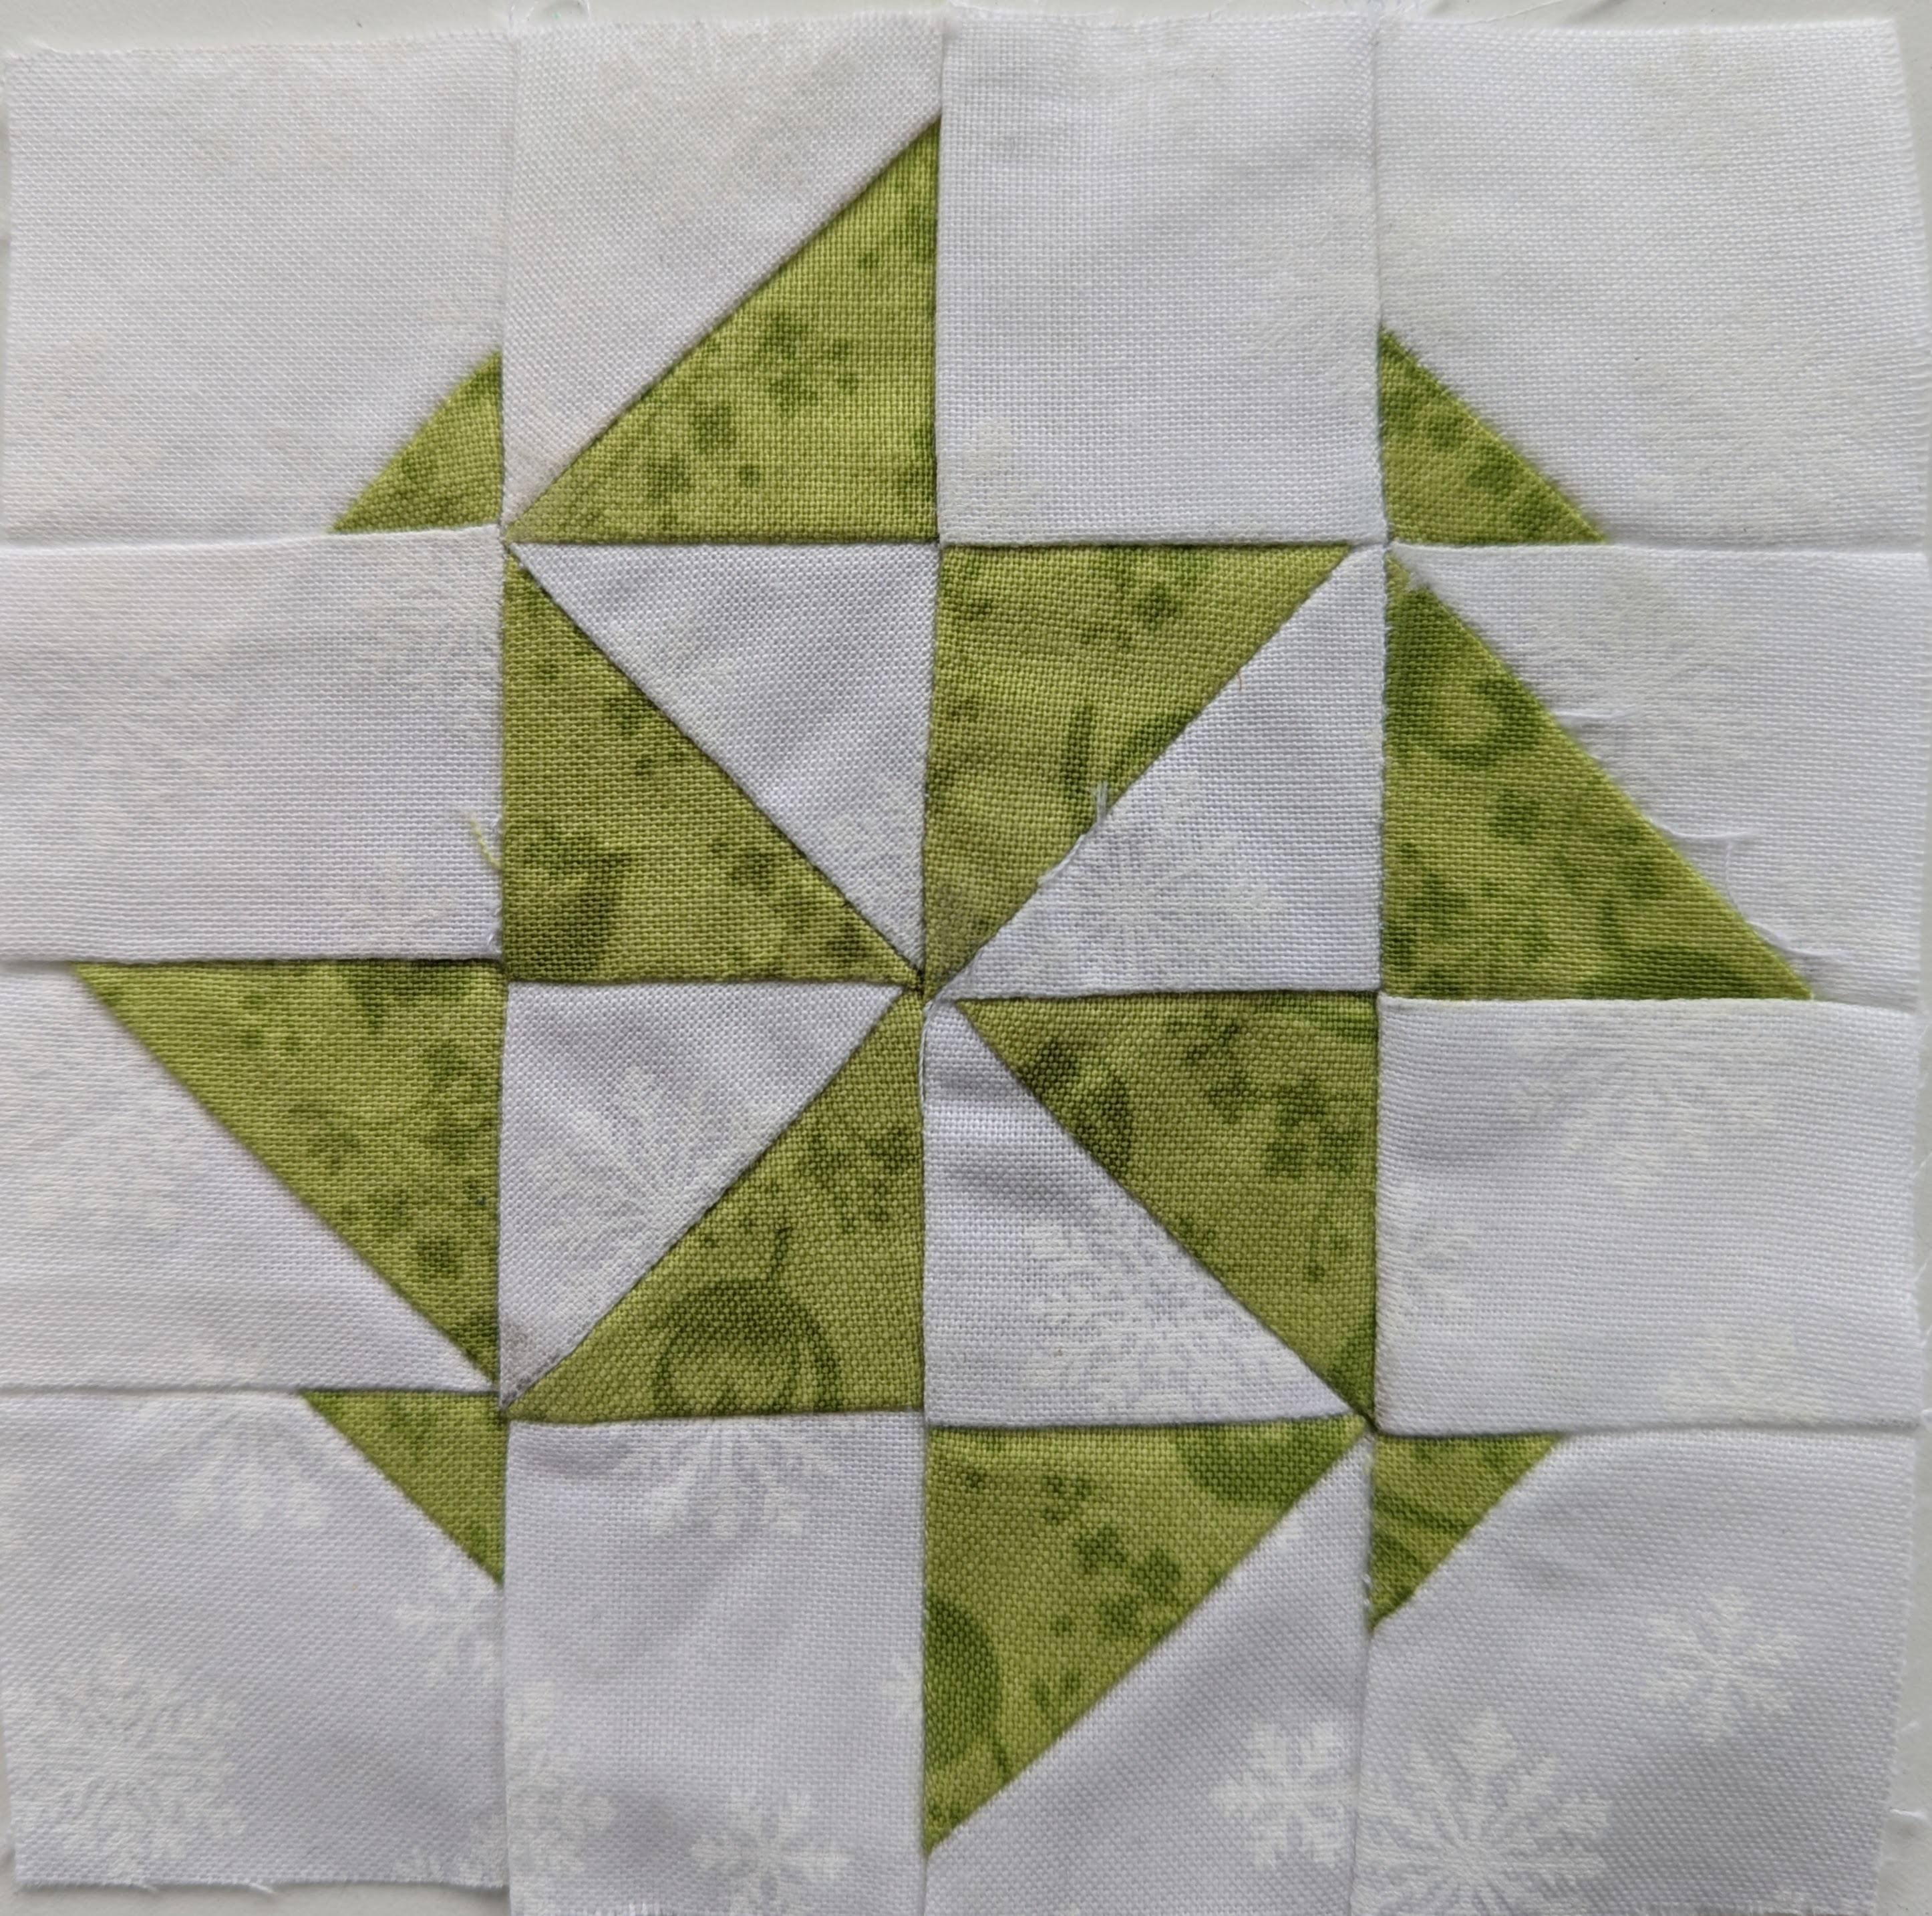
Pinwheel Gone Awry is the first block I looked at in EQ8, and it is the one that wavered between choosing the rotary cutting option and the Foundation Paper Piecing option. I chose FPP, but now I wonder if I perhaps should have done the other.
I thought that I could pre-cut over-sized blocks to save fabric. I could then position them to stitch as usual in the Foundation Paper Piecing process. It didn’t really work well, and I don’t have the match I had hoped for on the corners. I think that this was mostly due to the thickness of seams and paper when sewing.
Successes:
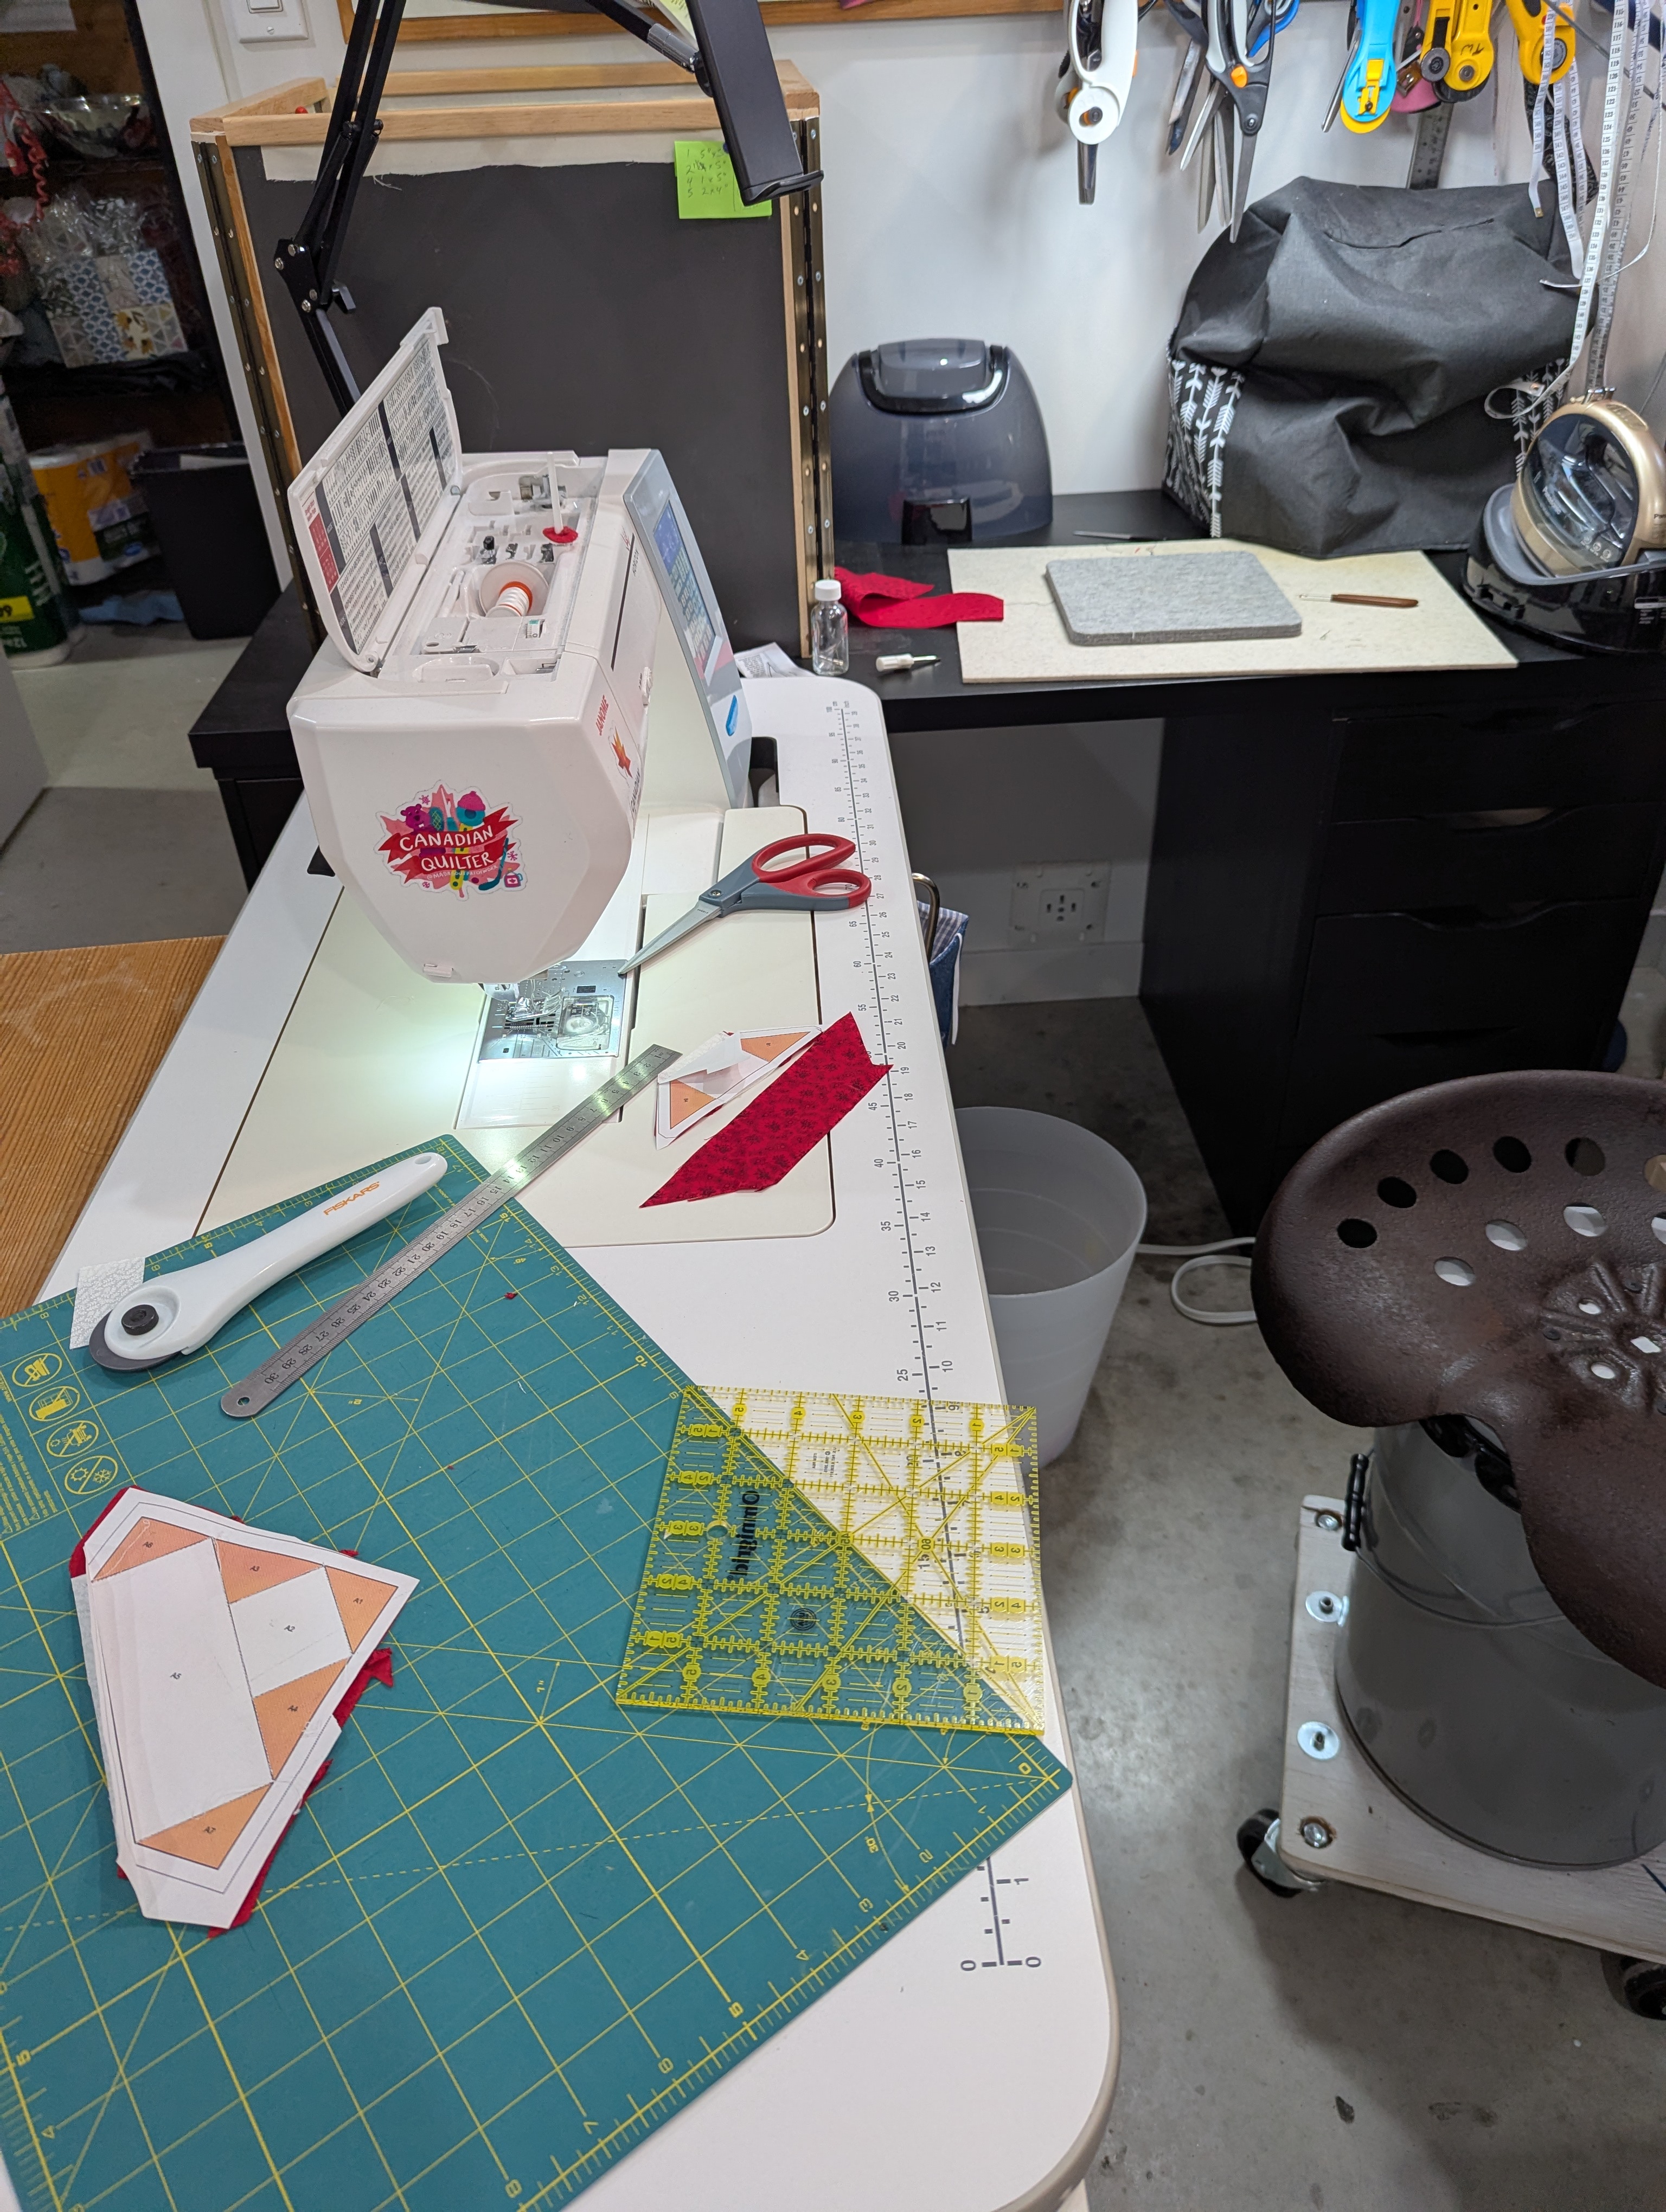
I am getting faster at the FPP process, with cutting station, sewing machine, and pressing station all in a “U” shape, minimizing movement.
Challenges:
The thickness of intersecting seams and paper are causing my presser foot to slide, and making my seams inaccurate
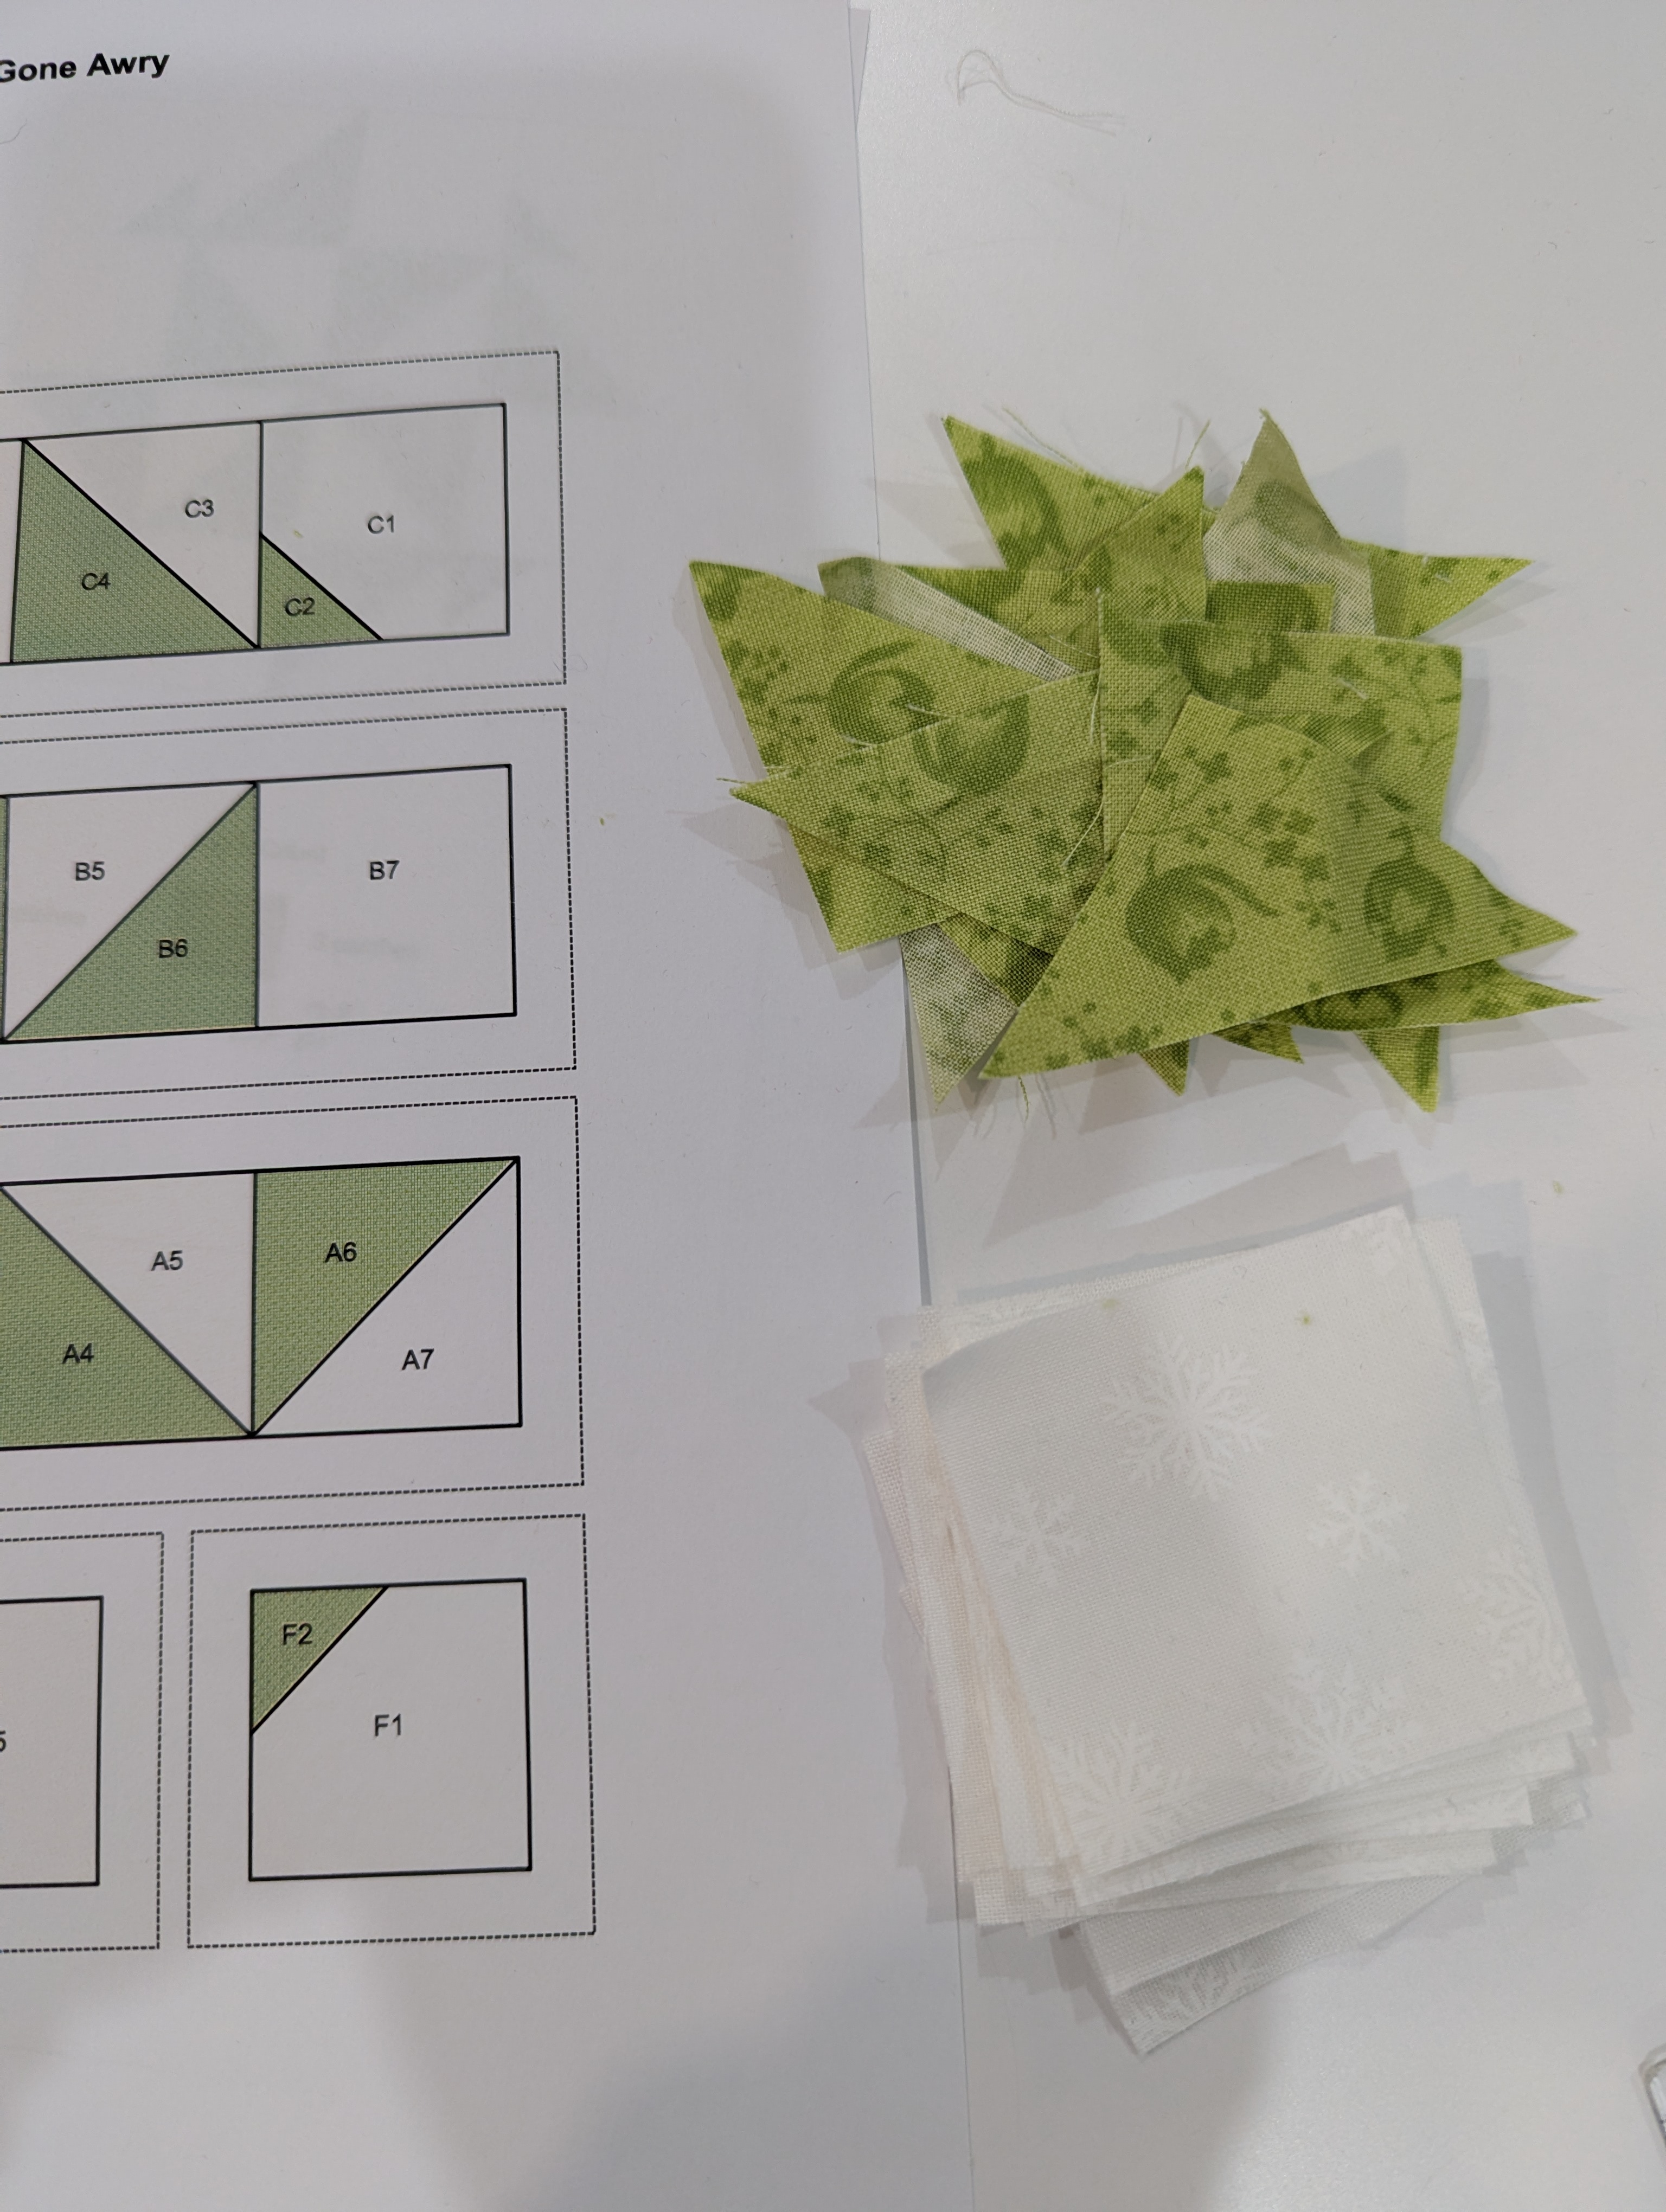
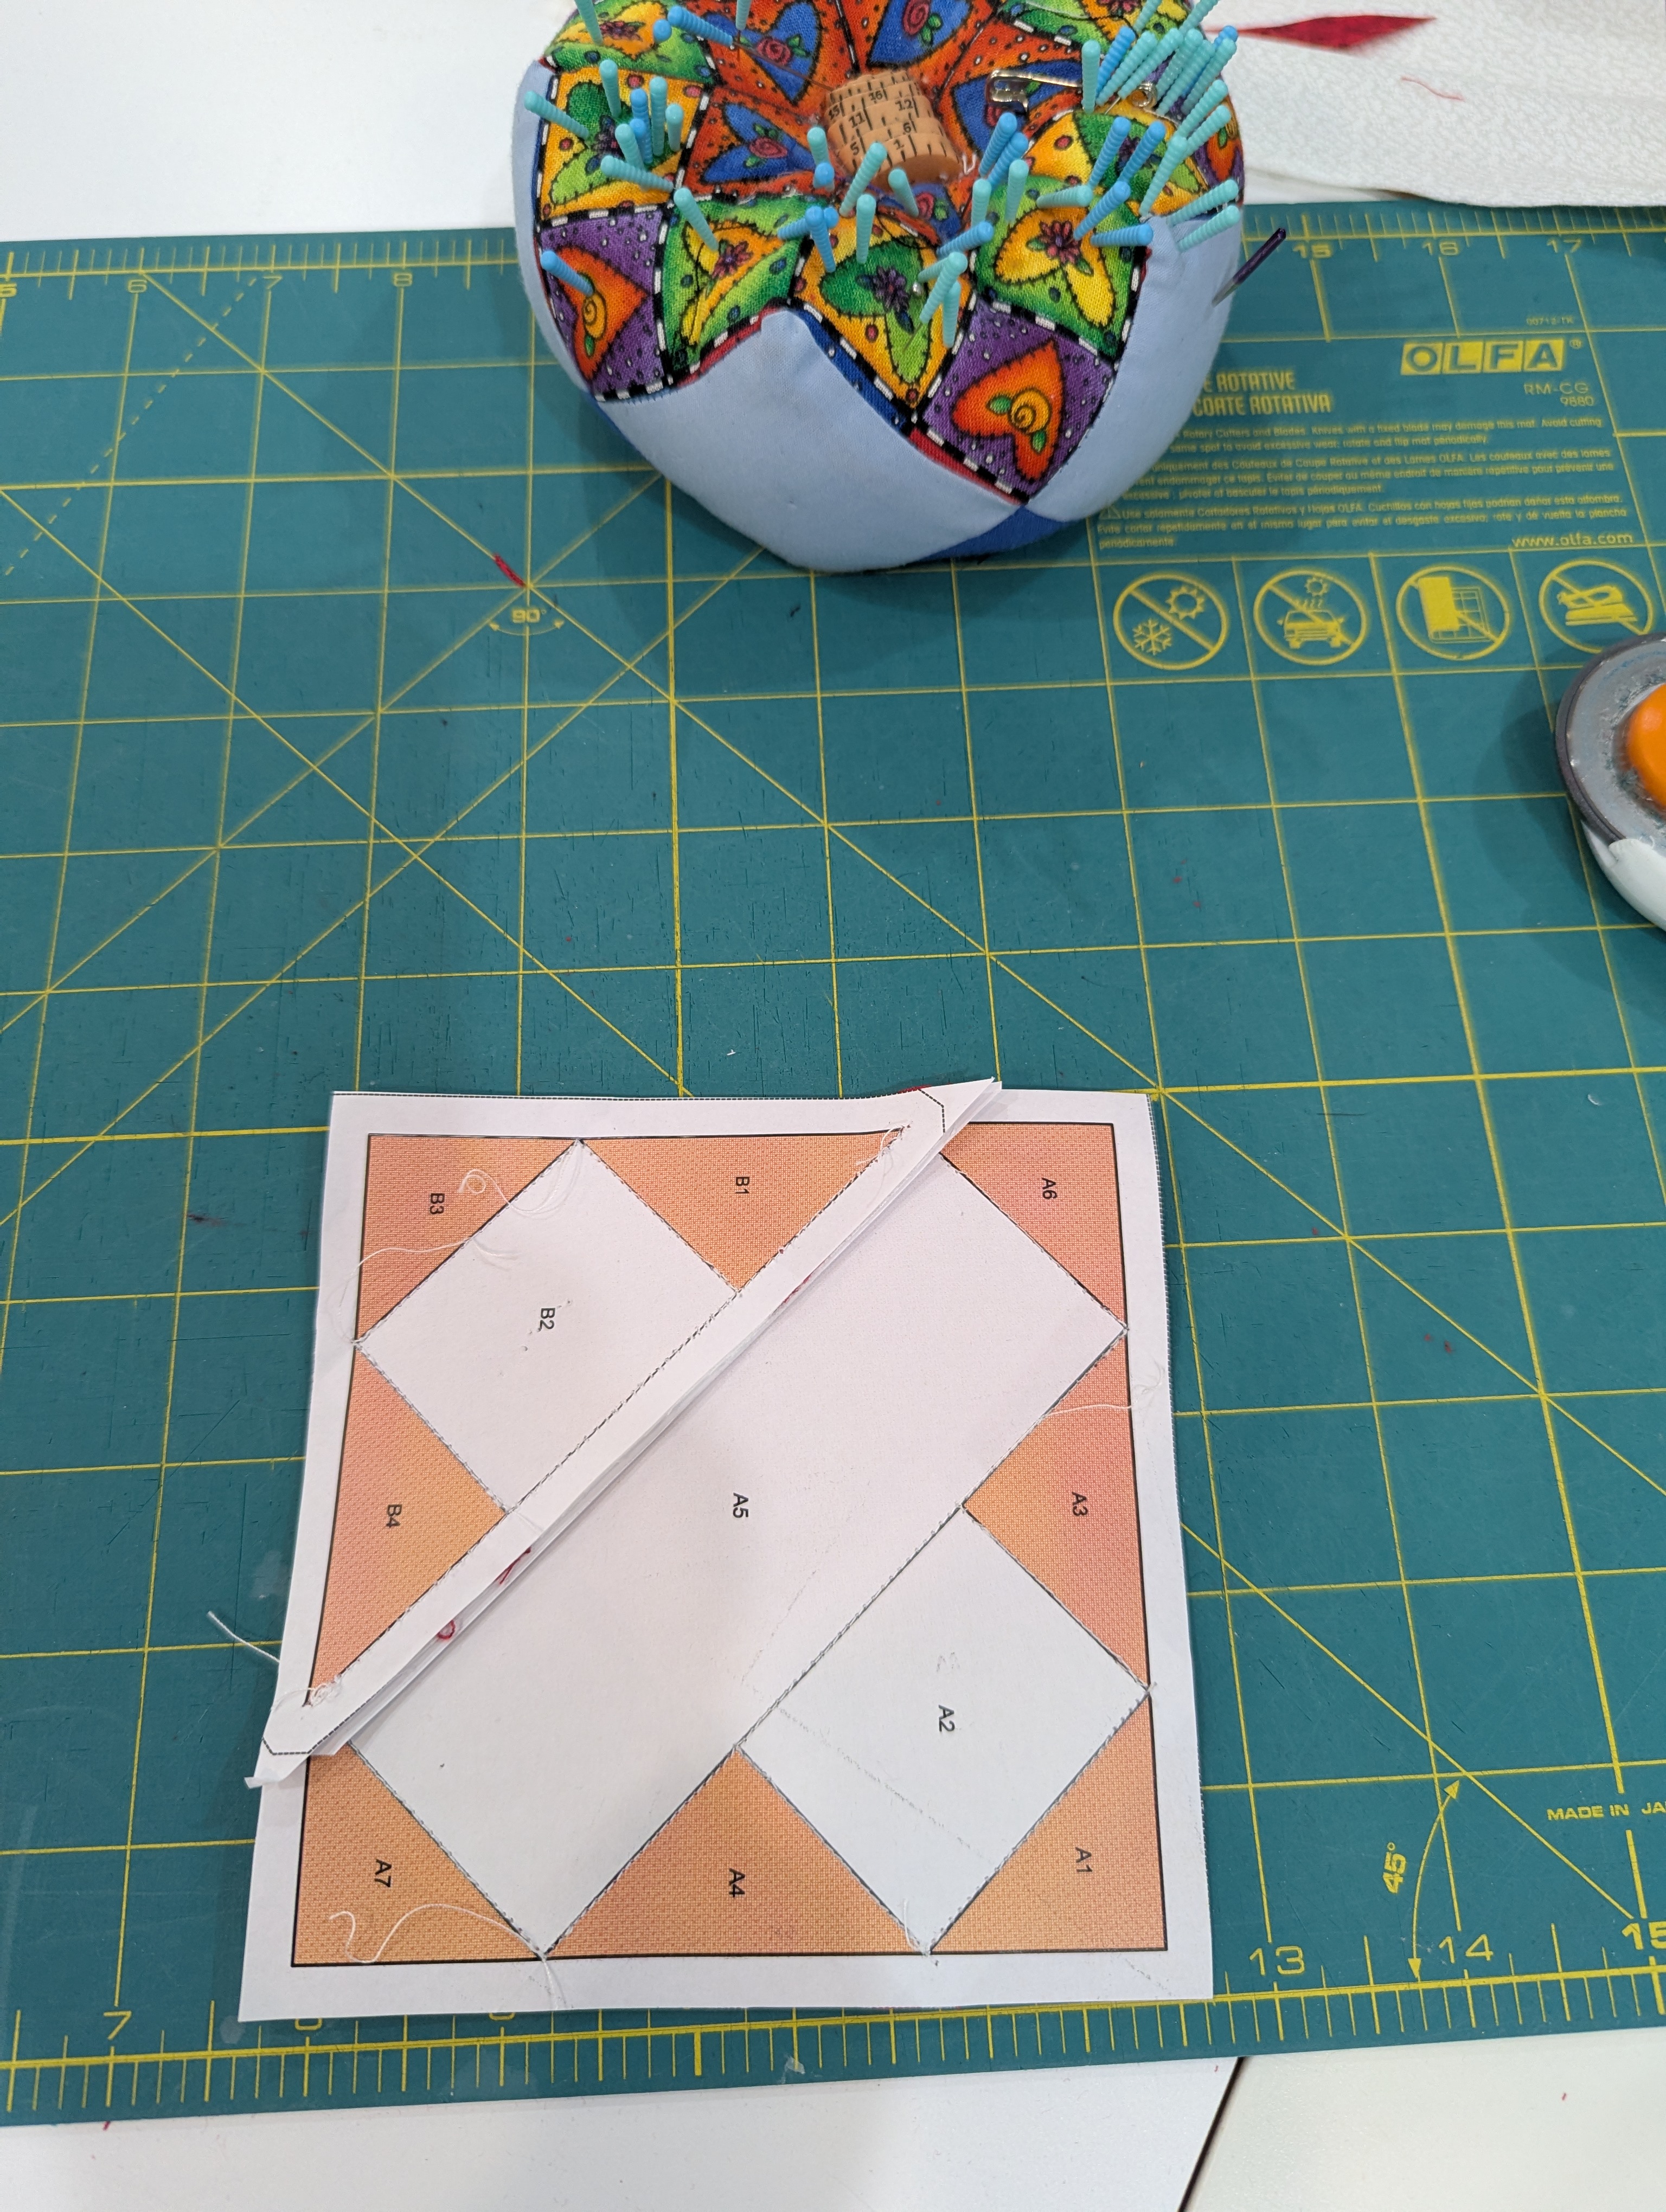
I struggled to position the triangles. Often I had to tear out to ensure that I had a seam allowance. I really shouldn’t have worried, since all the triangles are eventually within seams, so the quarter-inch isn’t crucial.
Next Steps:
I am going to try one of the future blocks by rotary cutting oversized pieces, then sewing and cutting down to size. I think that it would have been much better for this block in particular.
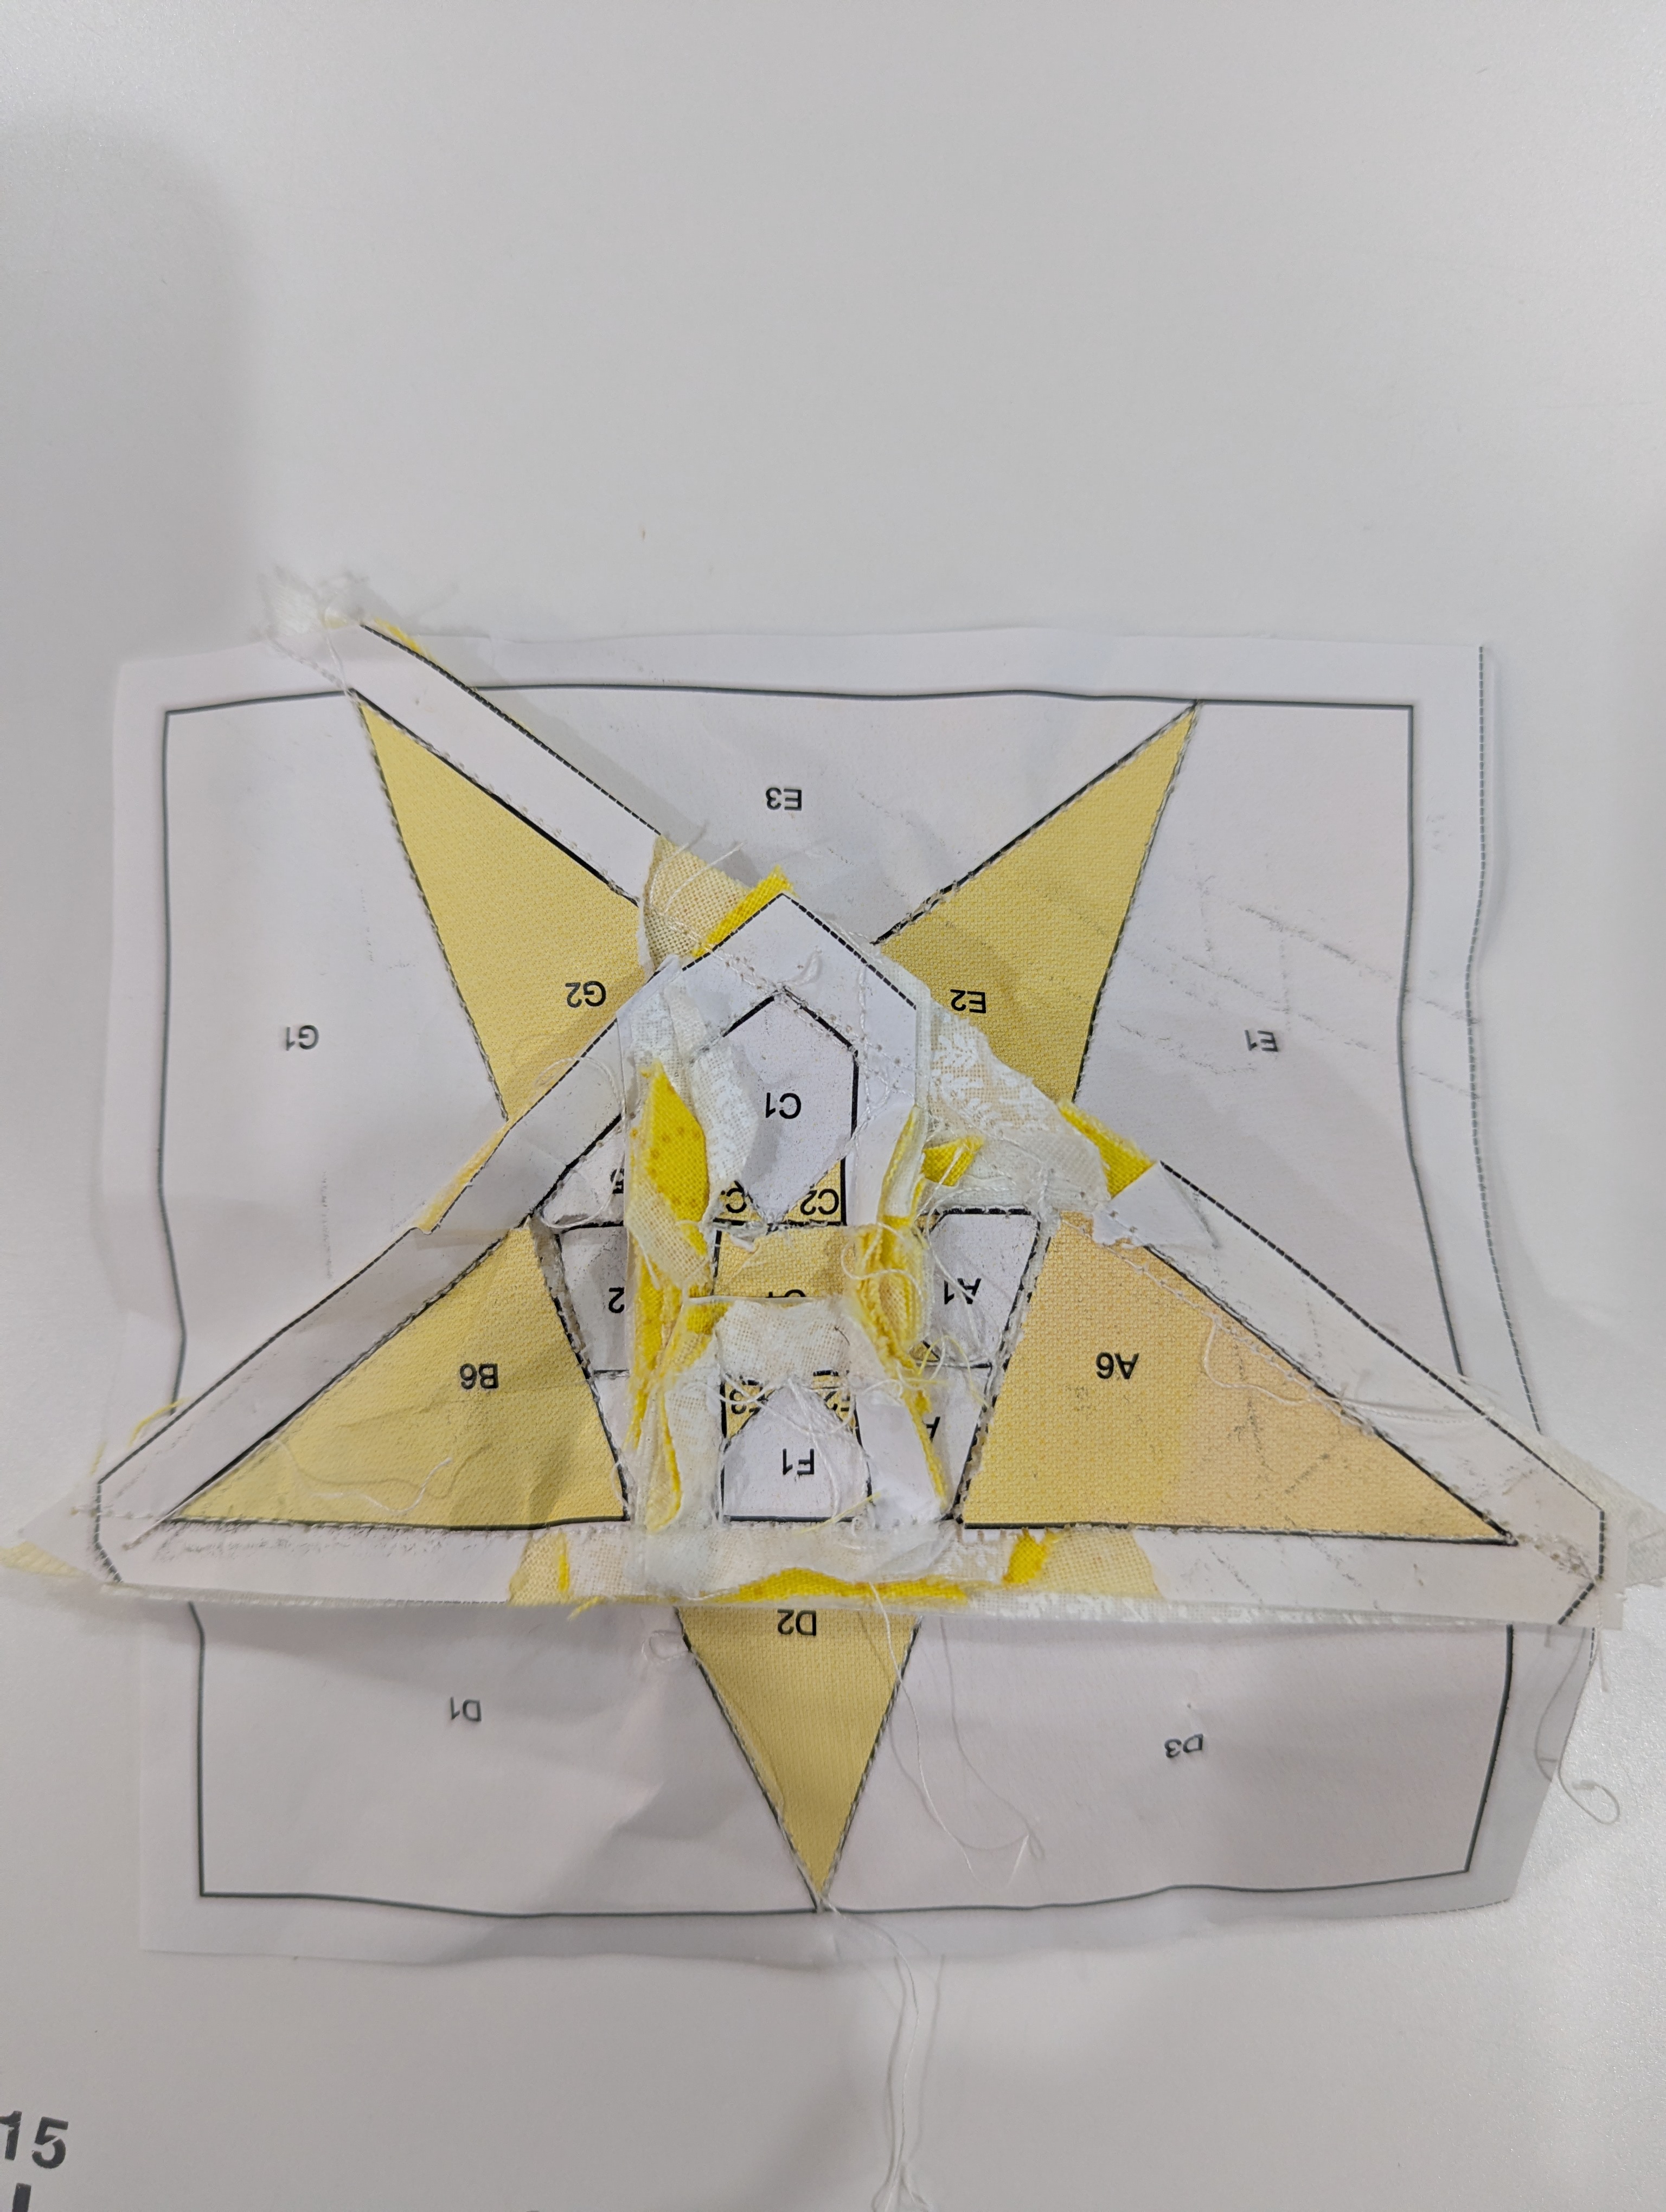
So much fun completing this block! It’s the third week of the Dear Jane Stitch Along group on Facebook, and there is so much variety in the blocks posted by the members. Very inspiring!
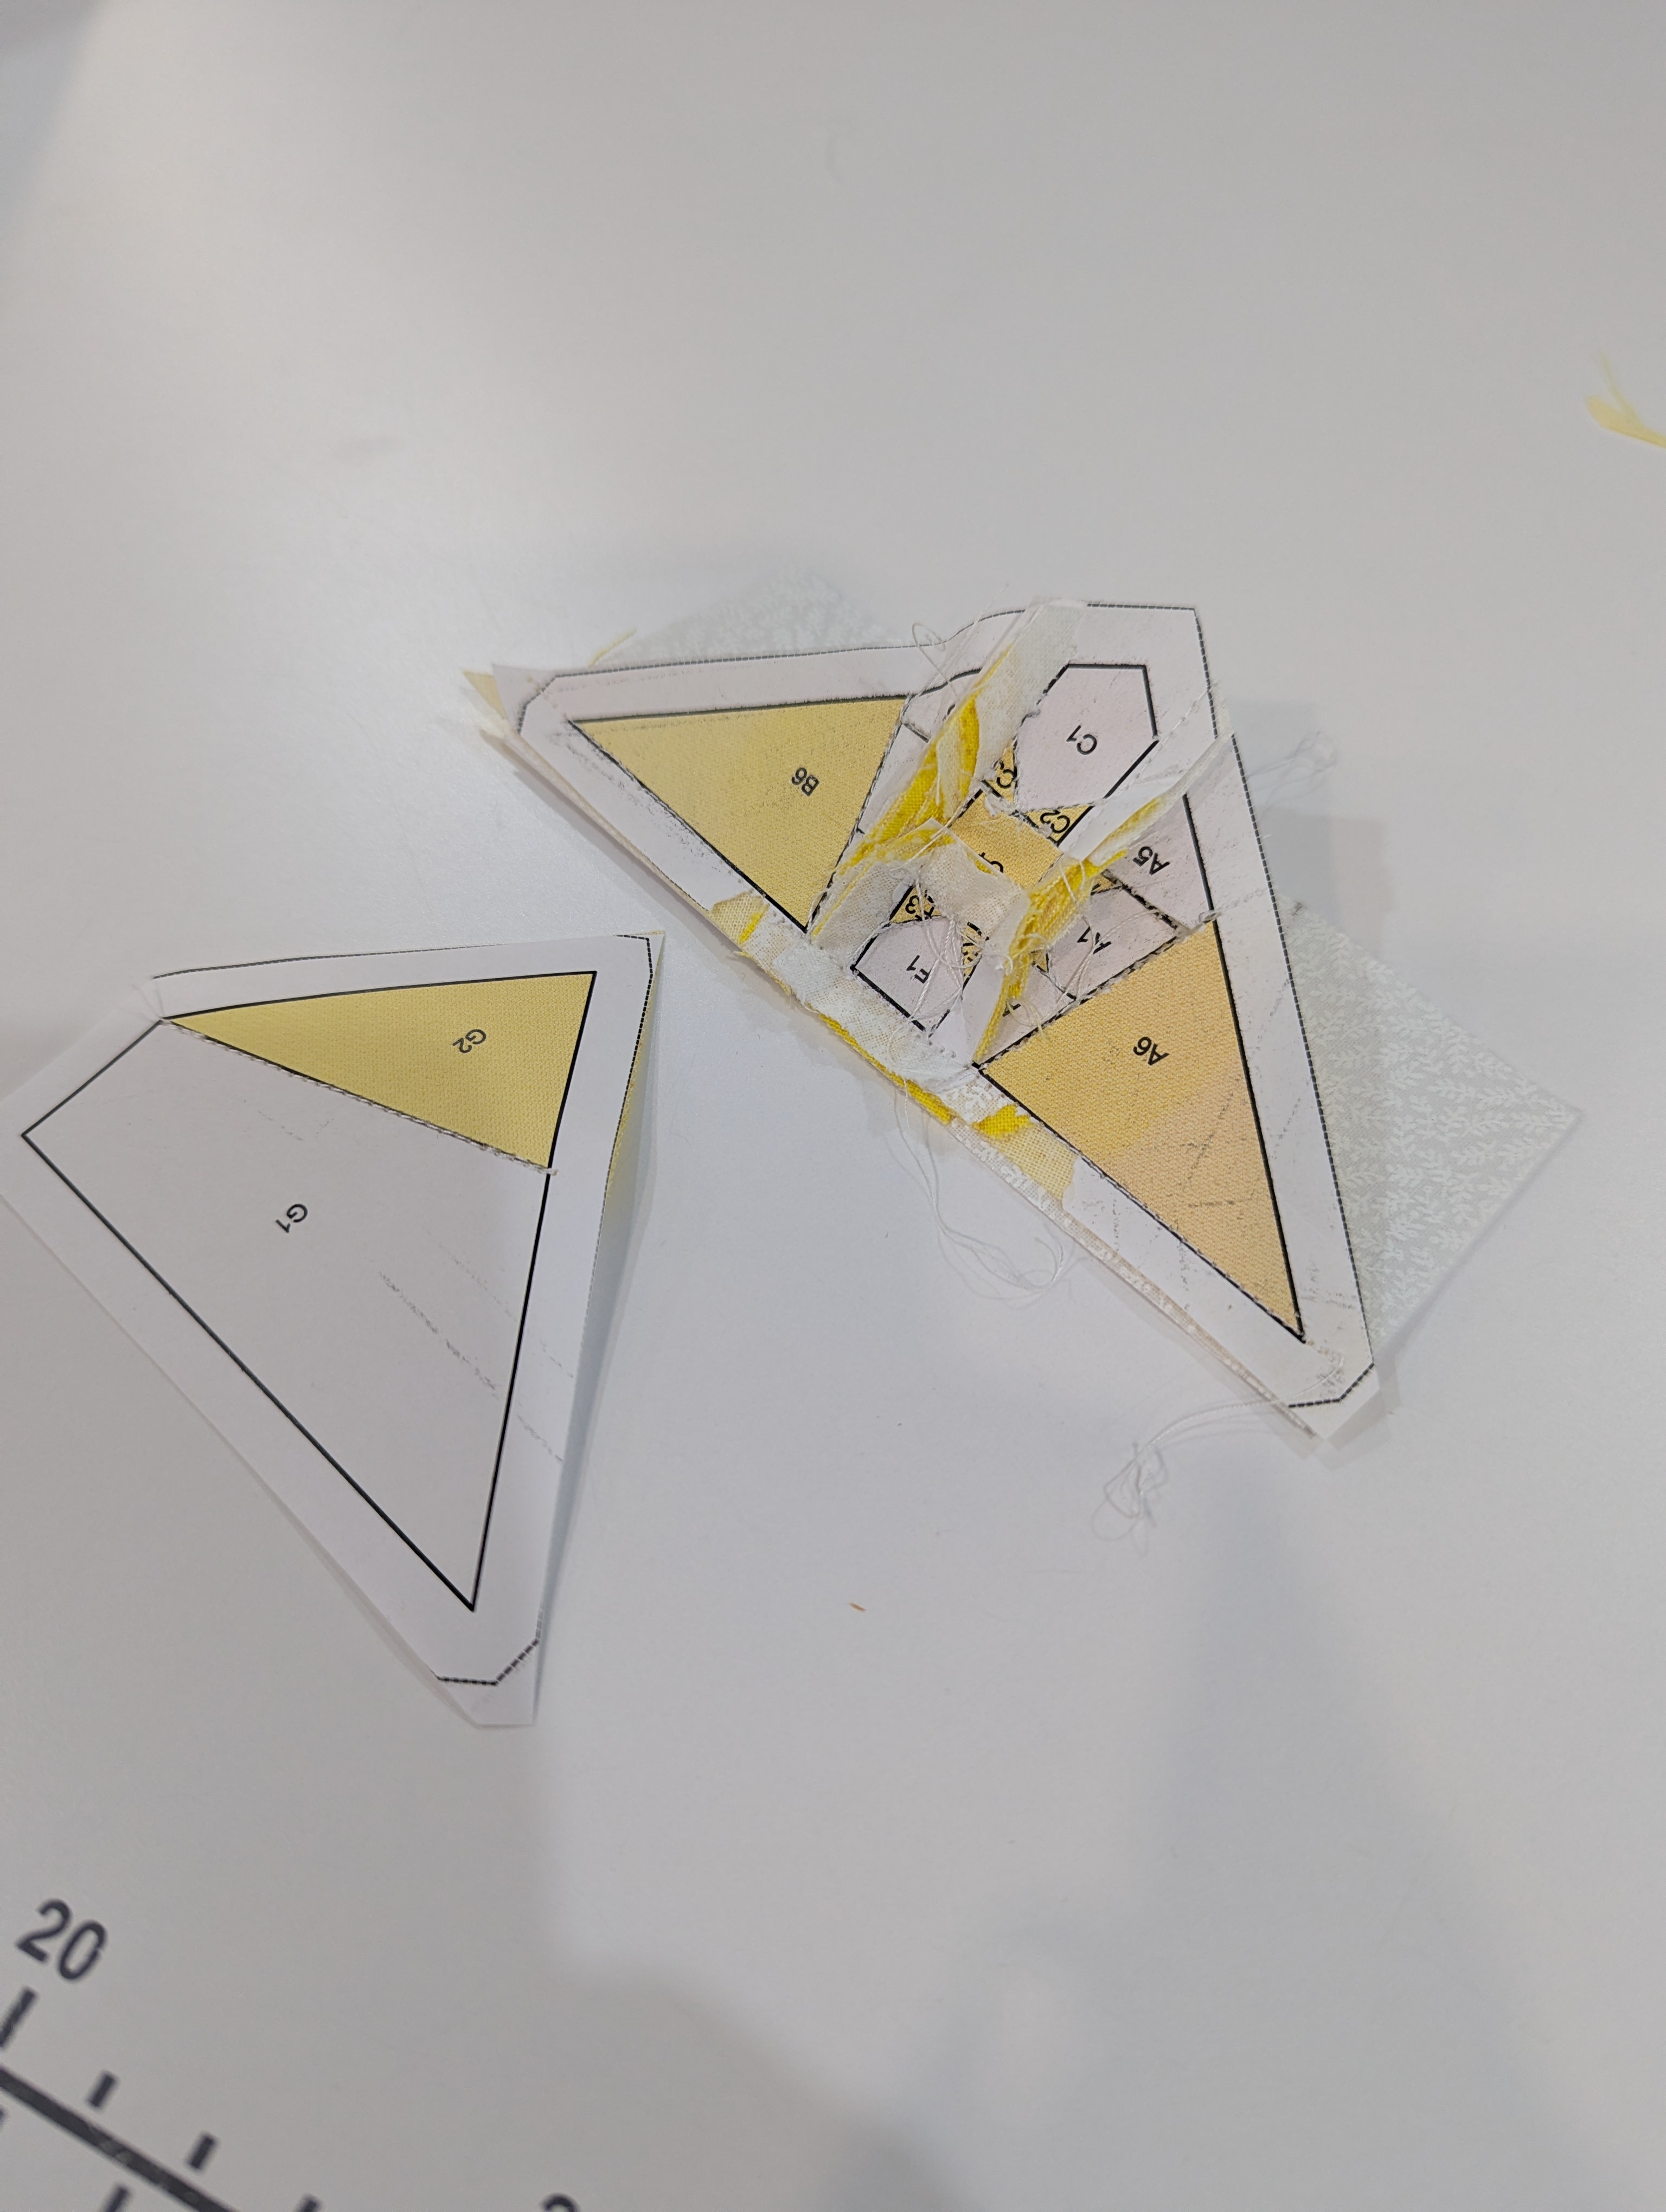
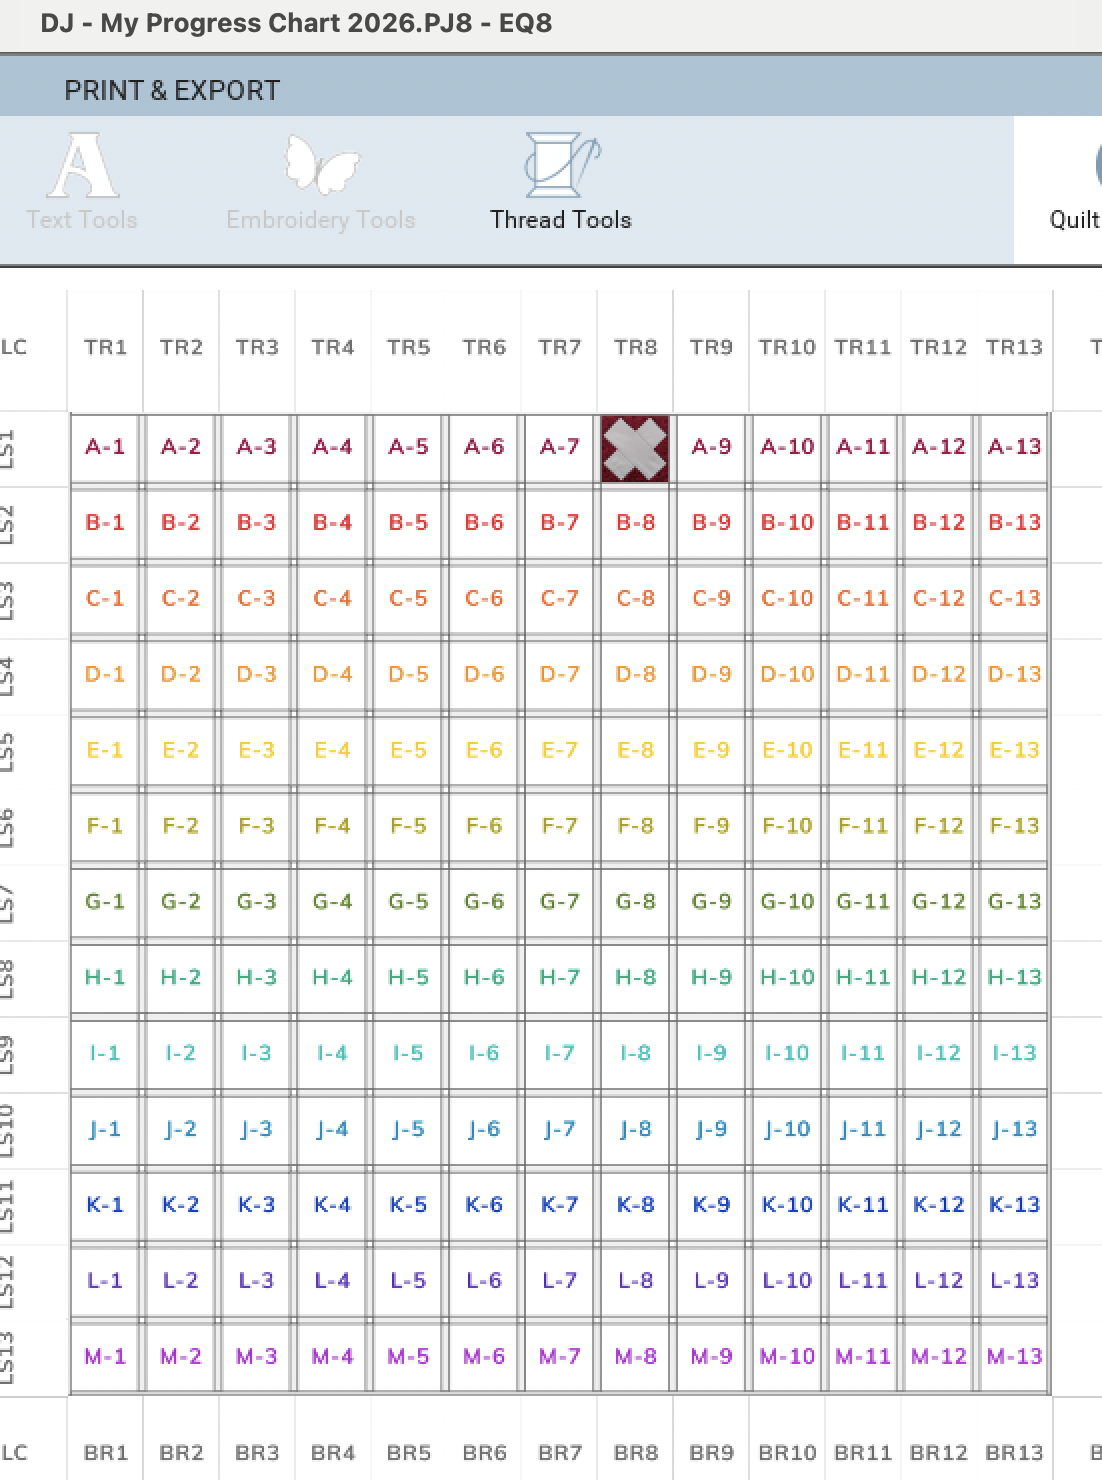
This is a perfect block for FPP. But I recognize that I am possibly breaking copyright by posting images of the pages from EQ8, so you won’t see any from this point forward. Here’s a gallery of some of the process:
FPP generates a lot of paper bits, and small scraps of fabric. My vacuum cleaner is going to get a workout!
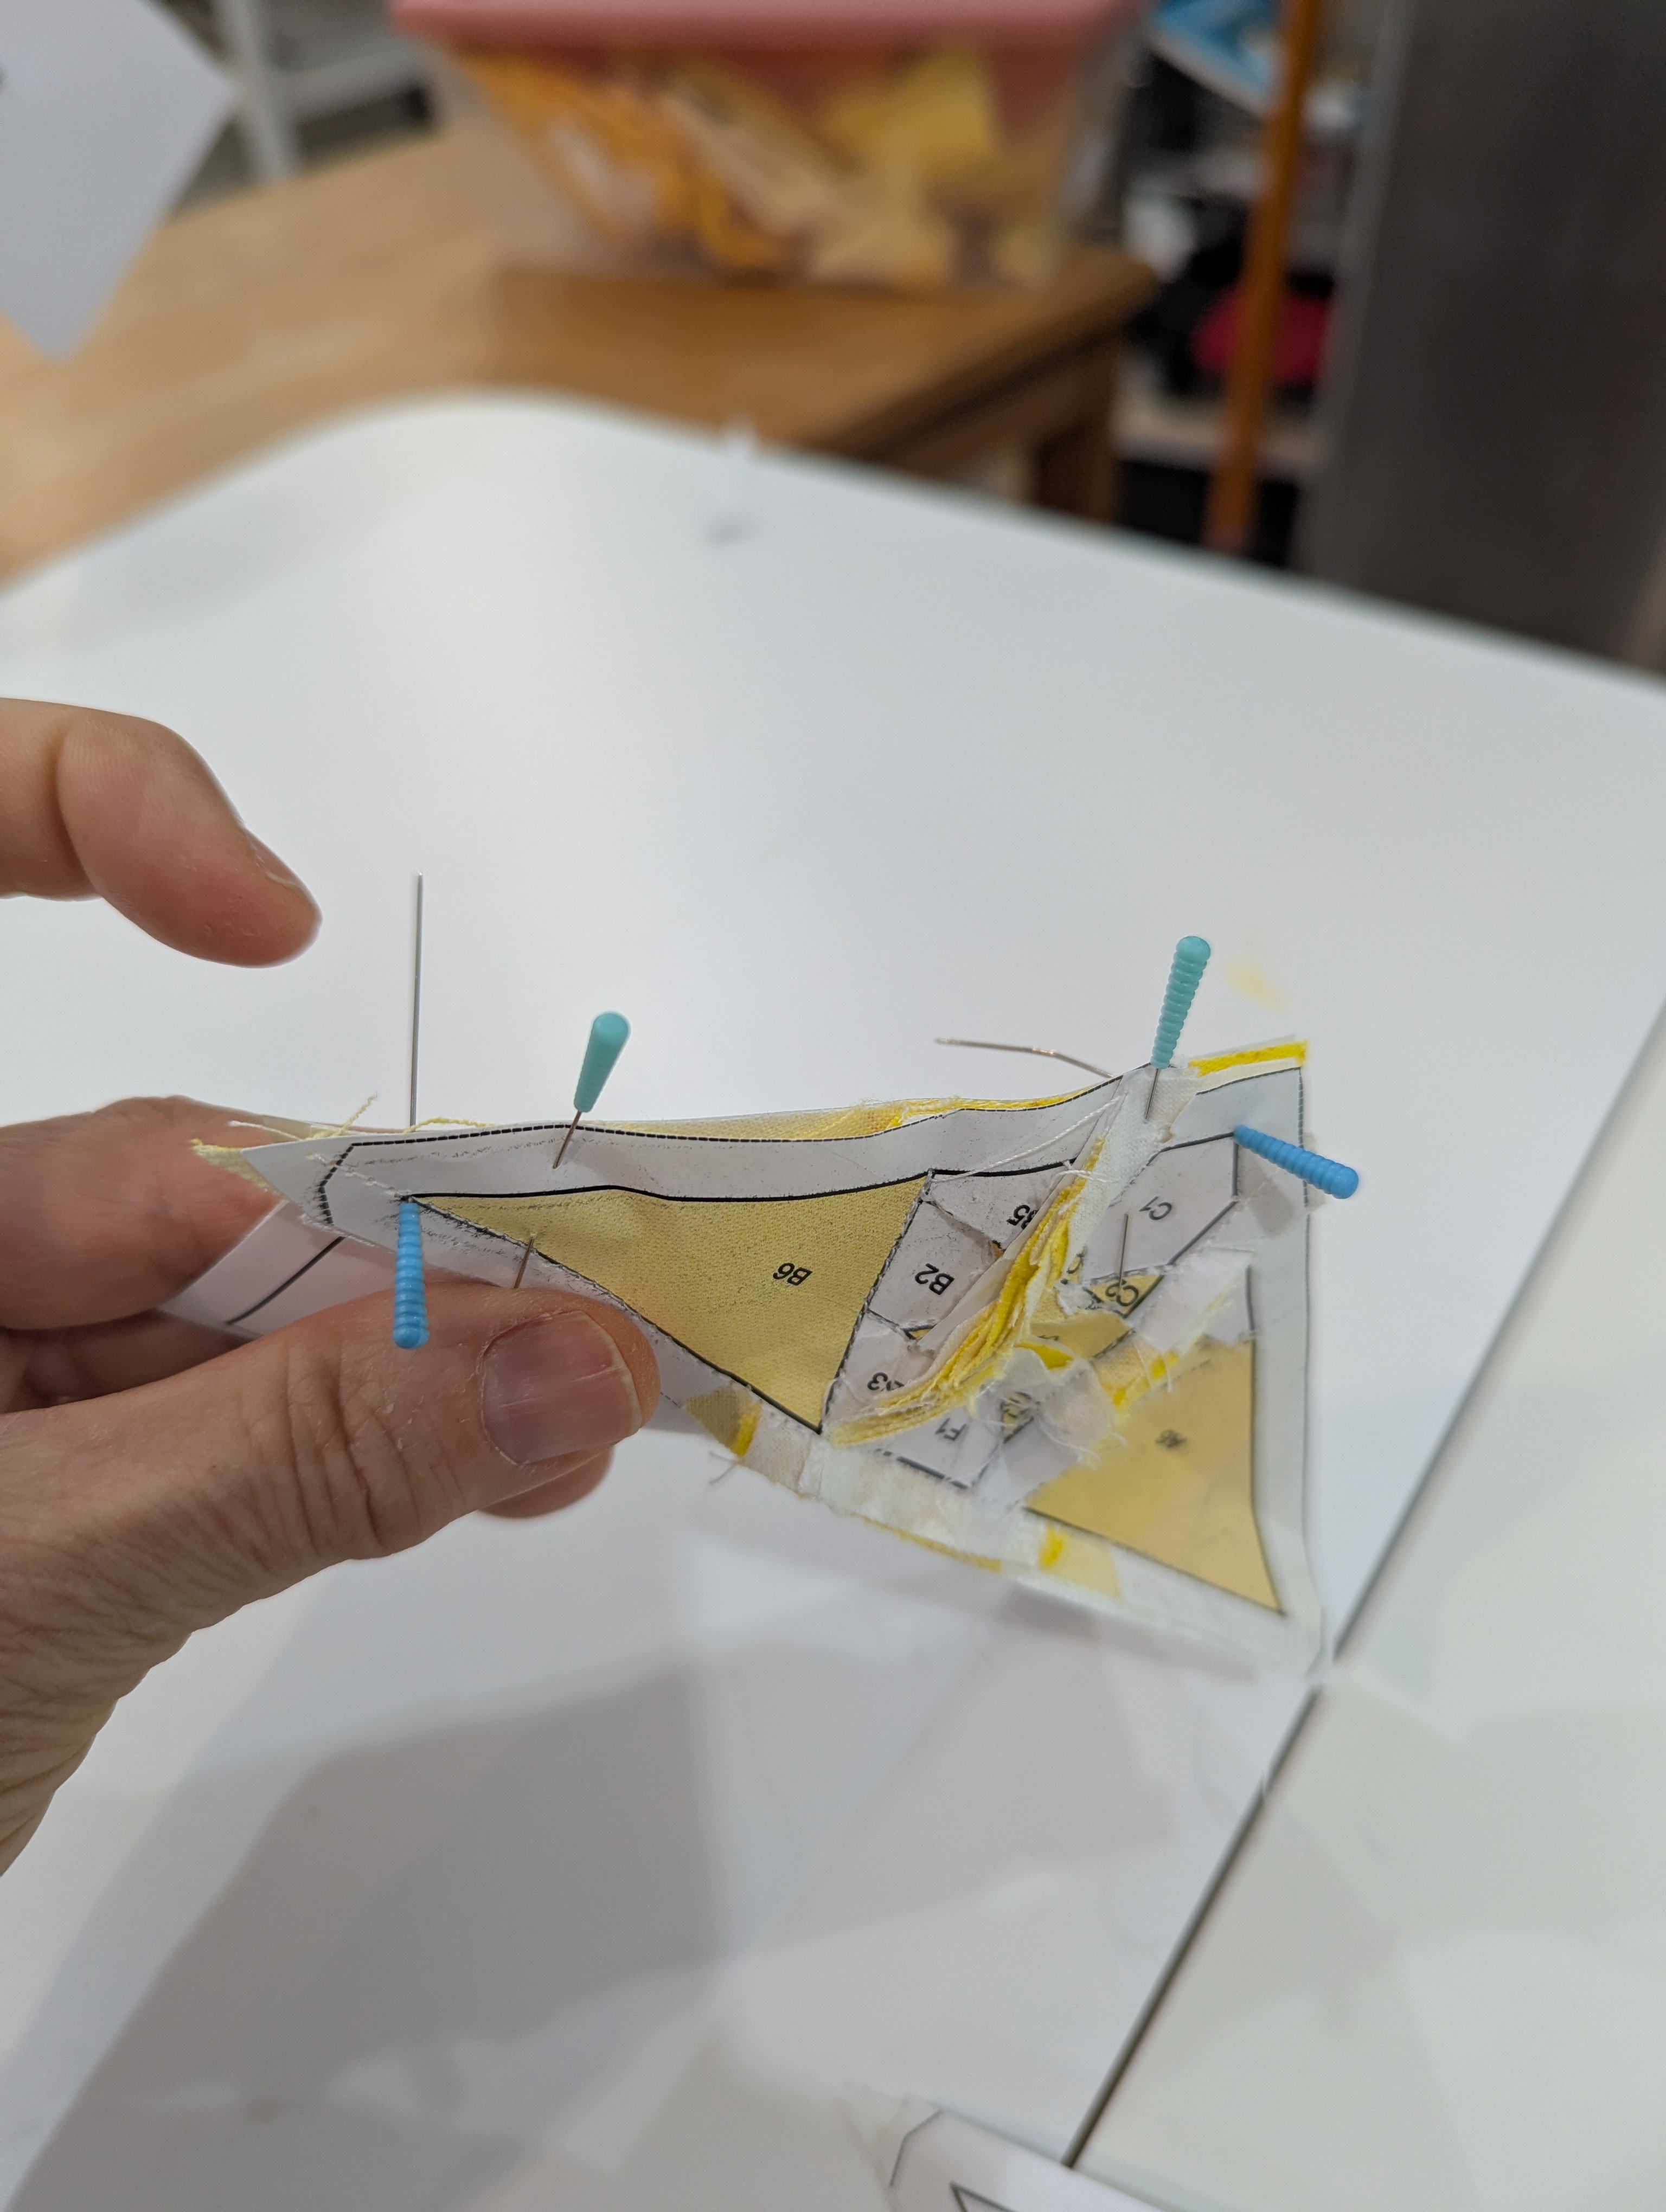
You can see where I use two pins in the same location. One pin stabs through the intersections of both pieces. The second pin then secures it. I find if I stab, then secure with the same pin, it shifts. So this process gets a better match. I also find that my Magic Pins (Fine) work well for the stabbing process. But I need the Extra Fine size to slide easily and lay flat for sewing.
Successes:
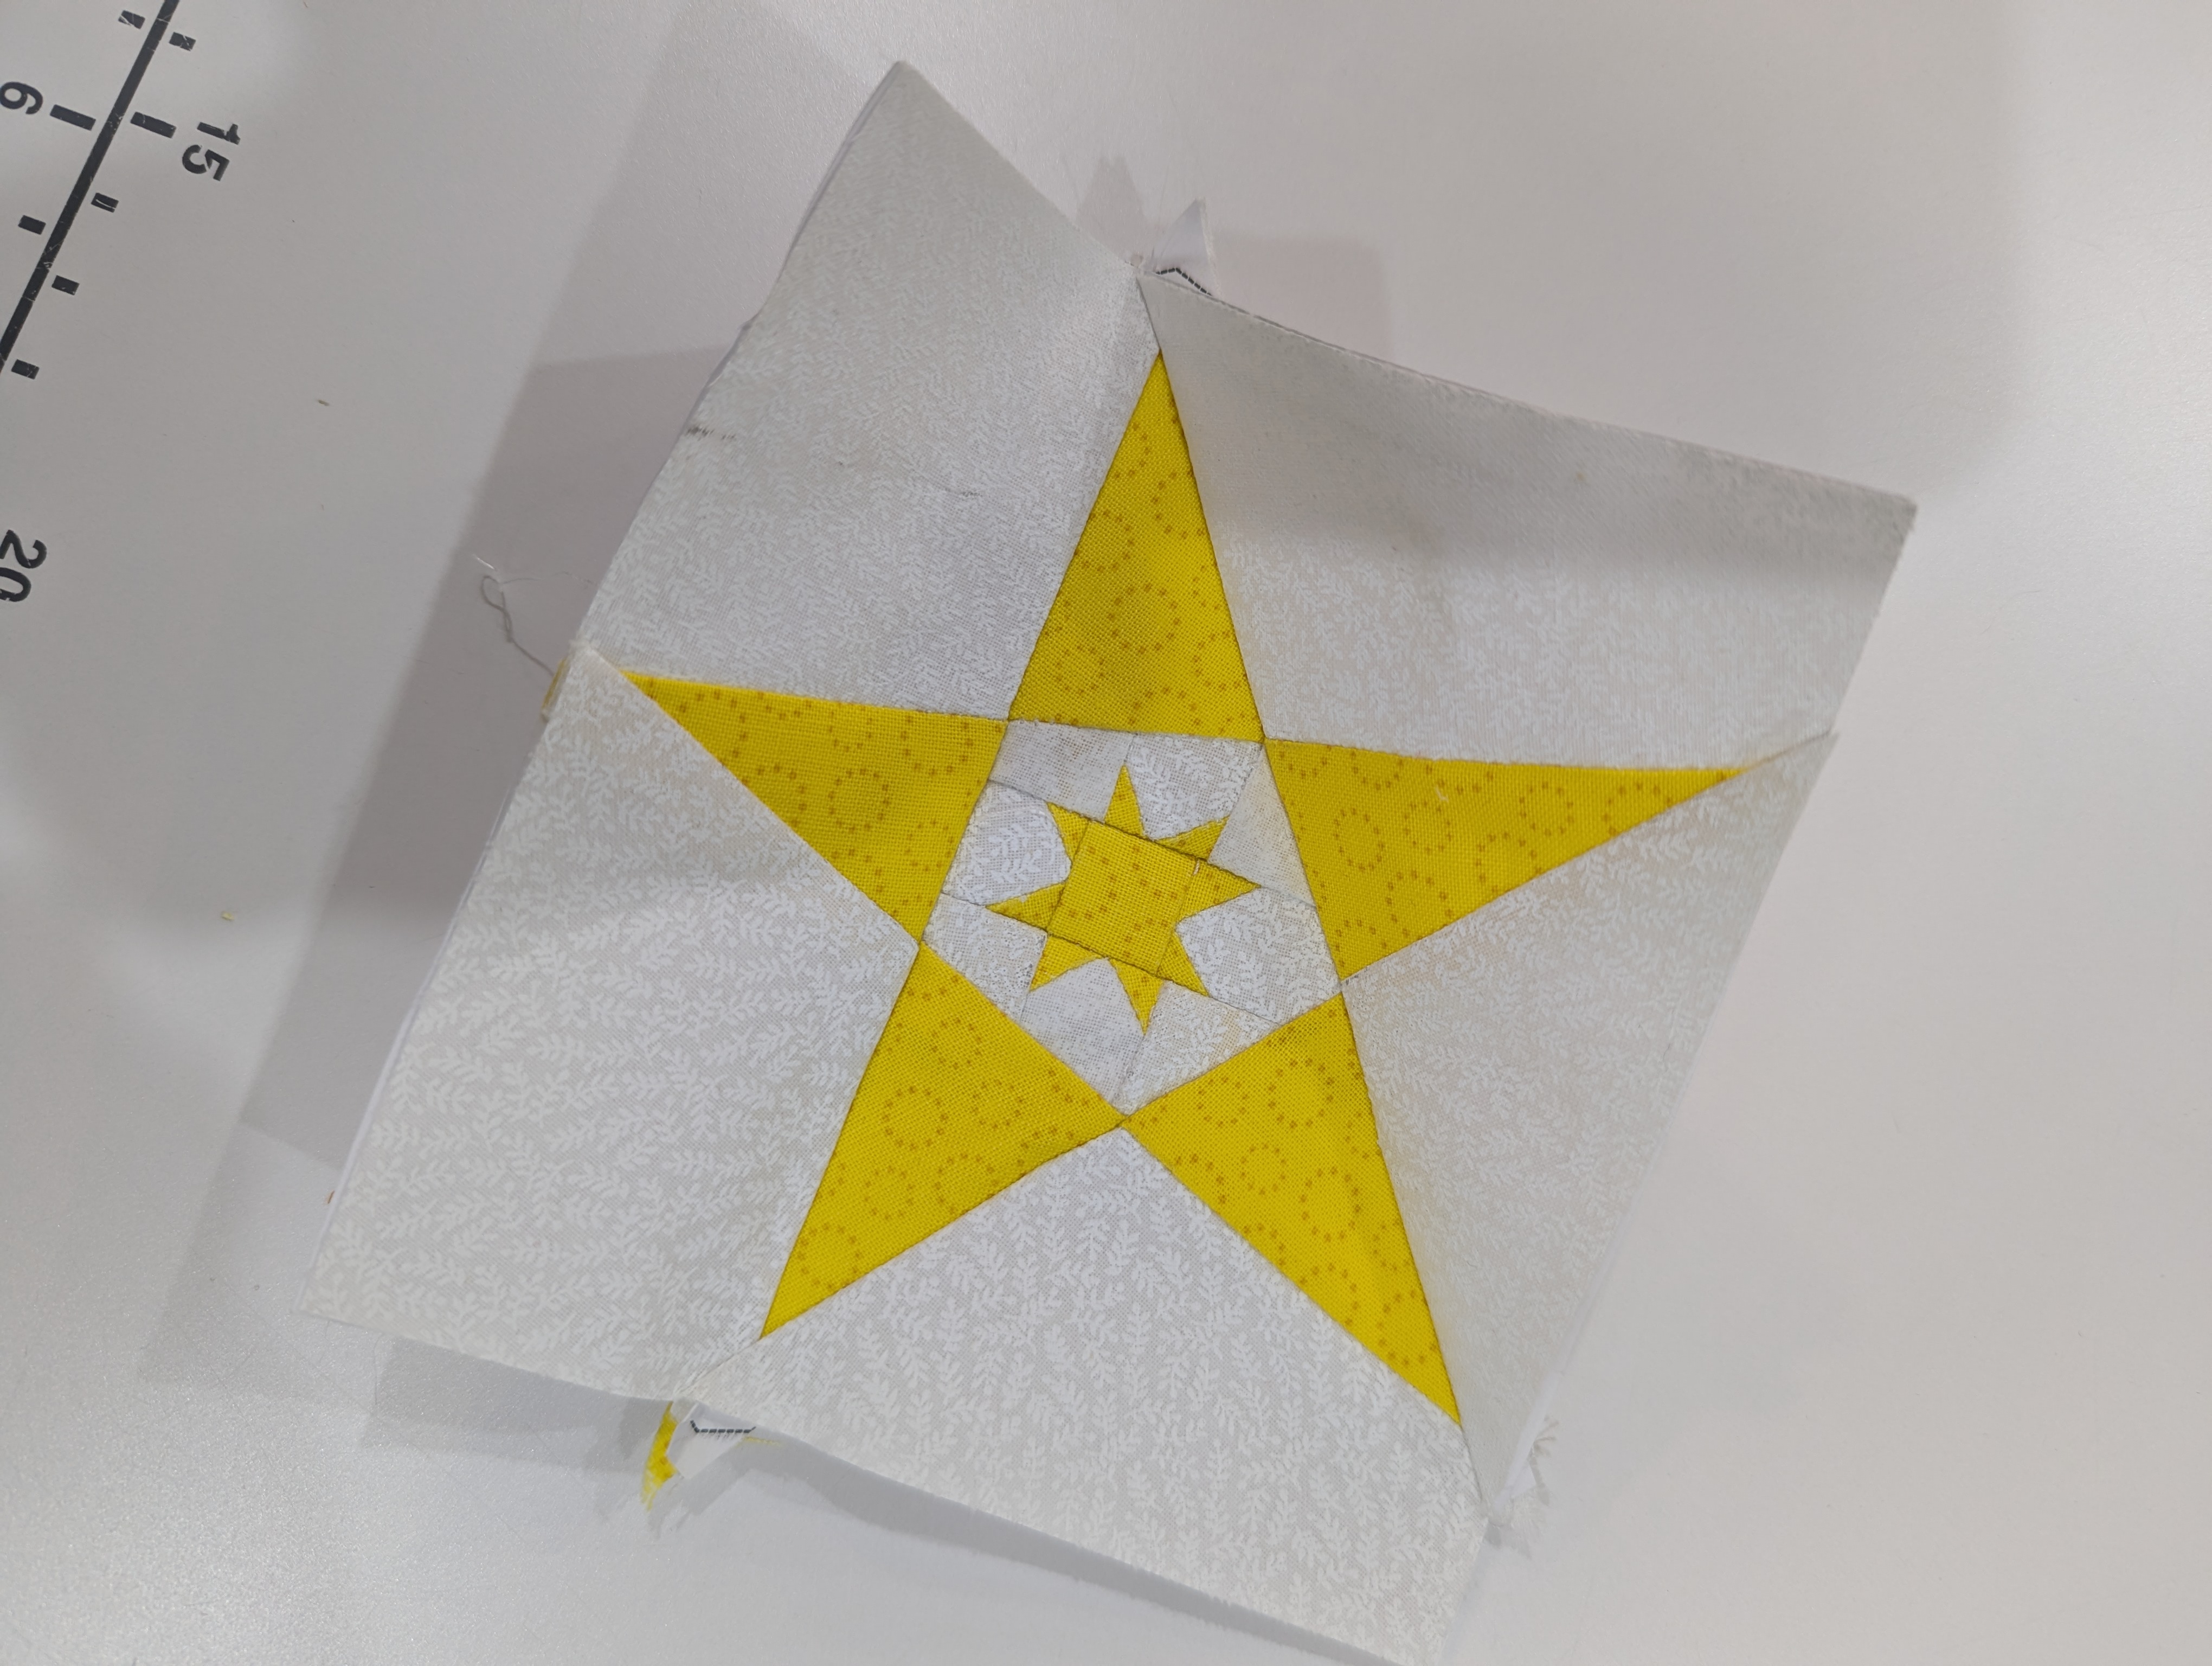
This is as precise as I think I could get with those tiny quarter-inch triangles
I was able to use fine tweezers to get most of the paper out. And then I used “The World’s Kindest Nail Brush” from Lee Valley to remove the last bits.
My investment in the EQ8 software has already paid off with these four blocks completed. I believe I will be returning to this add-on to make larger versions of this block for other quilts.
Challenges:
I am using regular printer paper, so sometimes I stretch the seams as I remove this thicker paper. (I need to find my stack of Carol Doak’s Foundation paper to print the next blocks….. or order more!)
With the tiny pieces, there are a huge number of seam allowances on the back, necessitating some careful grading and trimming
Also due to the thickness, it is challenging to keep the presser foot in line. I had to re-sew a couple of seams where the line was off.
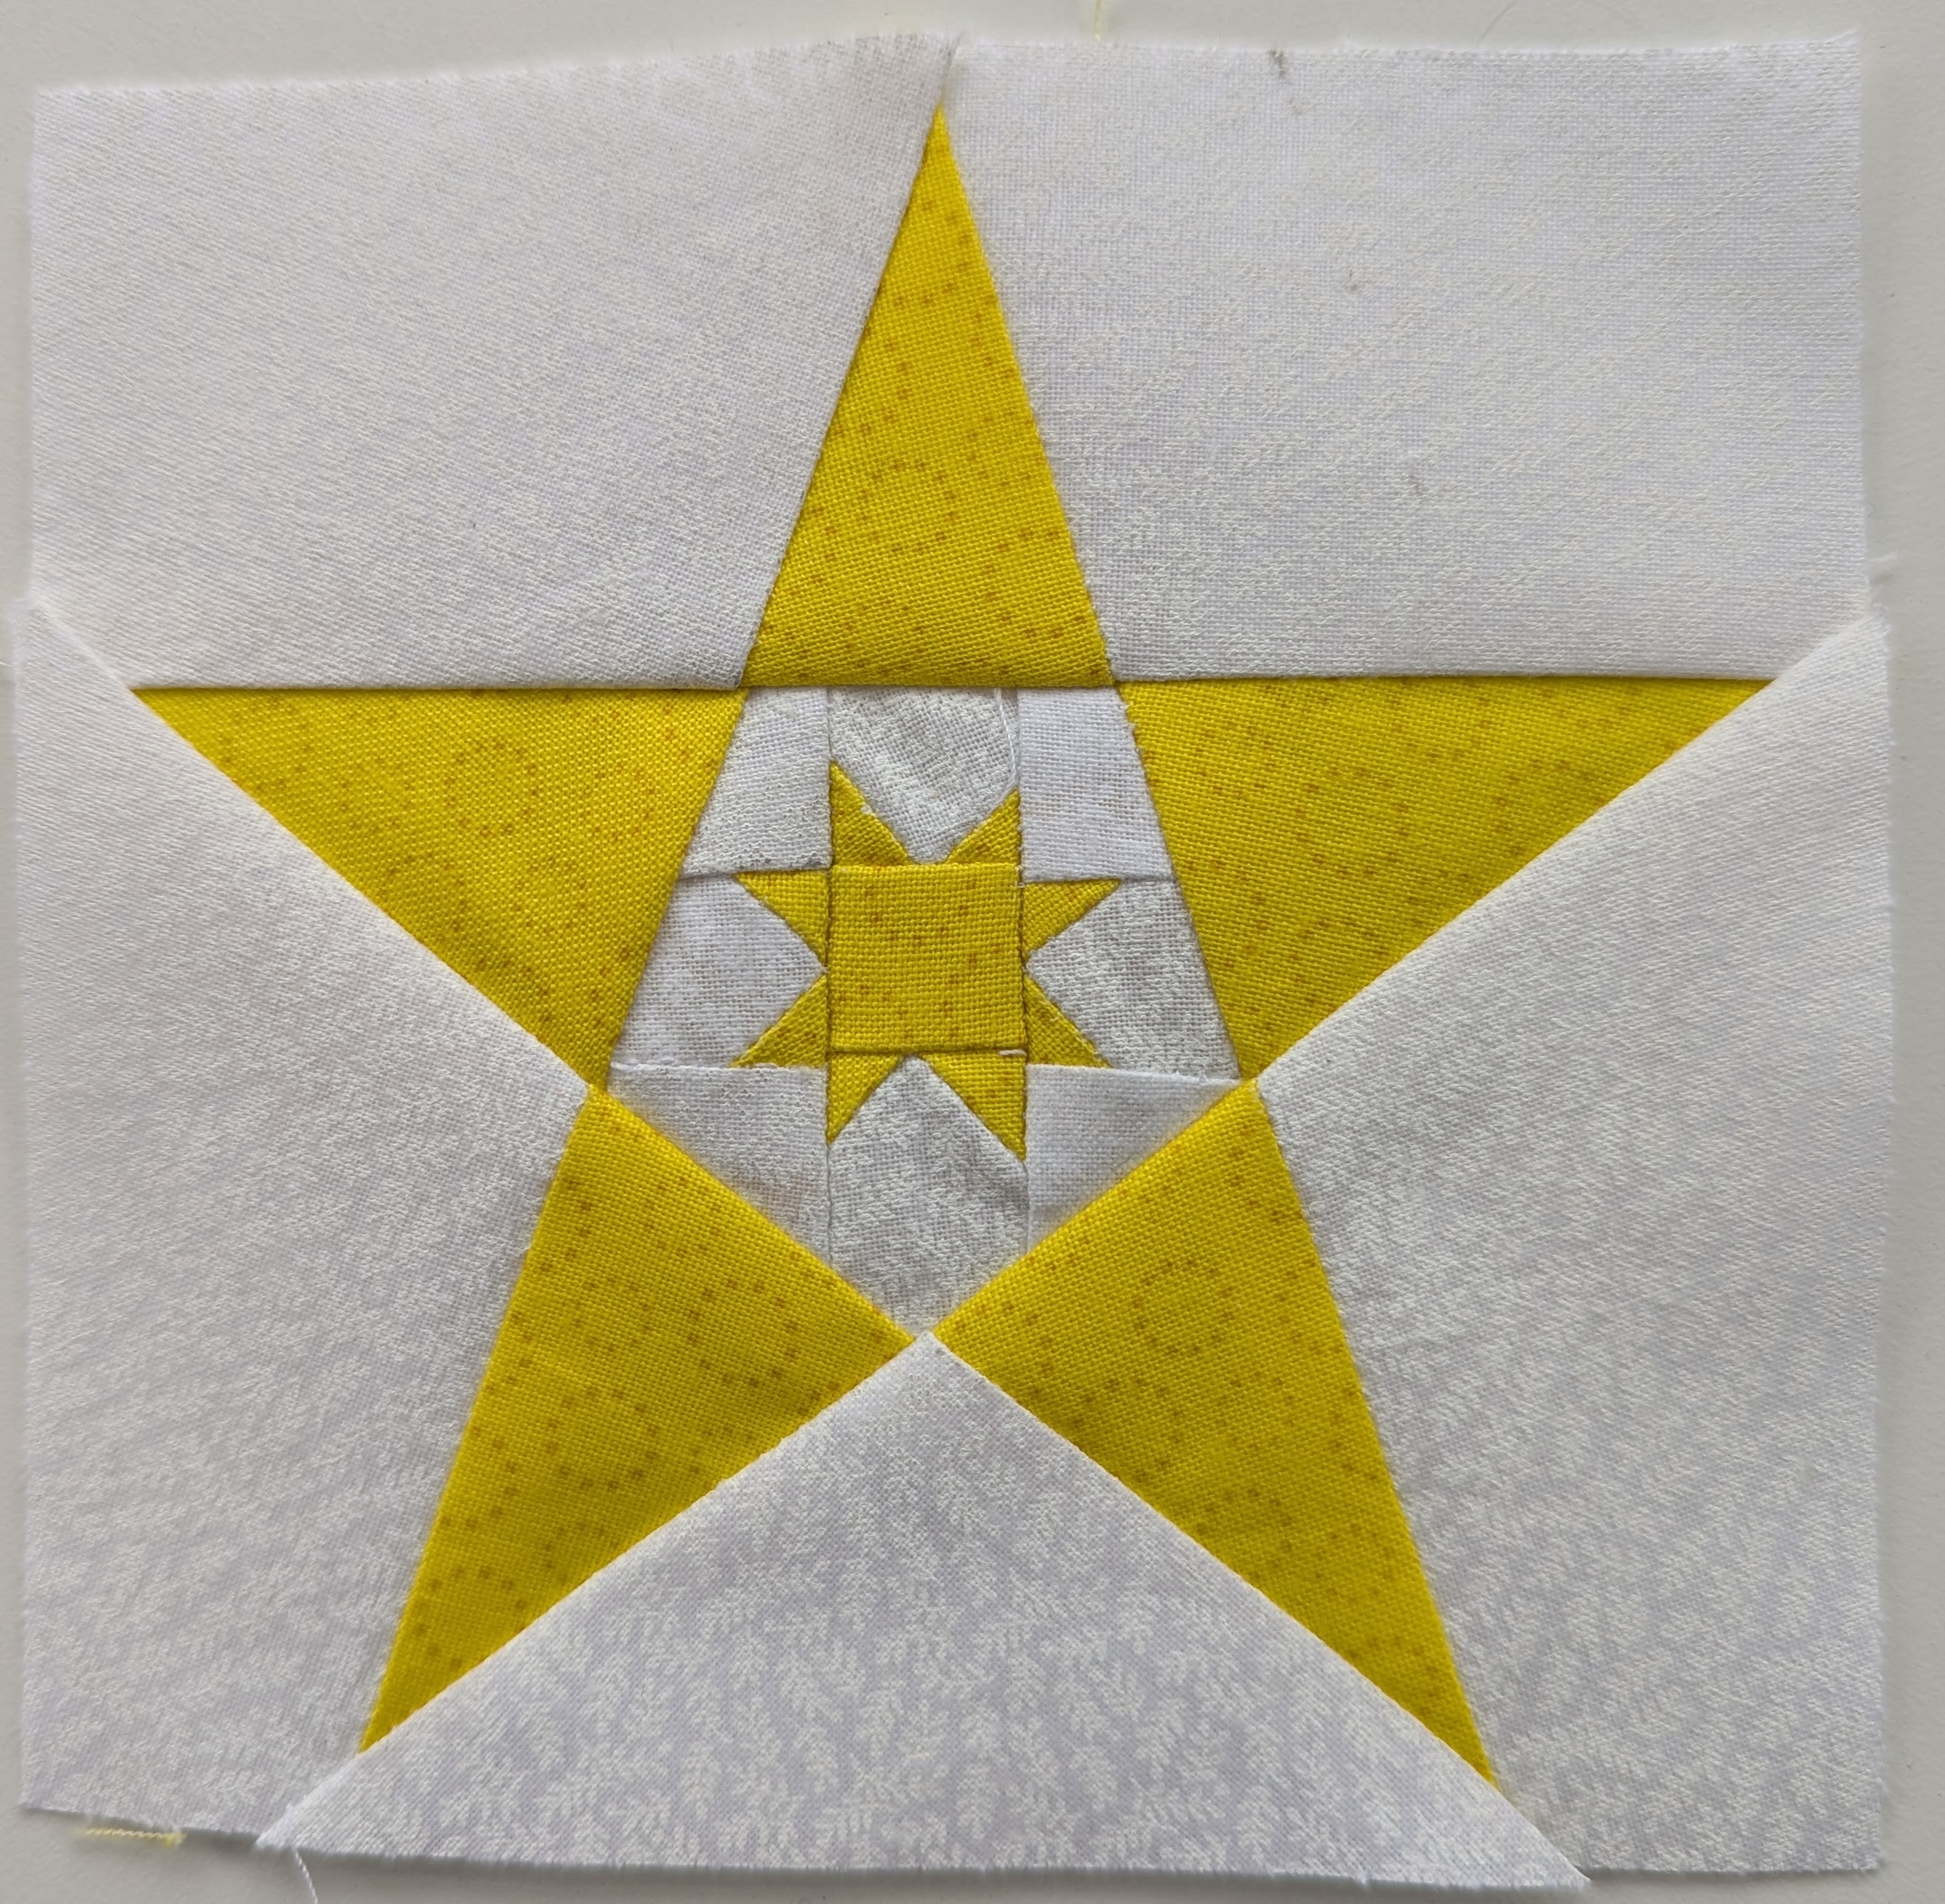
I chose my strongest “yellow” for this block, but wish I had selected one with even more contrast, to show off that tiny Ohio Star.
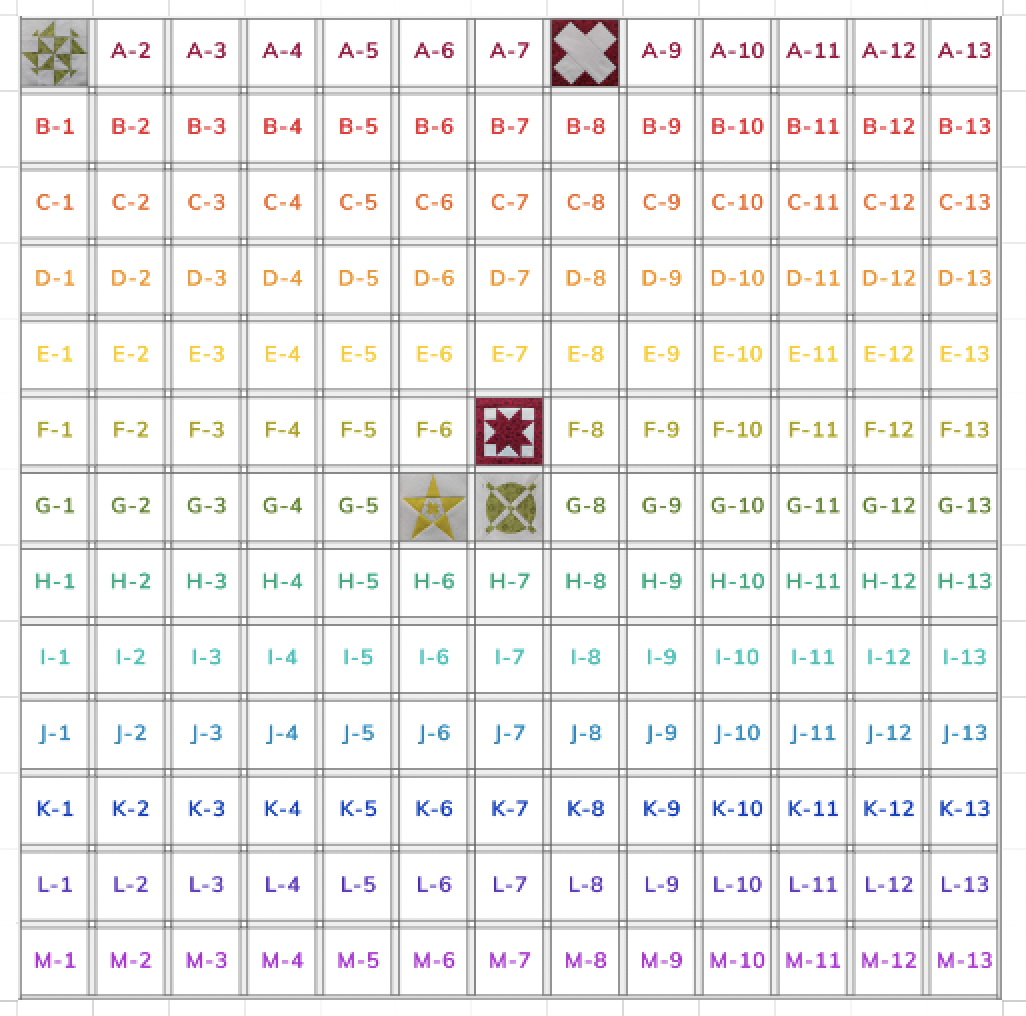
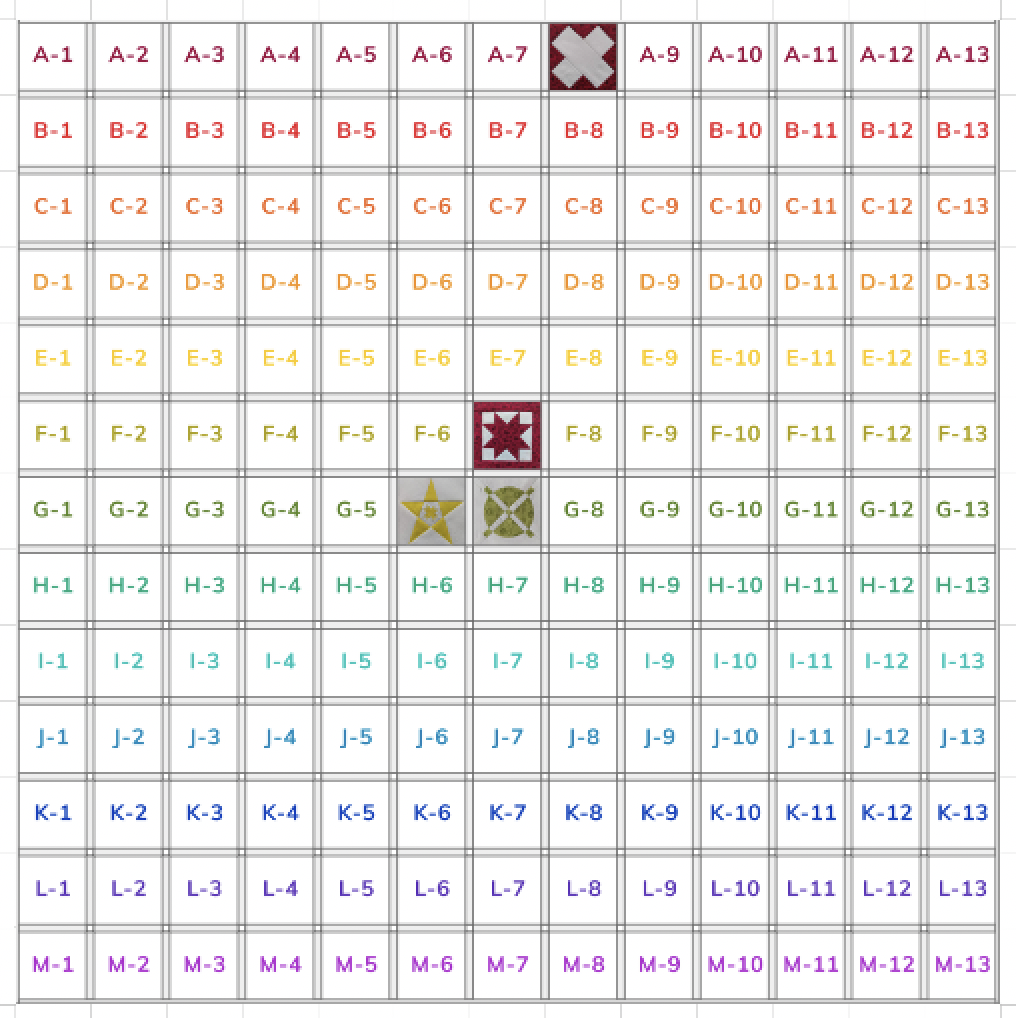
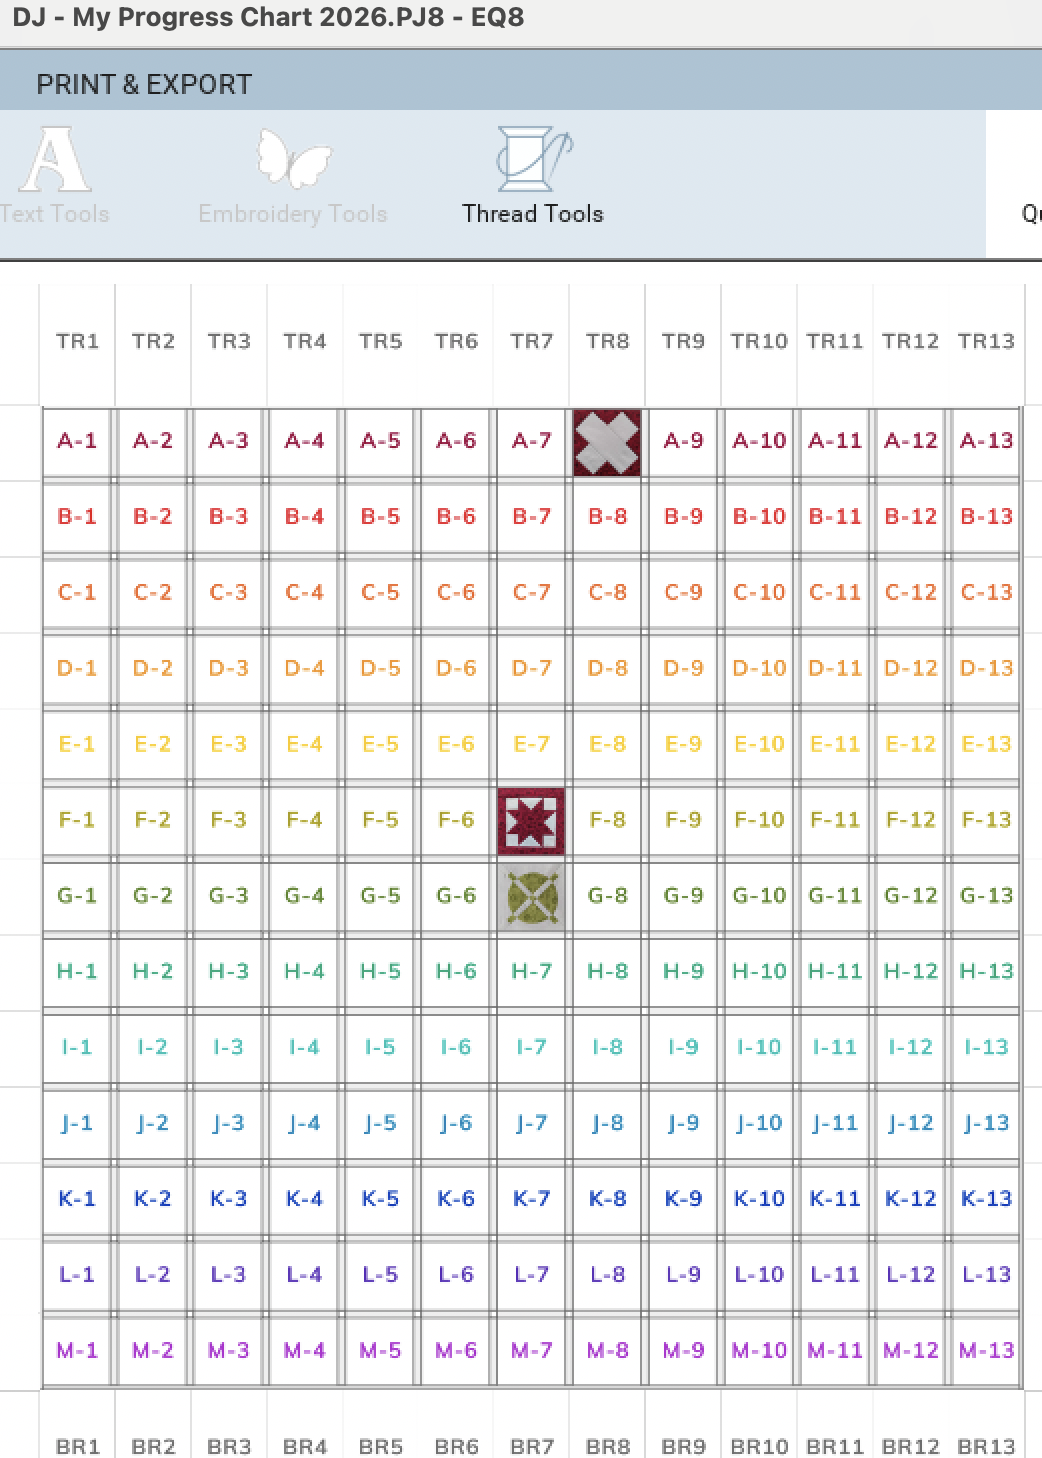
Here’s what the quilt looks like now, with G-6 added:
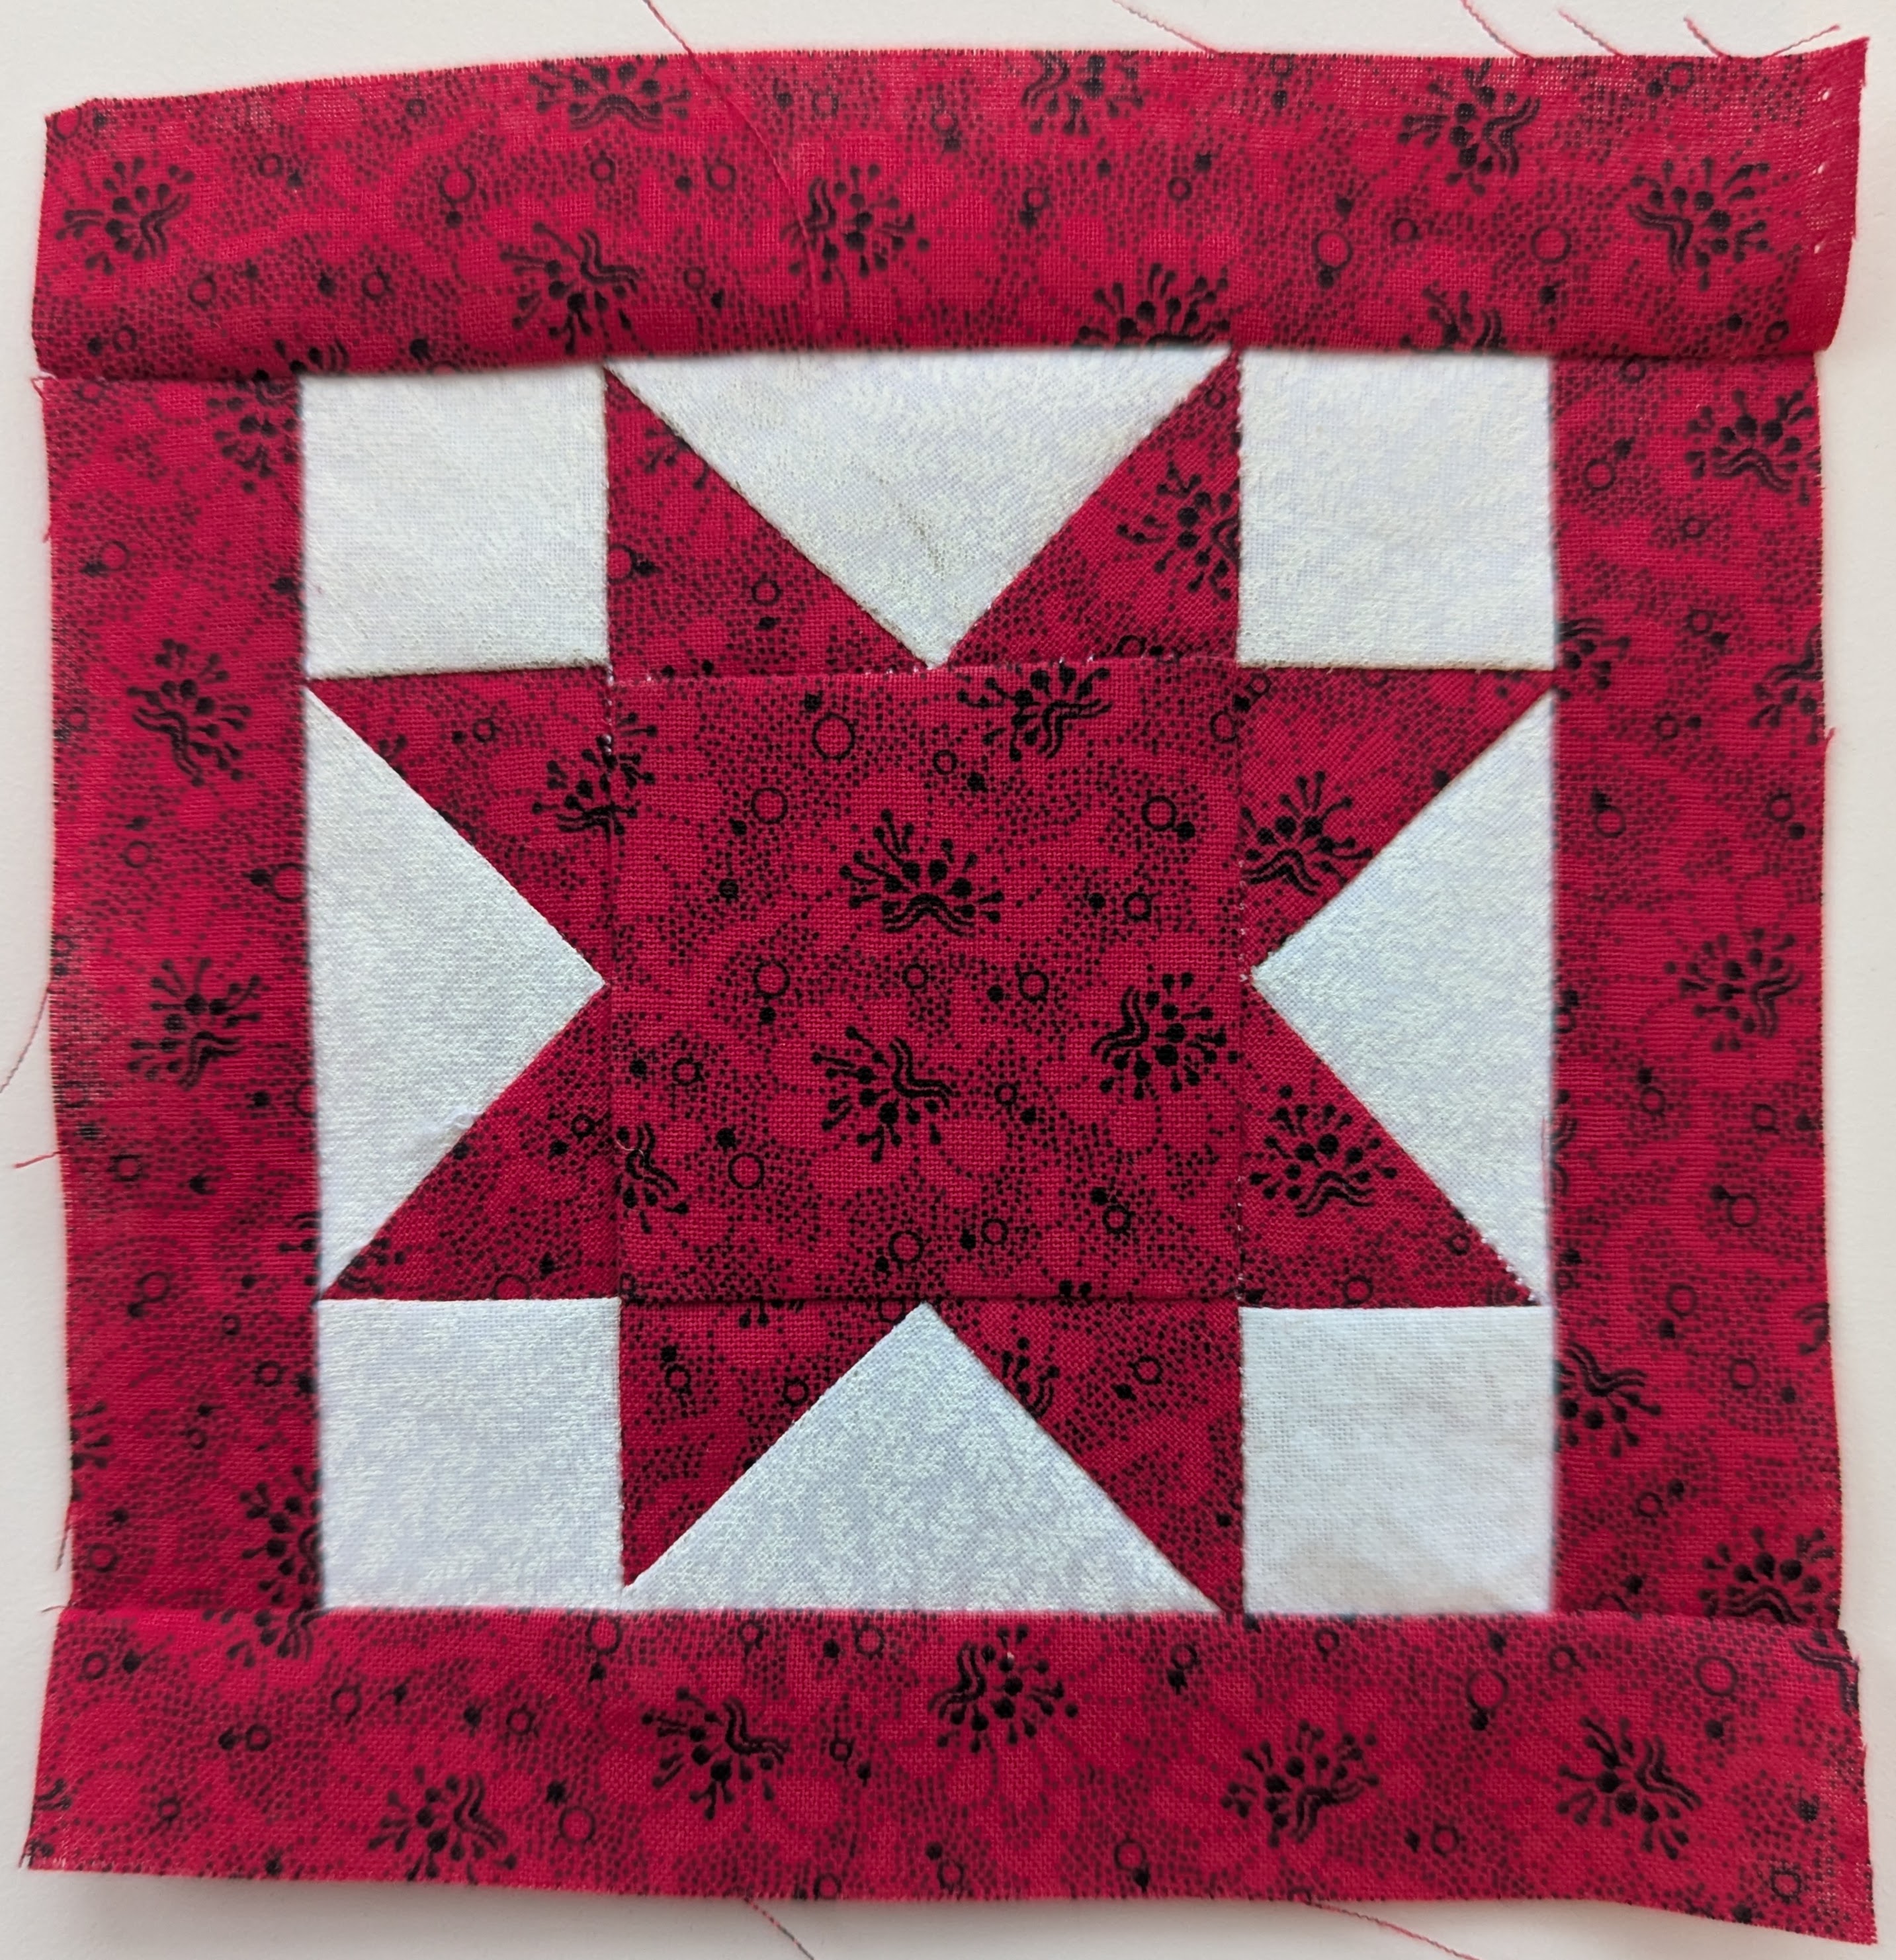
This block confirmed my decision to favour Foundation Paper Piecing. Except for the last three borders, it was all constructed using a printout from EQ8.
I chose to repeat the use of red, since one of my goals is to use up my stash of fabric. And I like a quilt where the eye can jump from one focus colour to the next.
In the Dear Jane Stitch Along, the YouTube video by @JayneStitches, she handpieces this block. I think it would be a perfect block for this technique as well. If I were travelling, I would certainly consider hand-piecing while on a plane or bus.
Successes:
Nice crisp points due to the FPP technique
Lovely contrast of the red against the white background
If you have read my previous post, you will know that I am starting a quilting journey. This journey is expected to be measured in years rather than days. Today I took the first step by choosing a simple block, or at least one that appeared to be simple.
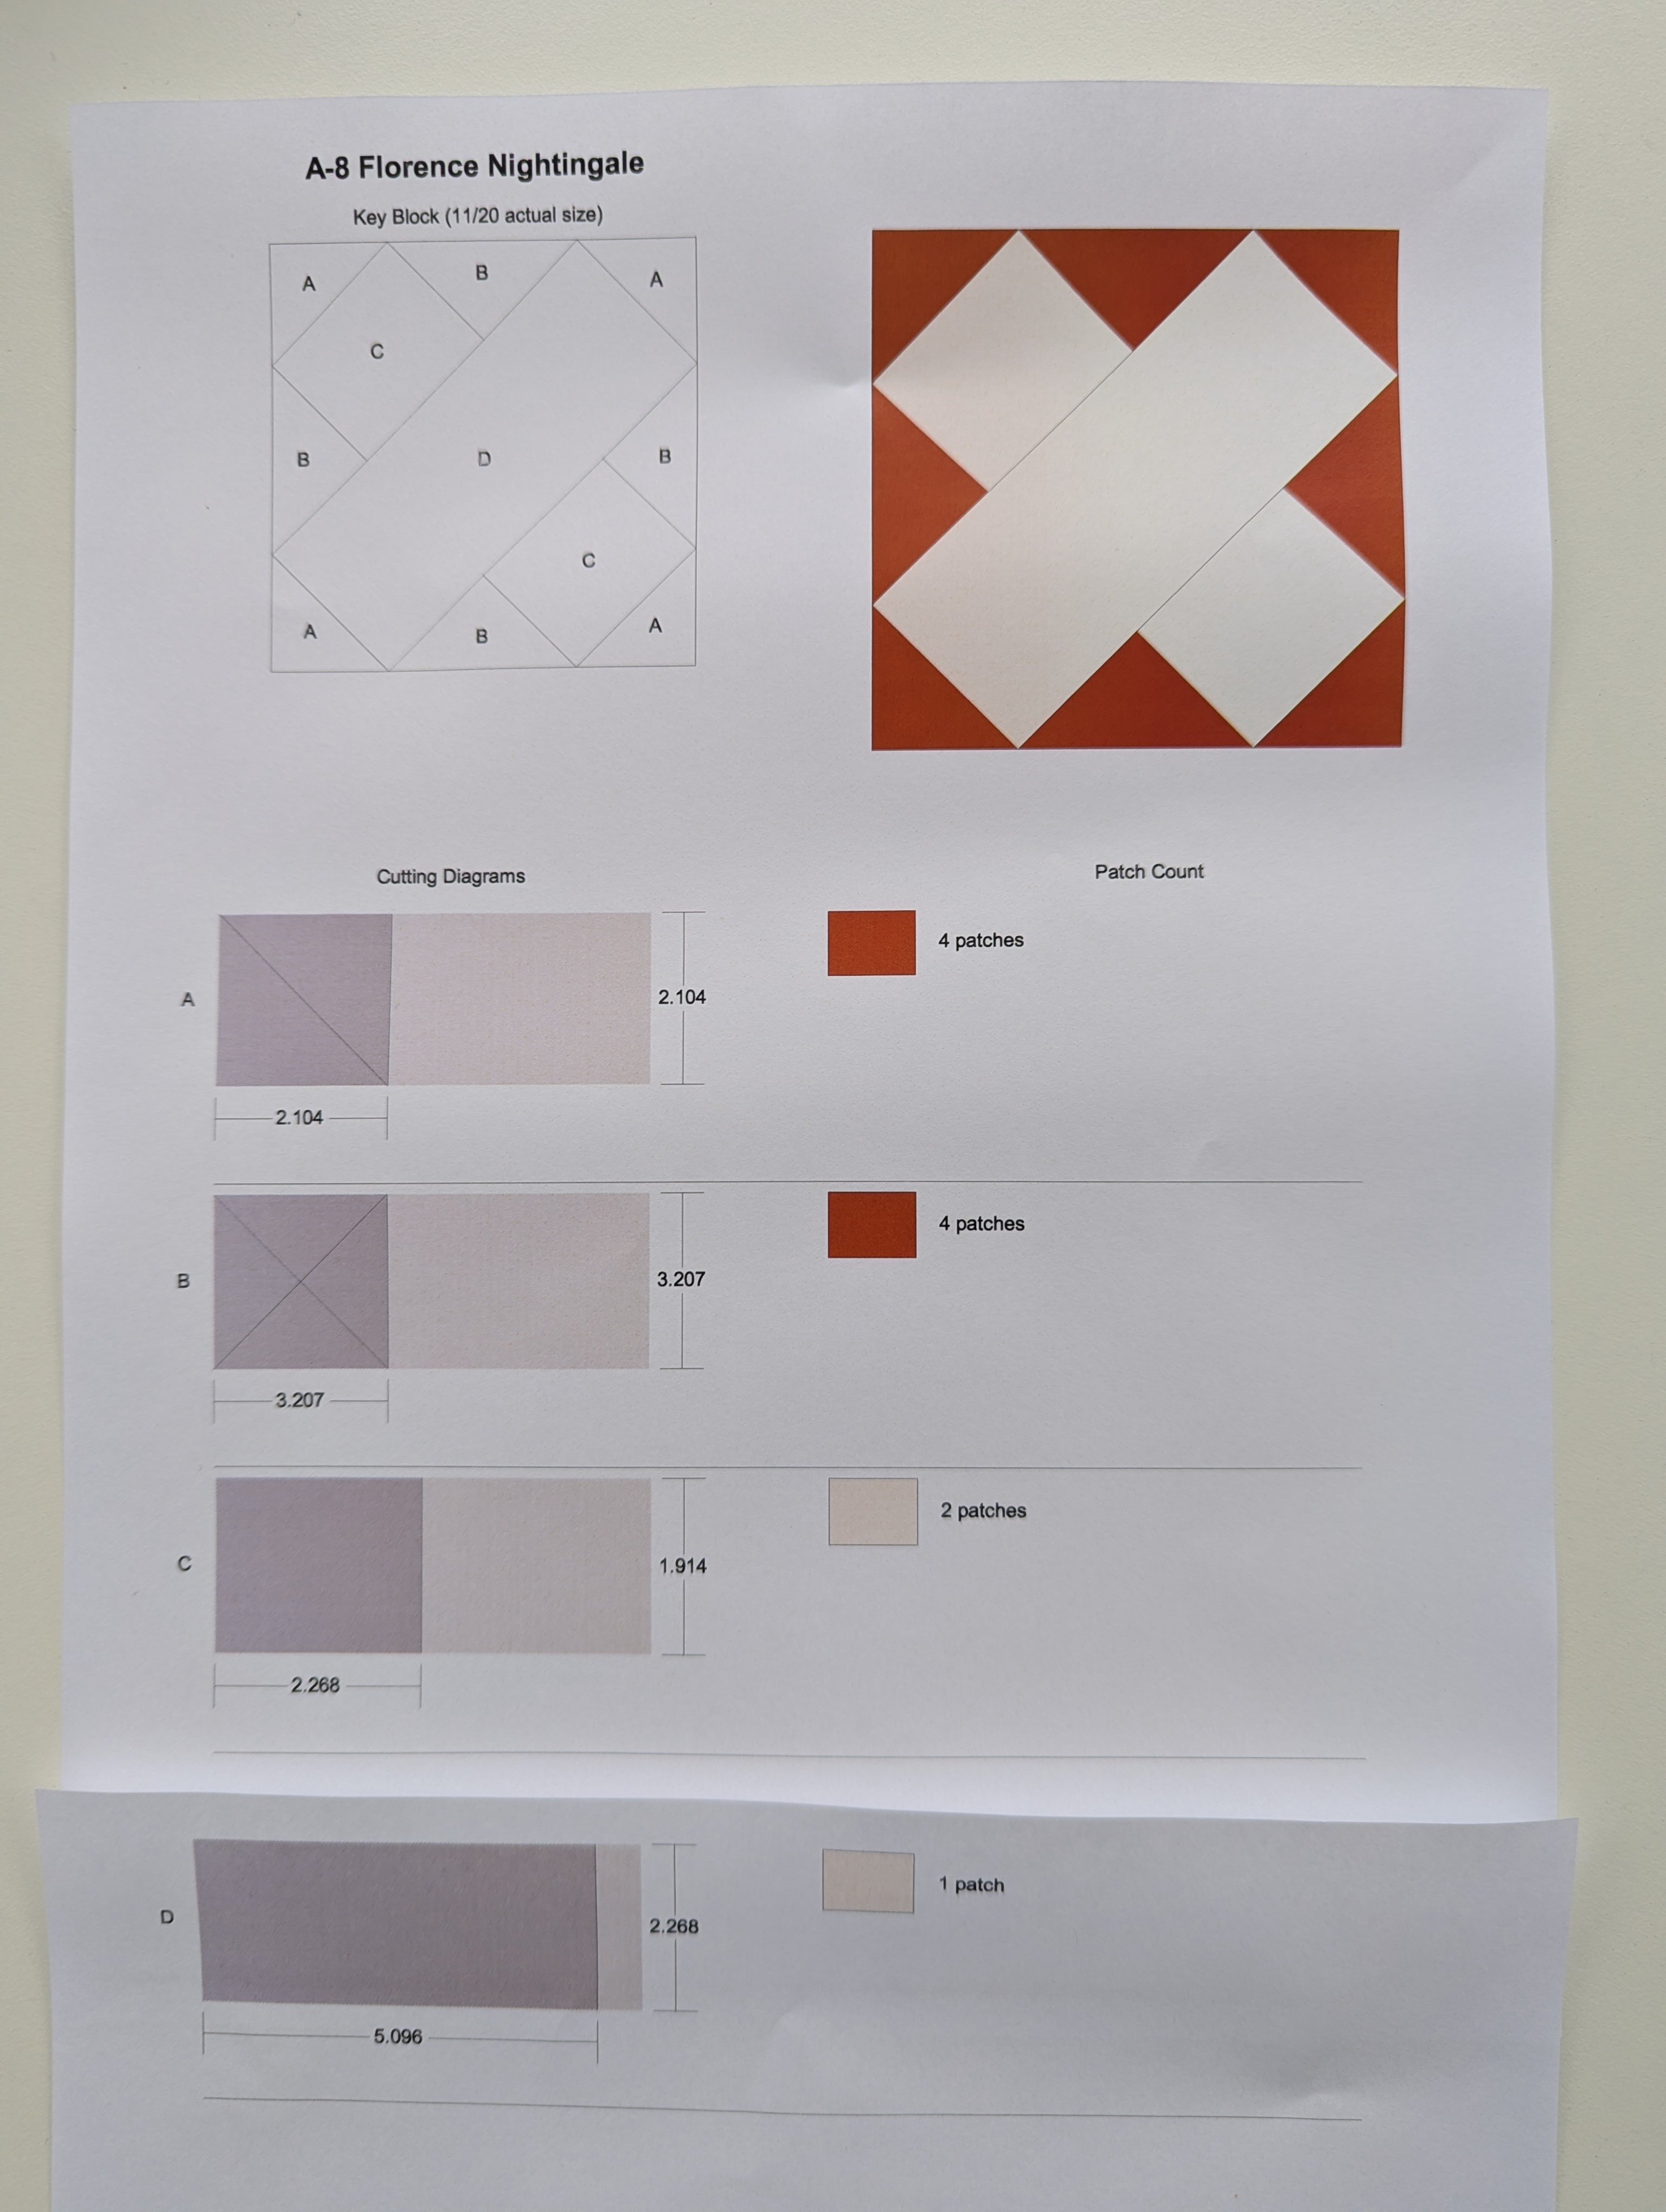
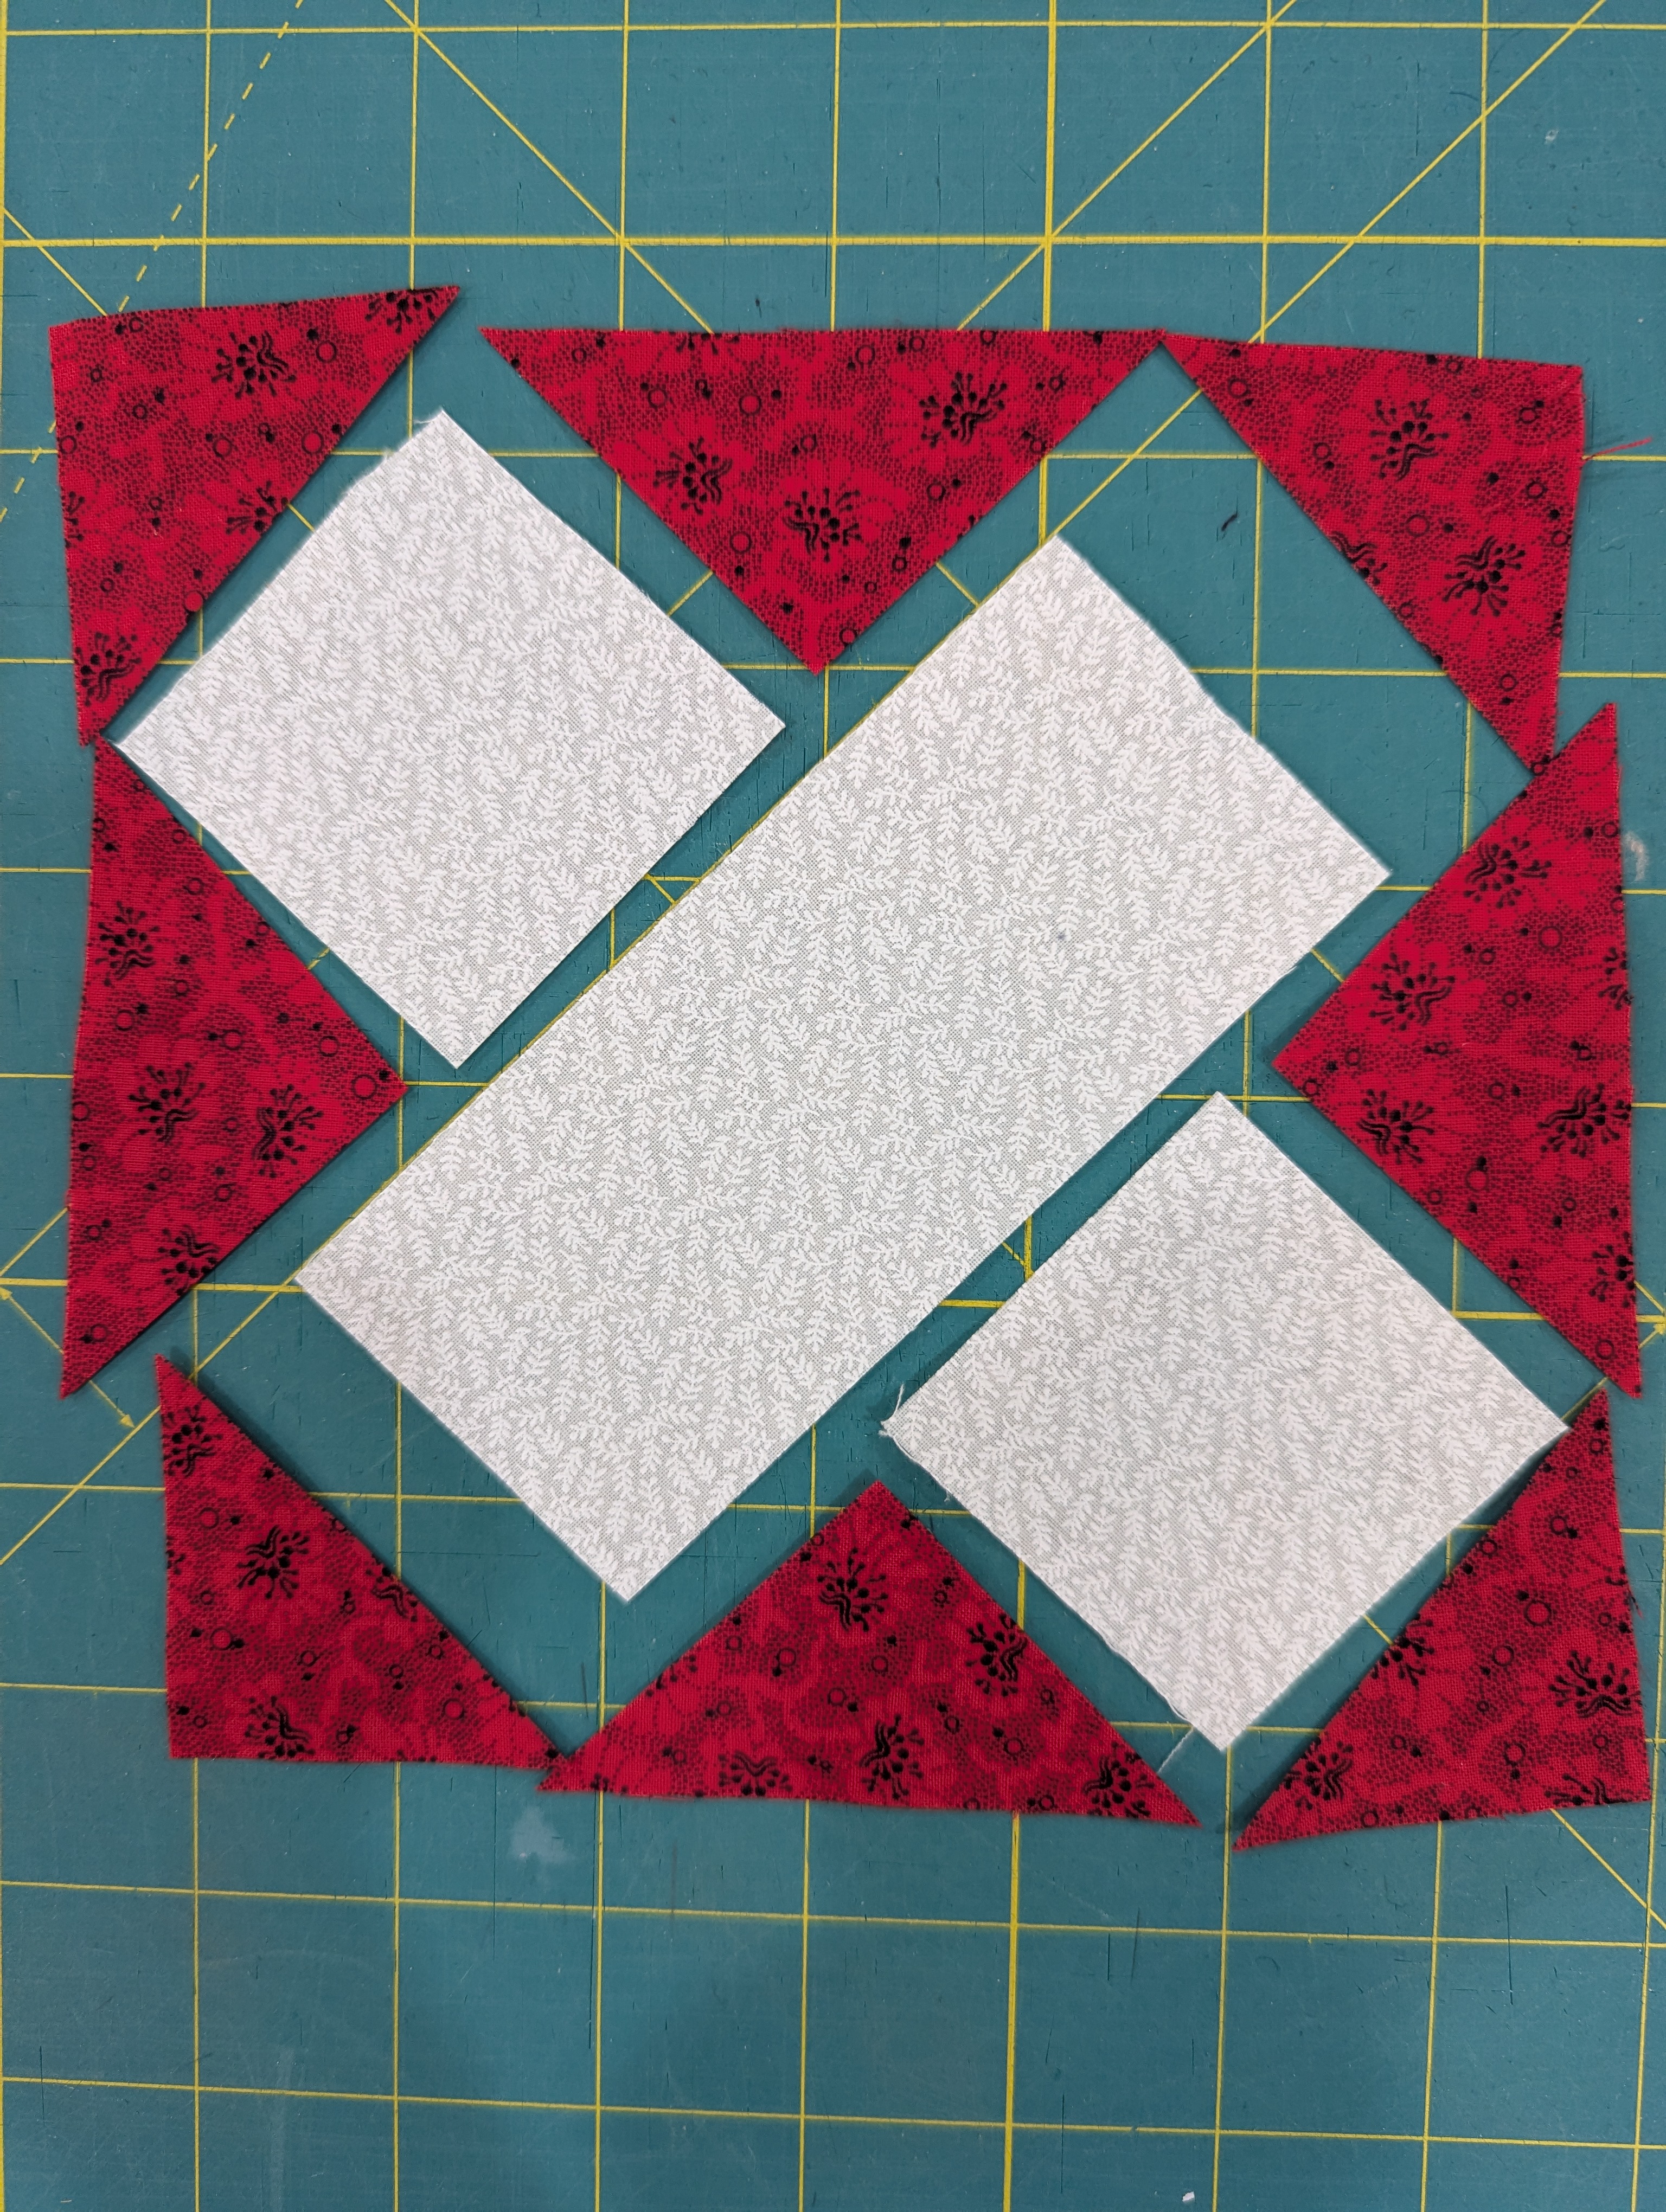
I am used to working with my rotary cutter and ruler to construct blocks. So I chose that option first from EQ8.
It looked straightforward, so I converted the decimals to fractions, cut my pieces and prepared to sew.
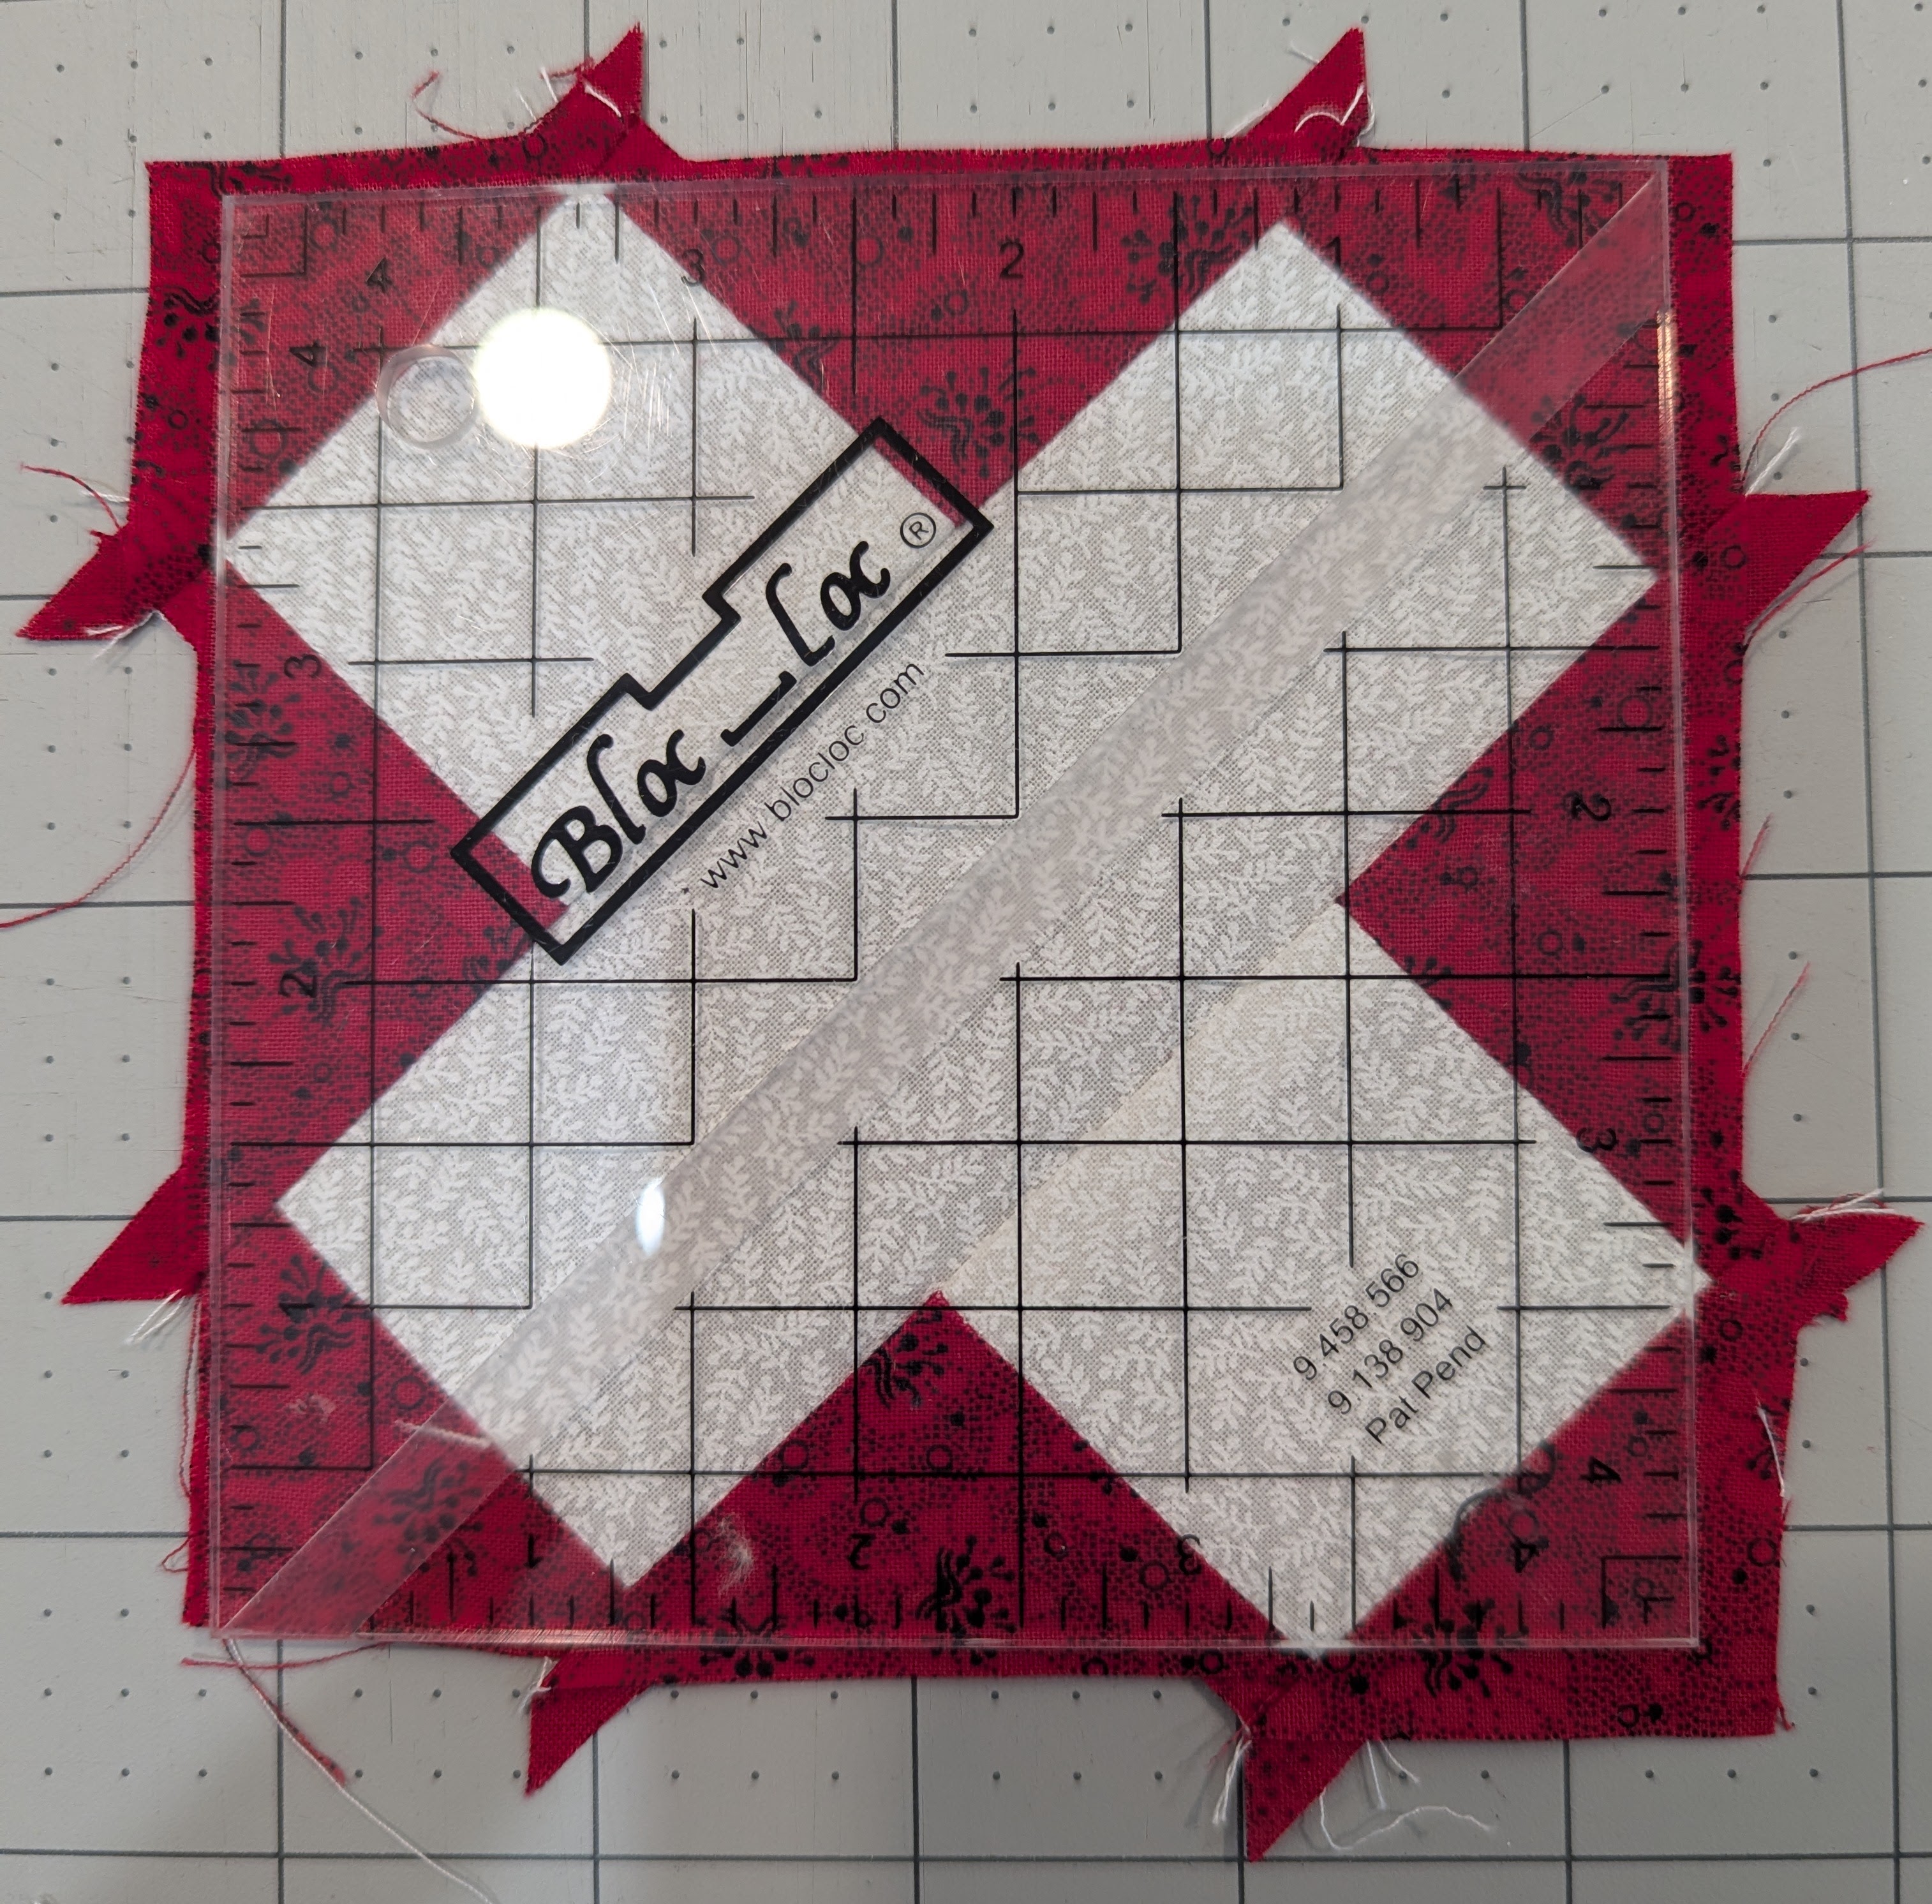
The blocks are to be 4.5″, so I found my only 4.5″ ruler, and checked it out. As you can see, it’s a little wonky. I definitely don’t have a quarter-inch seam allowance to use when I connect blocks with sashing at the end.
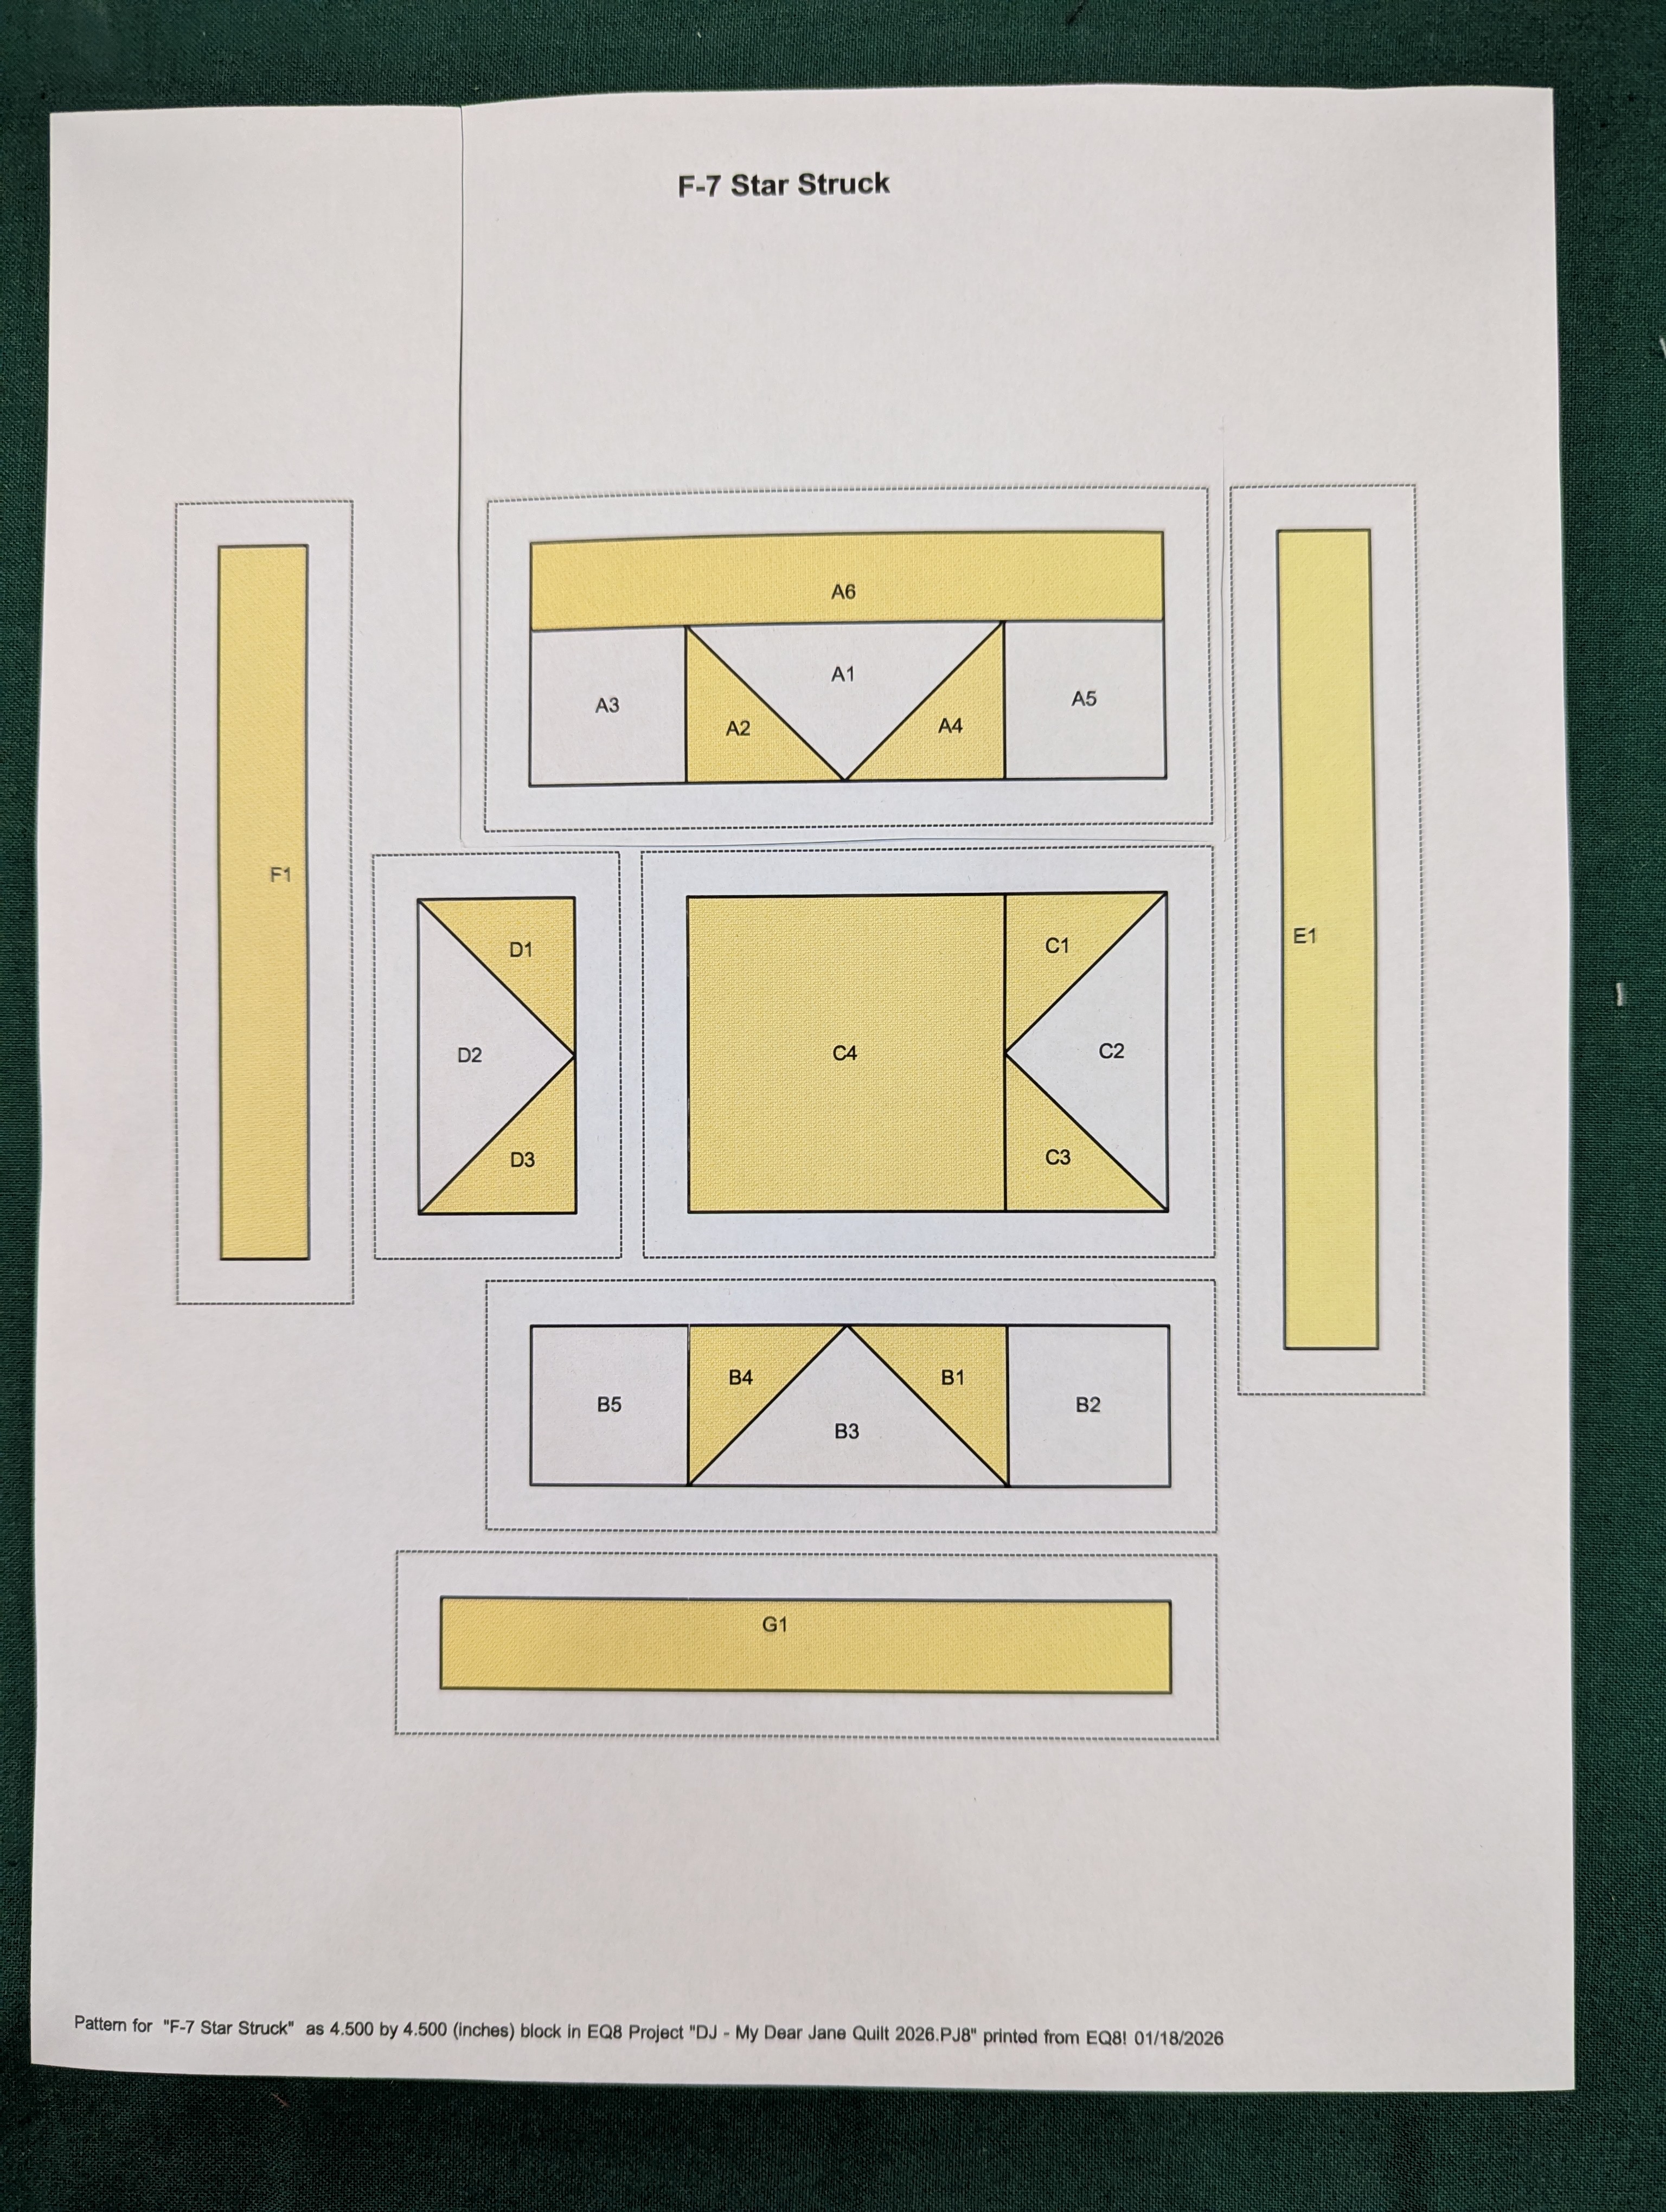
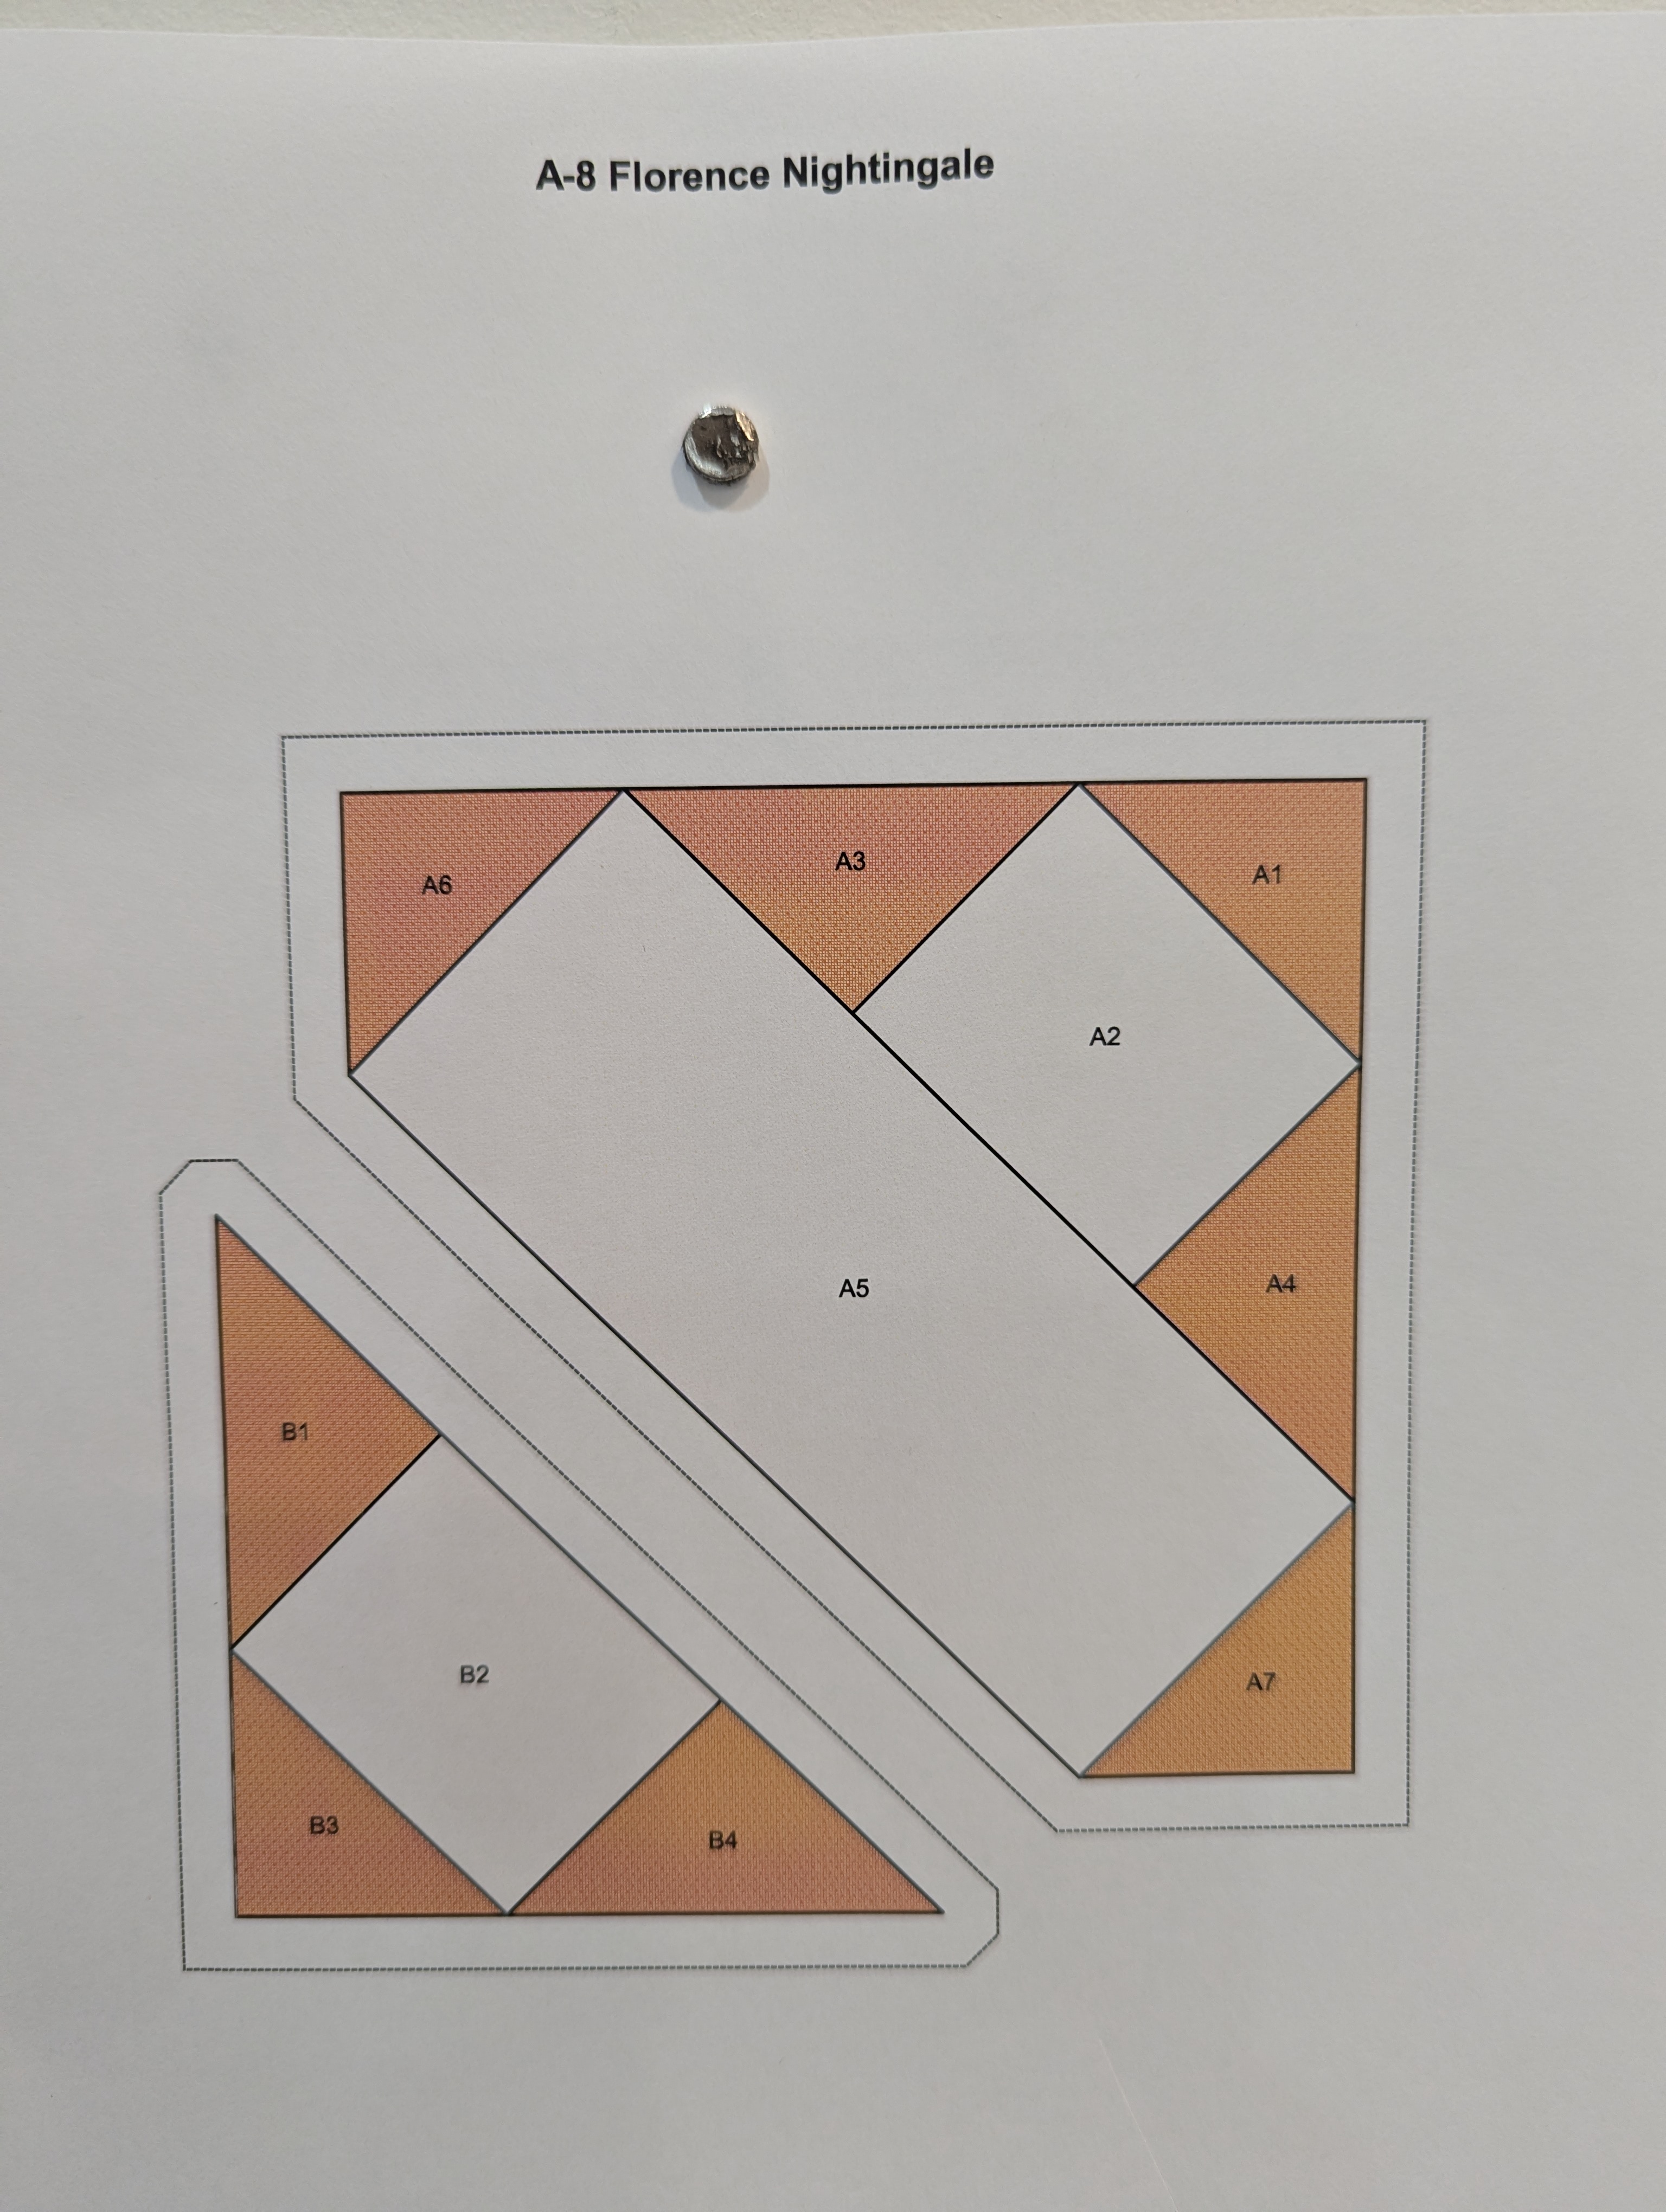
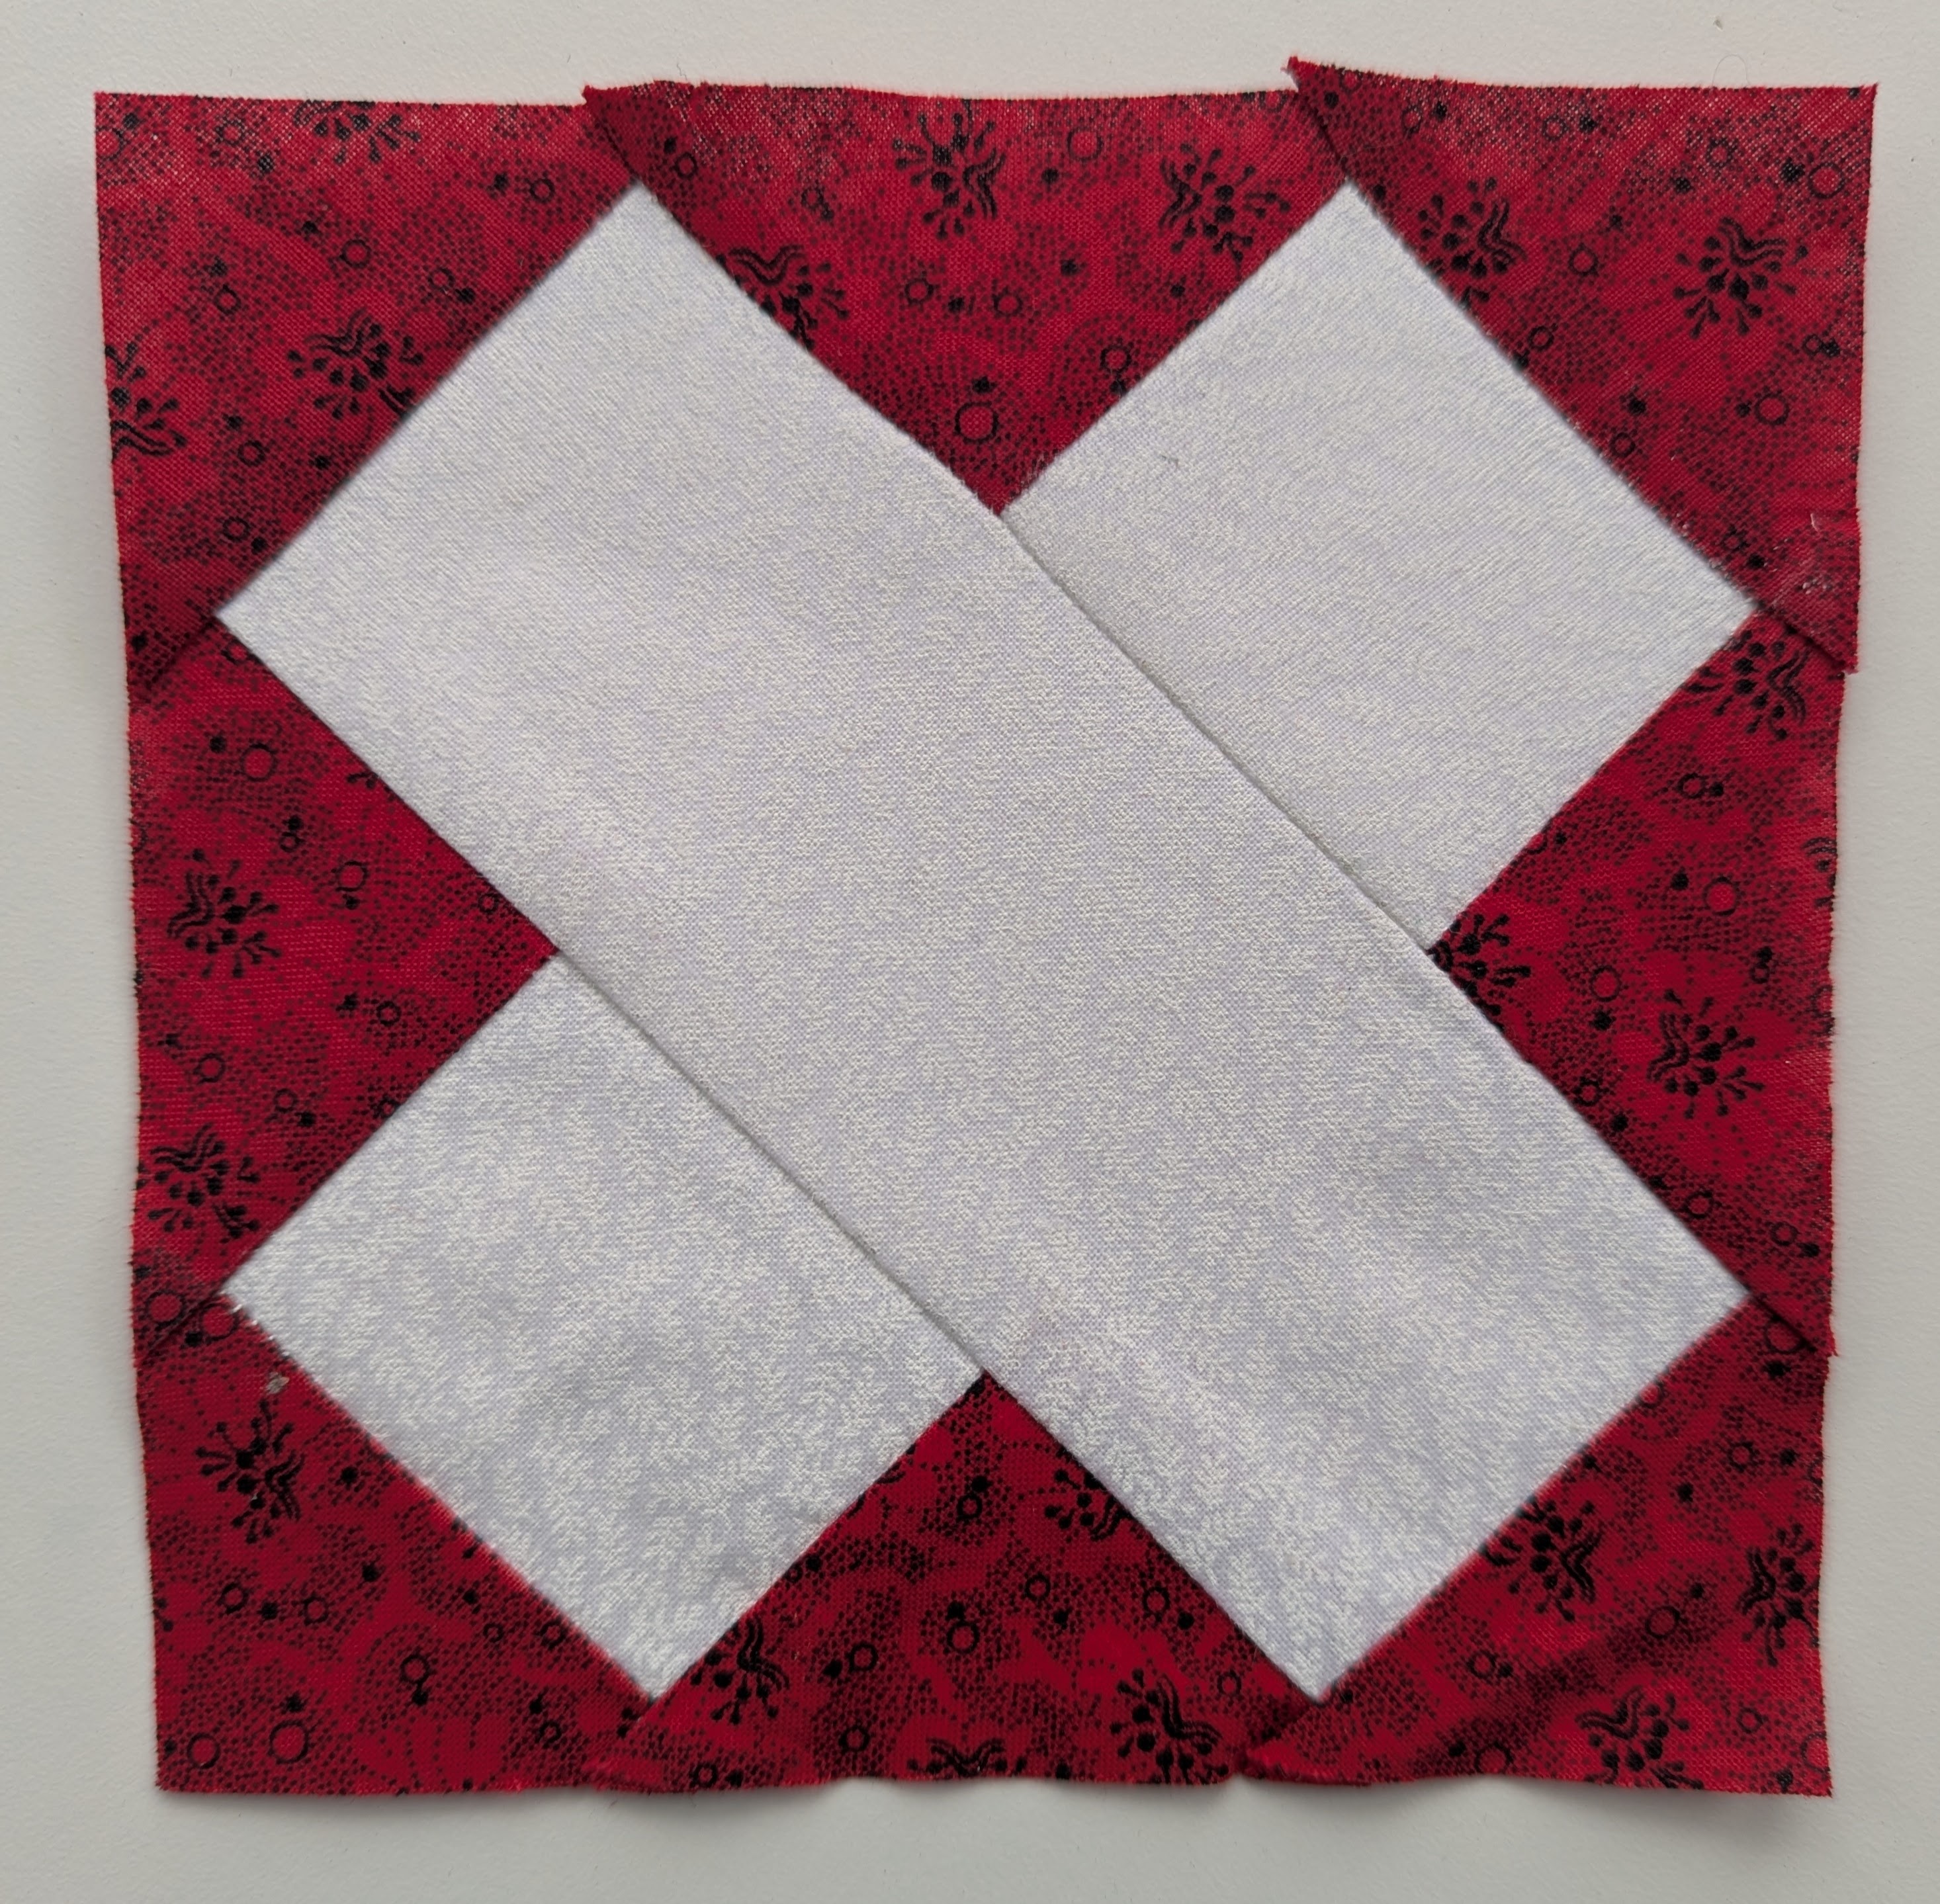
So, I then thought I should try out the foundation paper piecing (FPP) option:
I printed it on regular printer paper, and used the same fabrics:
This one is MUCH more accurate. Foundation Paper Piecing (FPP) should give me the ability to retain my points when I piece the quilt top.
Successes:
lovely contrast of white and red
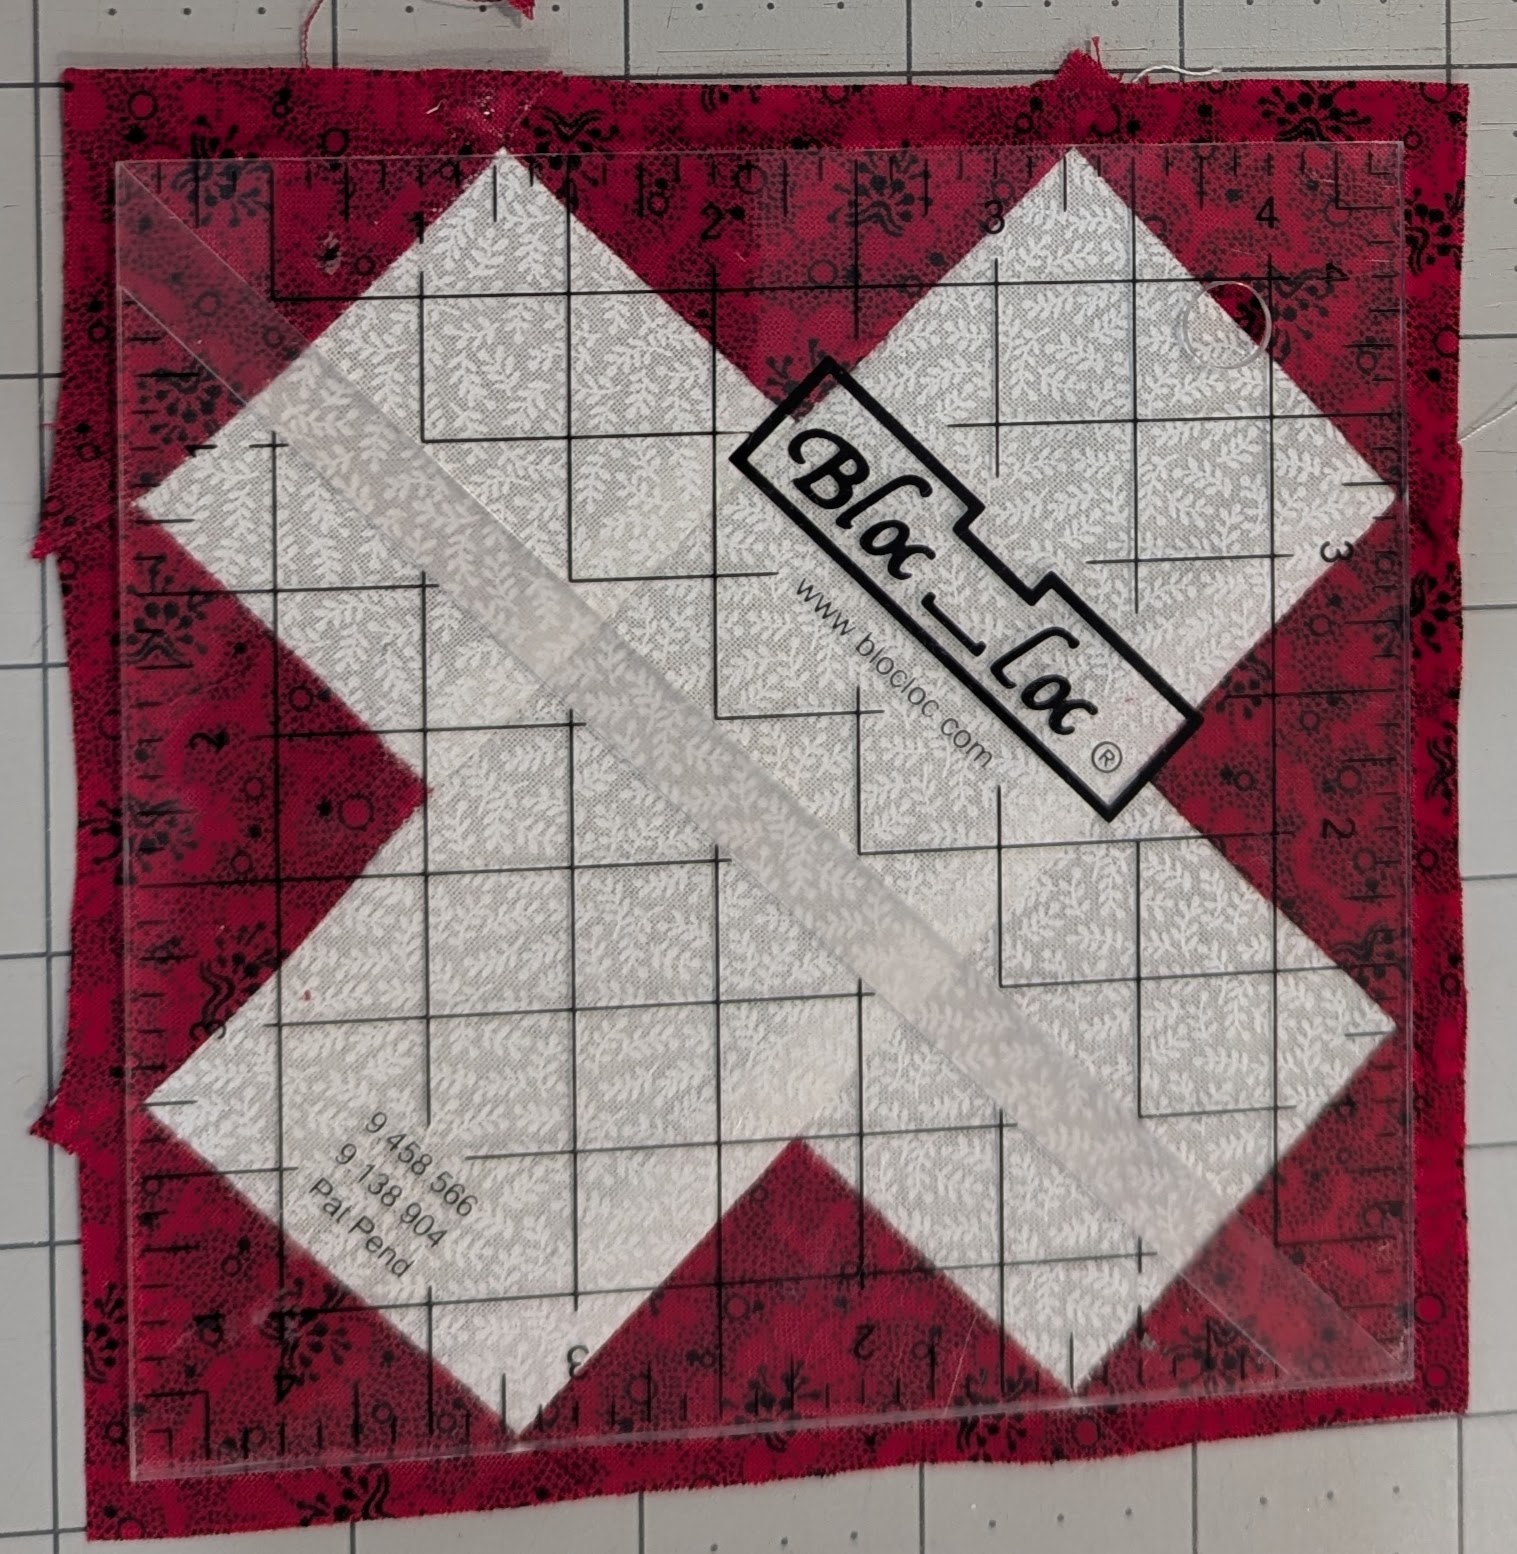
final block that is large enough to be trimmed to finished size
Challenges:
I will have more waste fabric using FPP rather than rotary cutting
I destroy the pattern when doing FPP, so I have no paper to file and document the block
And here’s what my quilt looks like so far:
I’m awaiting delivery of a new “Add-a-quarter plus” ruler, to help with the Foundation Paper Piecing. And I have also ordered liquid starch to use when tackling my needle-turn applique blocks. I have joined three Facebook groups and subscribed to several YouTube channels, in order to research techniques for each block as I encounter them. Hopefully this will speed up the process on some blocks, and ensure that I don’t need to make more than one version each time!
I was browsing YouTube this morning, and overheard a statement made by the narrator of a series of profiles of YouTubers called Rogue Reality, this one relating to Kate Jackson of the Last Homely House (https://youtu.be/XlZ8aXjzURM?si=5tvgfDof6kORN22y).
LEARNING ENOUGH TO BE DELIGHTED
I think that should be our goal in all learning. Aiming for perfection will inevitably result in frustration, but learning enough about something to reach that point of “delight” seems the best goal.
What if we took this approach with all our learning? We’d be more likely to encounter moments of delight in our life, and to discover those areas that we hadn’t considered “delightful”.
I will be hosting a workshop at the end of August, with a goal of having an item at the end of two hours that can be entered in our local fair. It is a wonderfully poorly-defined category within our fair list: “Quilt Block”. It doesn’t prescribe any size or method, so should permit each exhibitor to explore and submit a creation that “delights”.
We’ll touch on colour and fabric choices, methods of joining, and (briefly) on what the judge will be looking for.
But…. We don’t do our creative work for the judge, but for ourselves. So, I will encourage our participants to be as innovative as they wish, and hopefully we’ll end up with a wonderful display of needlework. Return to this blog after August 27, 2025, and I’ll share some of our creations!
It’s back to school for me yet again. This year I’m working as a Vice Principal in an Alternative School, providing secondary school courses to students from grade 9 to 12. It’s an amazing place, and here’s why:
Safe Alternate Timetable
We have a consistent Monday to Friday timetable, rather than the hybrid model, with its two 2.5 hour classes each that run for a week and then switch with the other two for the following week. Our students attend either for two hours in person in the morning or two hours online in the afternoon, once a week for each credit. They are working independently for the balance of the week, with the goal being to complete two credits each quadmester.
This means that we have very few people in the building, with very small classes in person, so students and staff feel much less at risk of COVID exposure. And students always have the option to shift to online, should the degree of risk change.
No Deadlines
While the goal is to complete two credits each quadmester, our students have the option to “roll over” their students into the next. Our schedule will be the same from September to June, so students can anticipate support until they complete their credits. They can even roll their courses into the following school year, if needed. Our teachers have structured their course content to provide both direct instruction during their two-hour classes, and rich supportive materials in their Virtual Learning Environment (either D2L/Brightspace or Google Classroom). So control is truly in the hands of our students.
There is really no reason why this couldn’t be the case in our traditional secondary schools, but we have strong cultural norms that function to deny flexibility to our students.
Personalization
Because we have intake at multiple points in the year, and students are progressing at different paces, our teachers provide individual programs and support to each student. Our class sizes are very small, and our teachers are able to customize the program for each student.
Our students thrive in this environment, with very few returning to a traditional secondary school, but remaining with us until graduation.
First Names
All of our staff are addressed by their first names. This serves to “flatten” the organization, and puts everyone on the same level. I may be the Vice Principal, but I’m “Terry”, not Dr. Whitmell. Our Principal oversees seven alternative program sites, so she is here only a few times a week, but she is known by her first name, as is our custodian, the office staff, and our educational assistants.
This is a strong cultural indication to our new students that they are not in a traditional school, and with that realization comes hope and optimism that the rest of the school will be different as well.
Optimism
In all that we do, the focus is on success. Missing are detentions, penalties, suspensions, and many of the control mechanisms of a traditional secondary school. Instead our teachers can, as our school vision says, “Inspire Success, Confidence, and Hope”. Our students may remain with us until age twenty-one, and with a small teaching staff of two dozen they are able to forge strong relationships.
Support
We provide a range of programs, from grades 7 to 12, serving students whose needs can be academic, social, emotional or just a need for a safe place. Despite what we read in the media, students who are suspended or expelled are not abandoned by the education system. Instead they are enrolled in one of our programs, and are able to access Child and Youth Workers, Social Workers, and a range of community agencies as well.
A Safe Harbour
With all the uncertainty and fear we have been experiencing in the past eighteen months, I am thankful that I am working and contributing in such an amazing place!
My last post, Quilting and Math, was discussed this week by Doug Peterson in This Week in Ontario Edublogs, and with Chey, Pav and Stephen on VoicEd Radio. They made connections to other types of needlework, and they inspired me to look at my own projects for more connections to mathematics.
I’ve been crocheting (aka “hooking”) since I was about twelve. It appealed to me in the same way that Bach and ballet appealed to me: structured, beautiful, and satisfying.
Squares
My first crocheting projects were “granny squares”, which were very popular in the 1970’s. They begin with a central ring, into which you stitch clusters of three double crochet stitches, separated by single chain stitches. Here’s an afghan that I made in university for a boyfriend, who broke up with me as I was working on it. I decided to use it as my bedspread in residence, and it has travelled with me since.
Granny Square Afghan
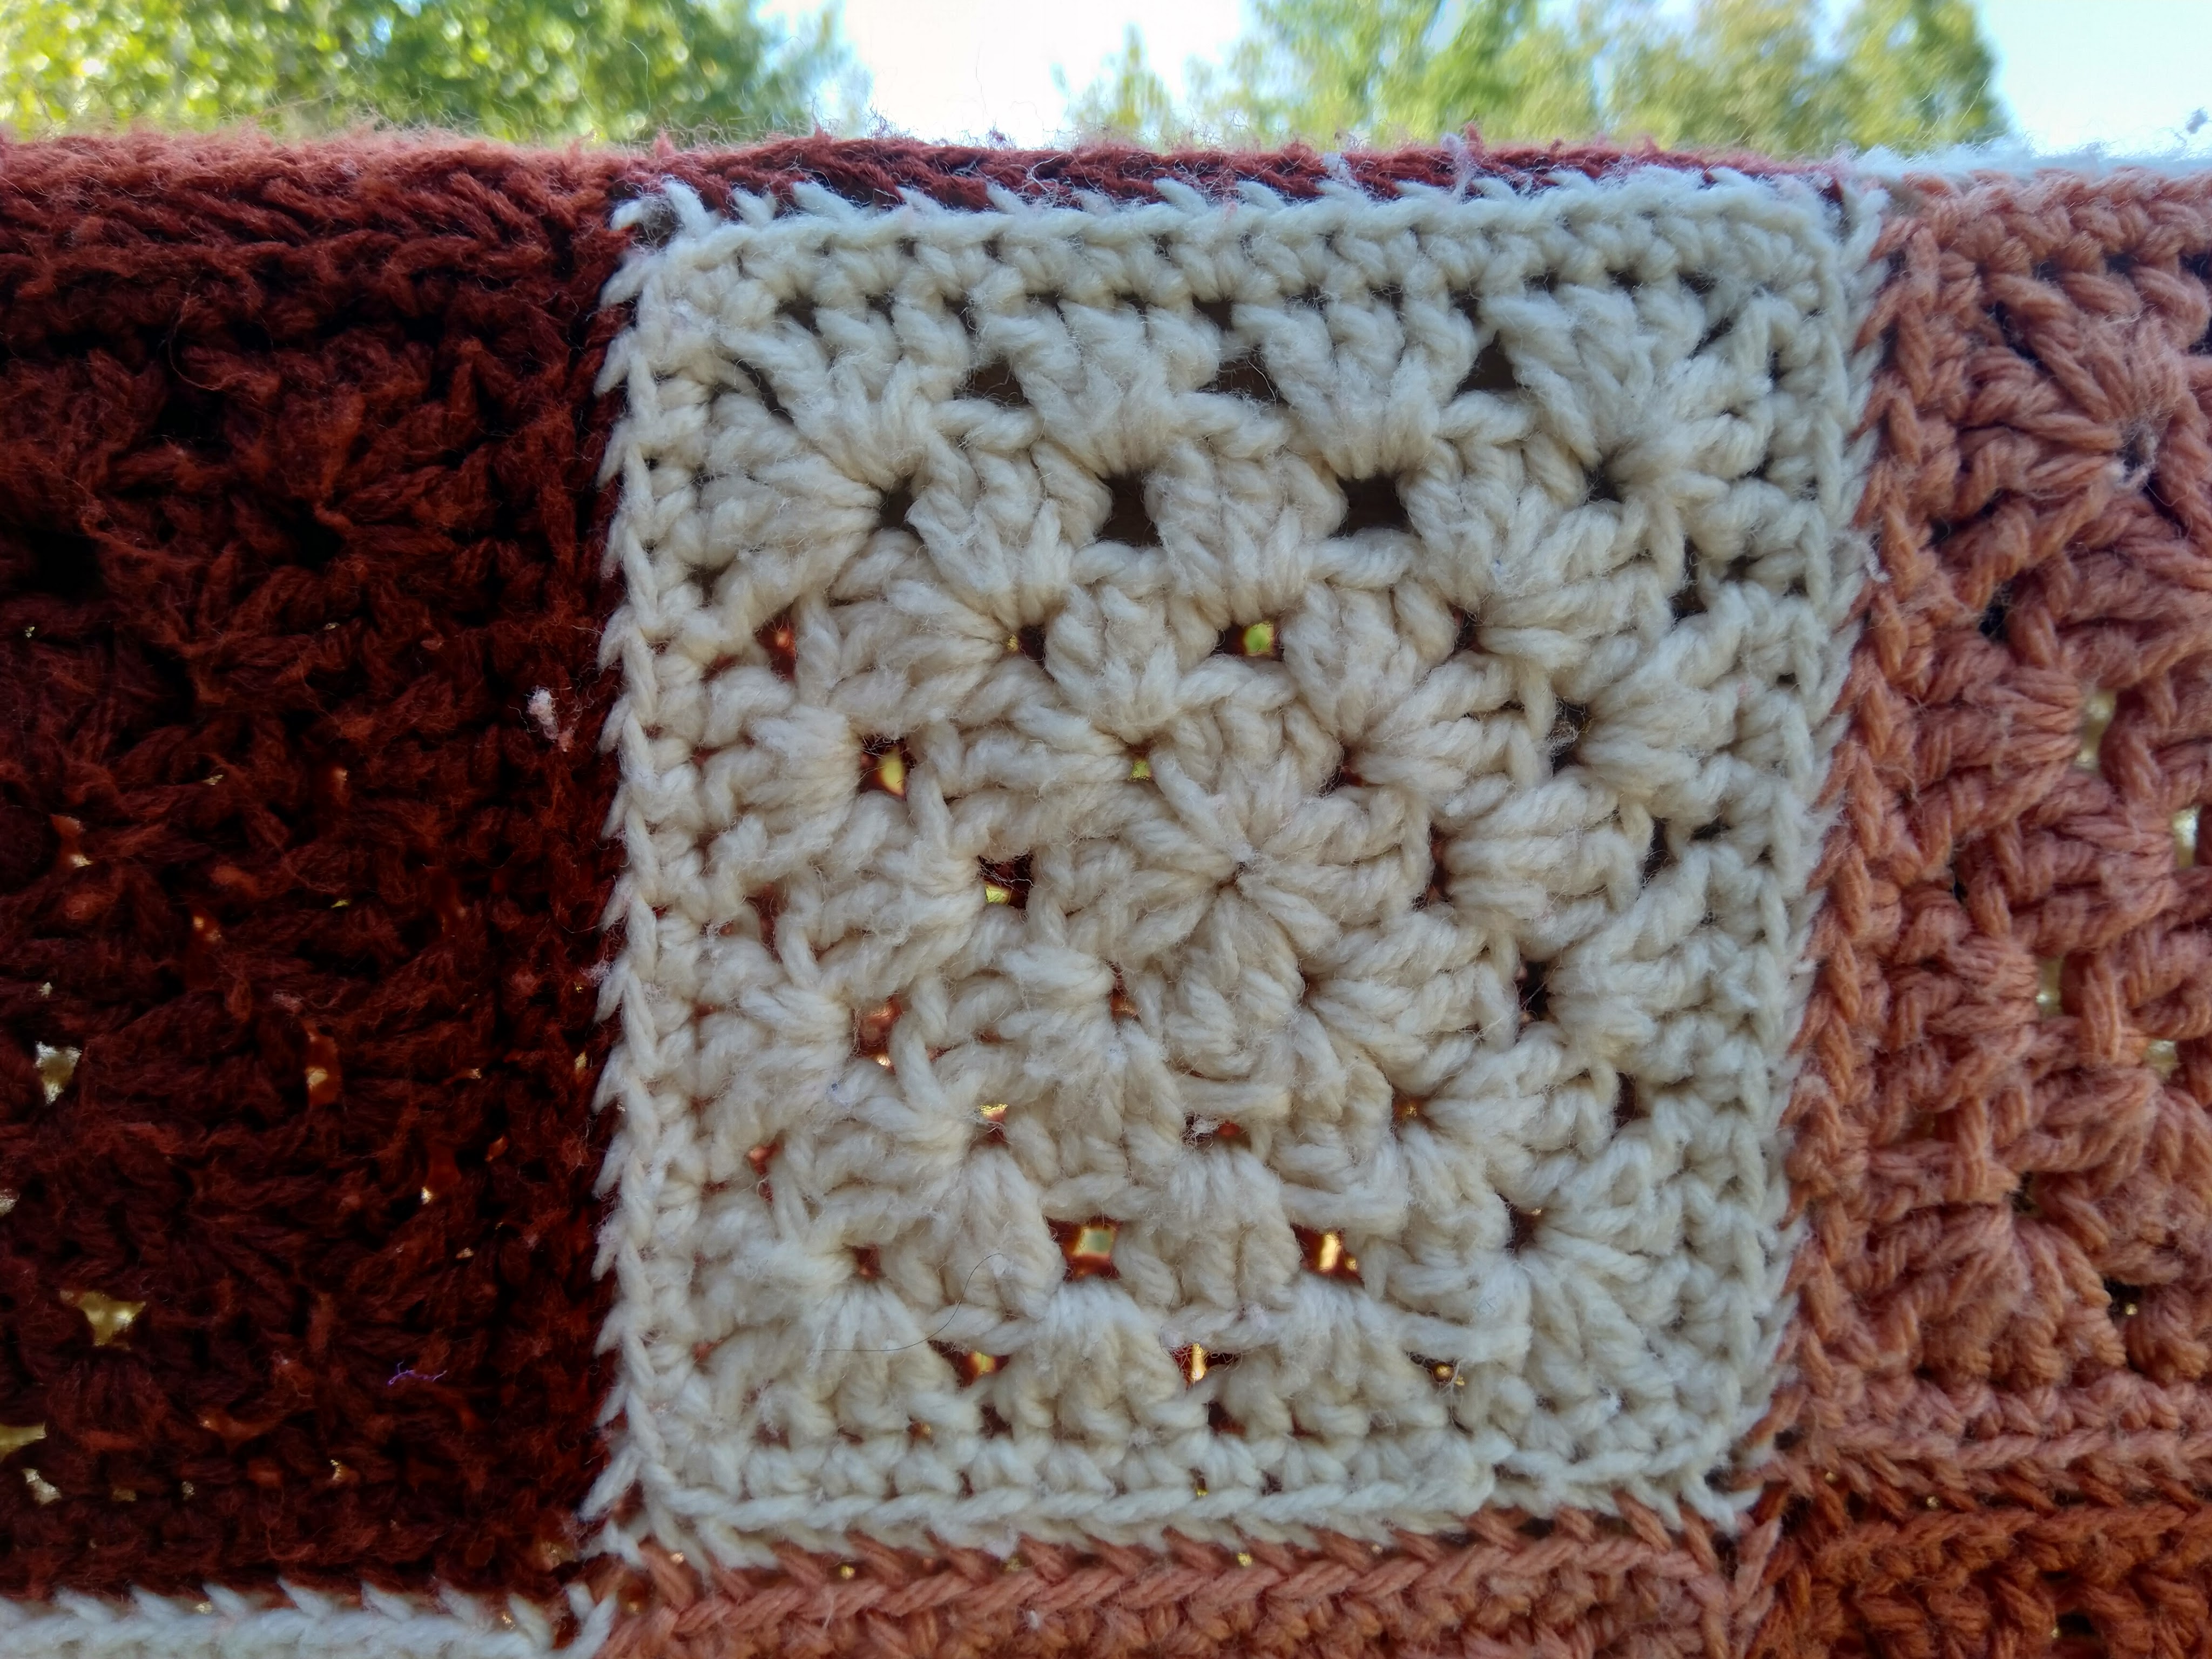
You can see, in this detailed image, how there are four clusters in the first round, eight in the second, twelve in the third, and so on. The corners can be one to three chains, depending on how tight you crochet, and how flat you need your fabric to lay.
Granny Square Detail
Here’s a baby afghan, made from one very large granny square:
Baby Granny Square
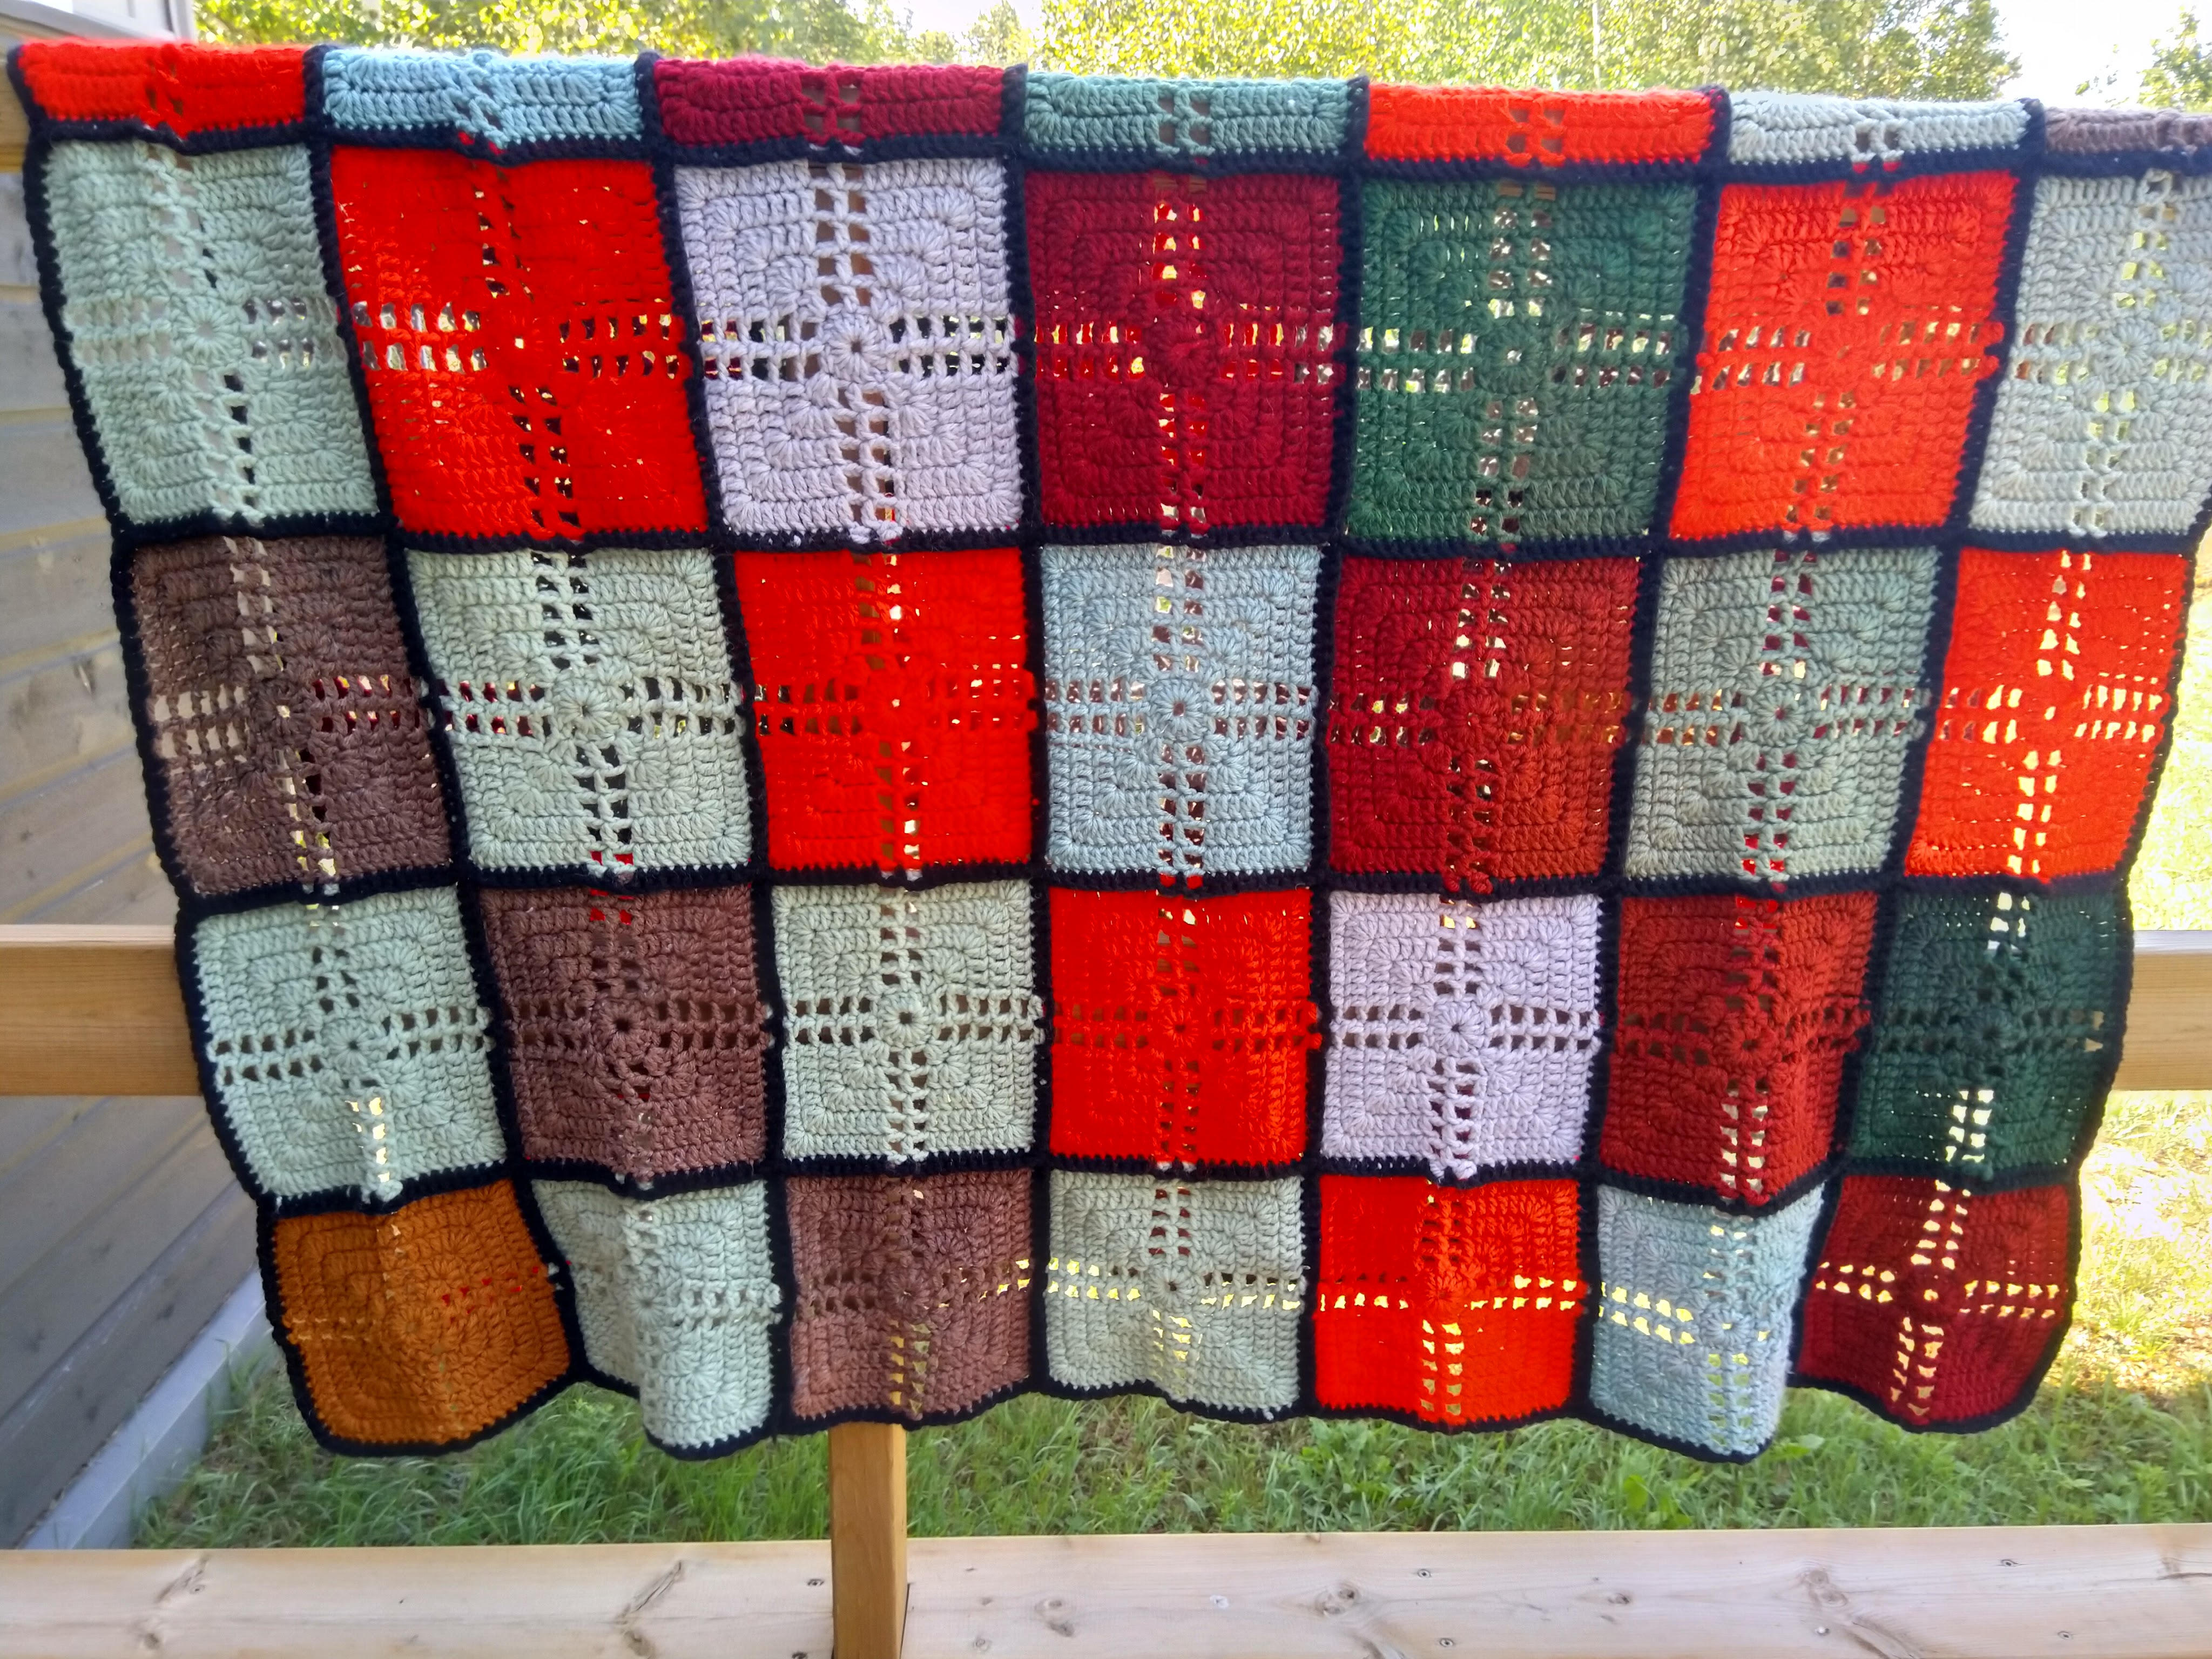
By combining more than three double crochets in a cluster it is possible to create variations on the granny square, as seen in this city block pattern:
Circles
You don’t have to make squares when you work from a central ring. You can add chains, and other stitches, and create shapes borrowed from botany:
Doily Detail
Rows
Some crochet projects begin with a foundation chain, and then proceed in rows. These rows can then be made to “zigzag”, through the addition of clusters of stitches at the “zig”, and then skipping stitches on the “zag”.
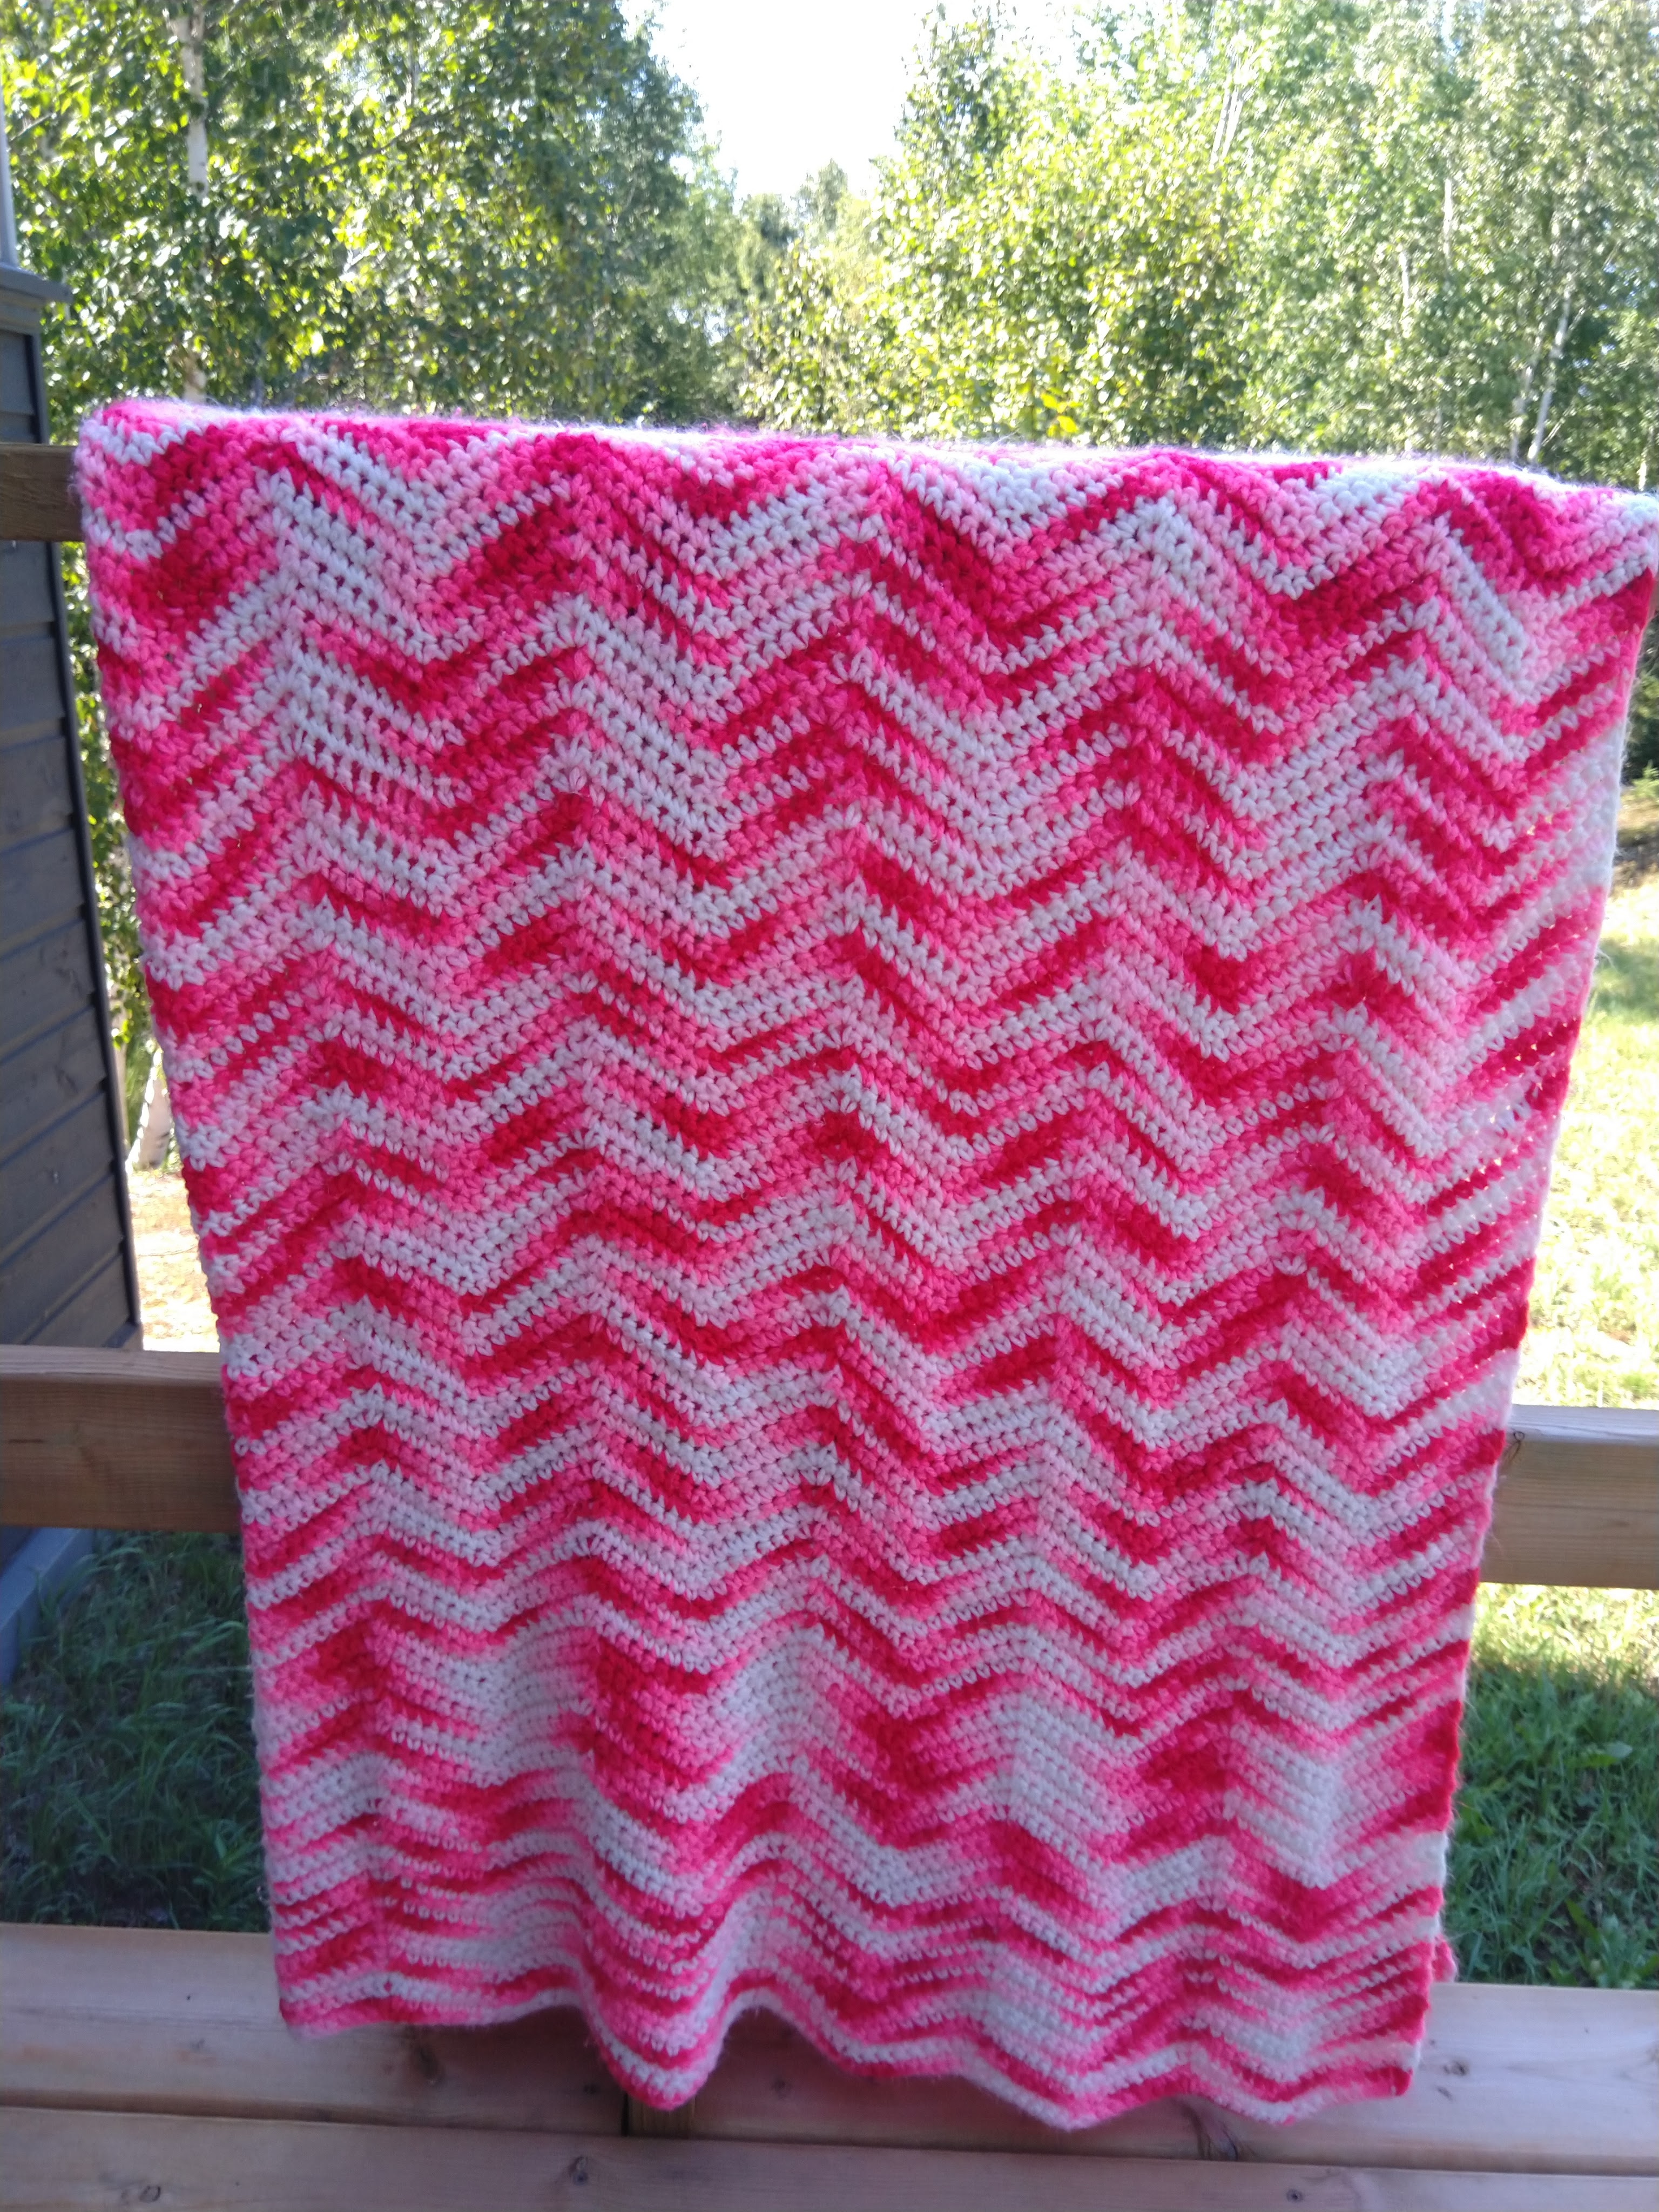
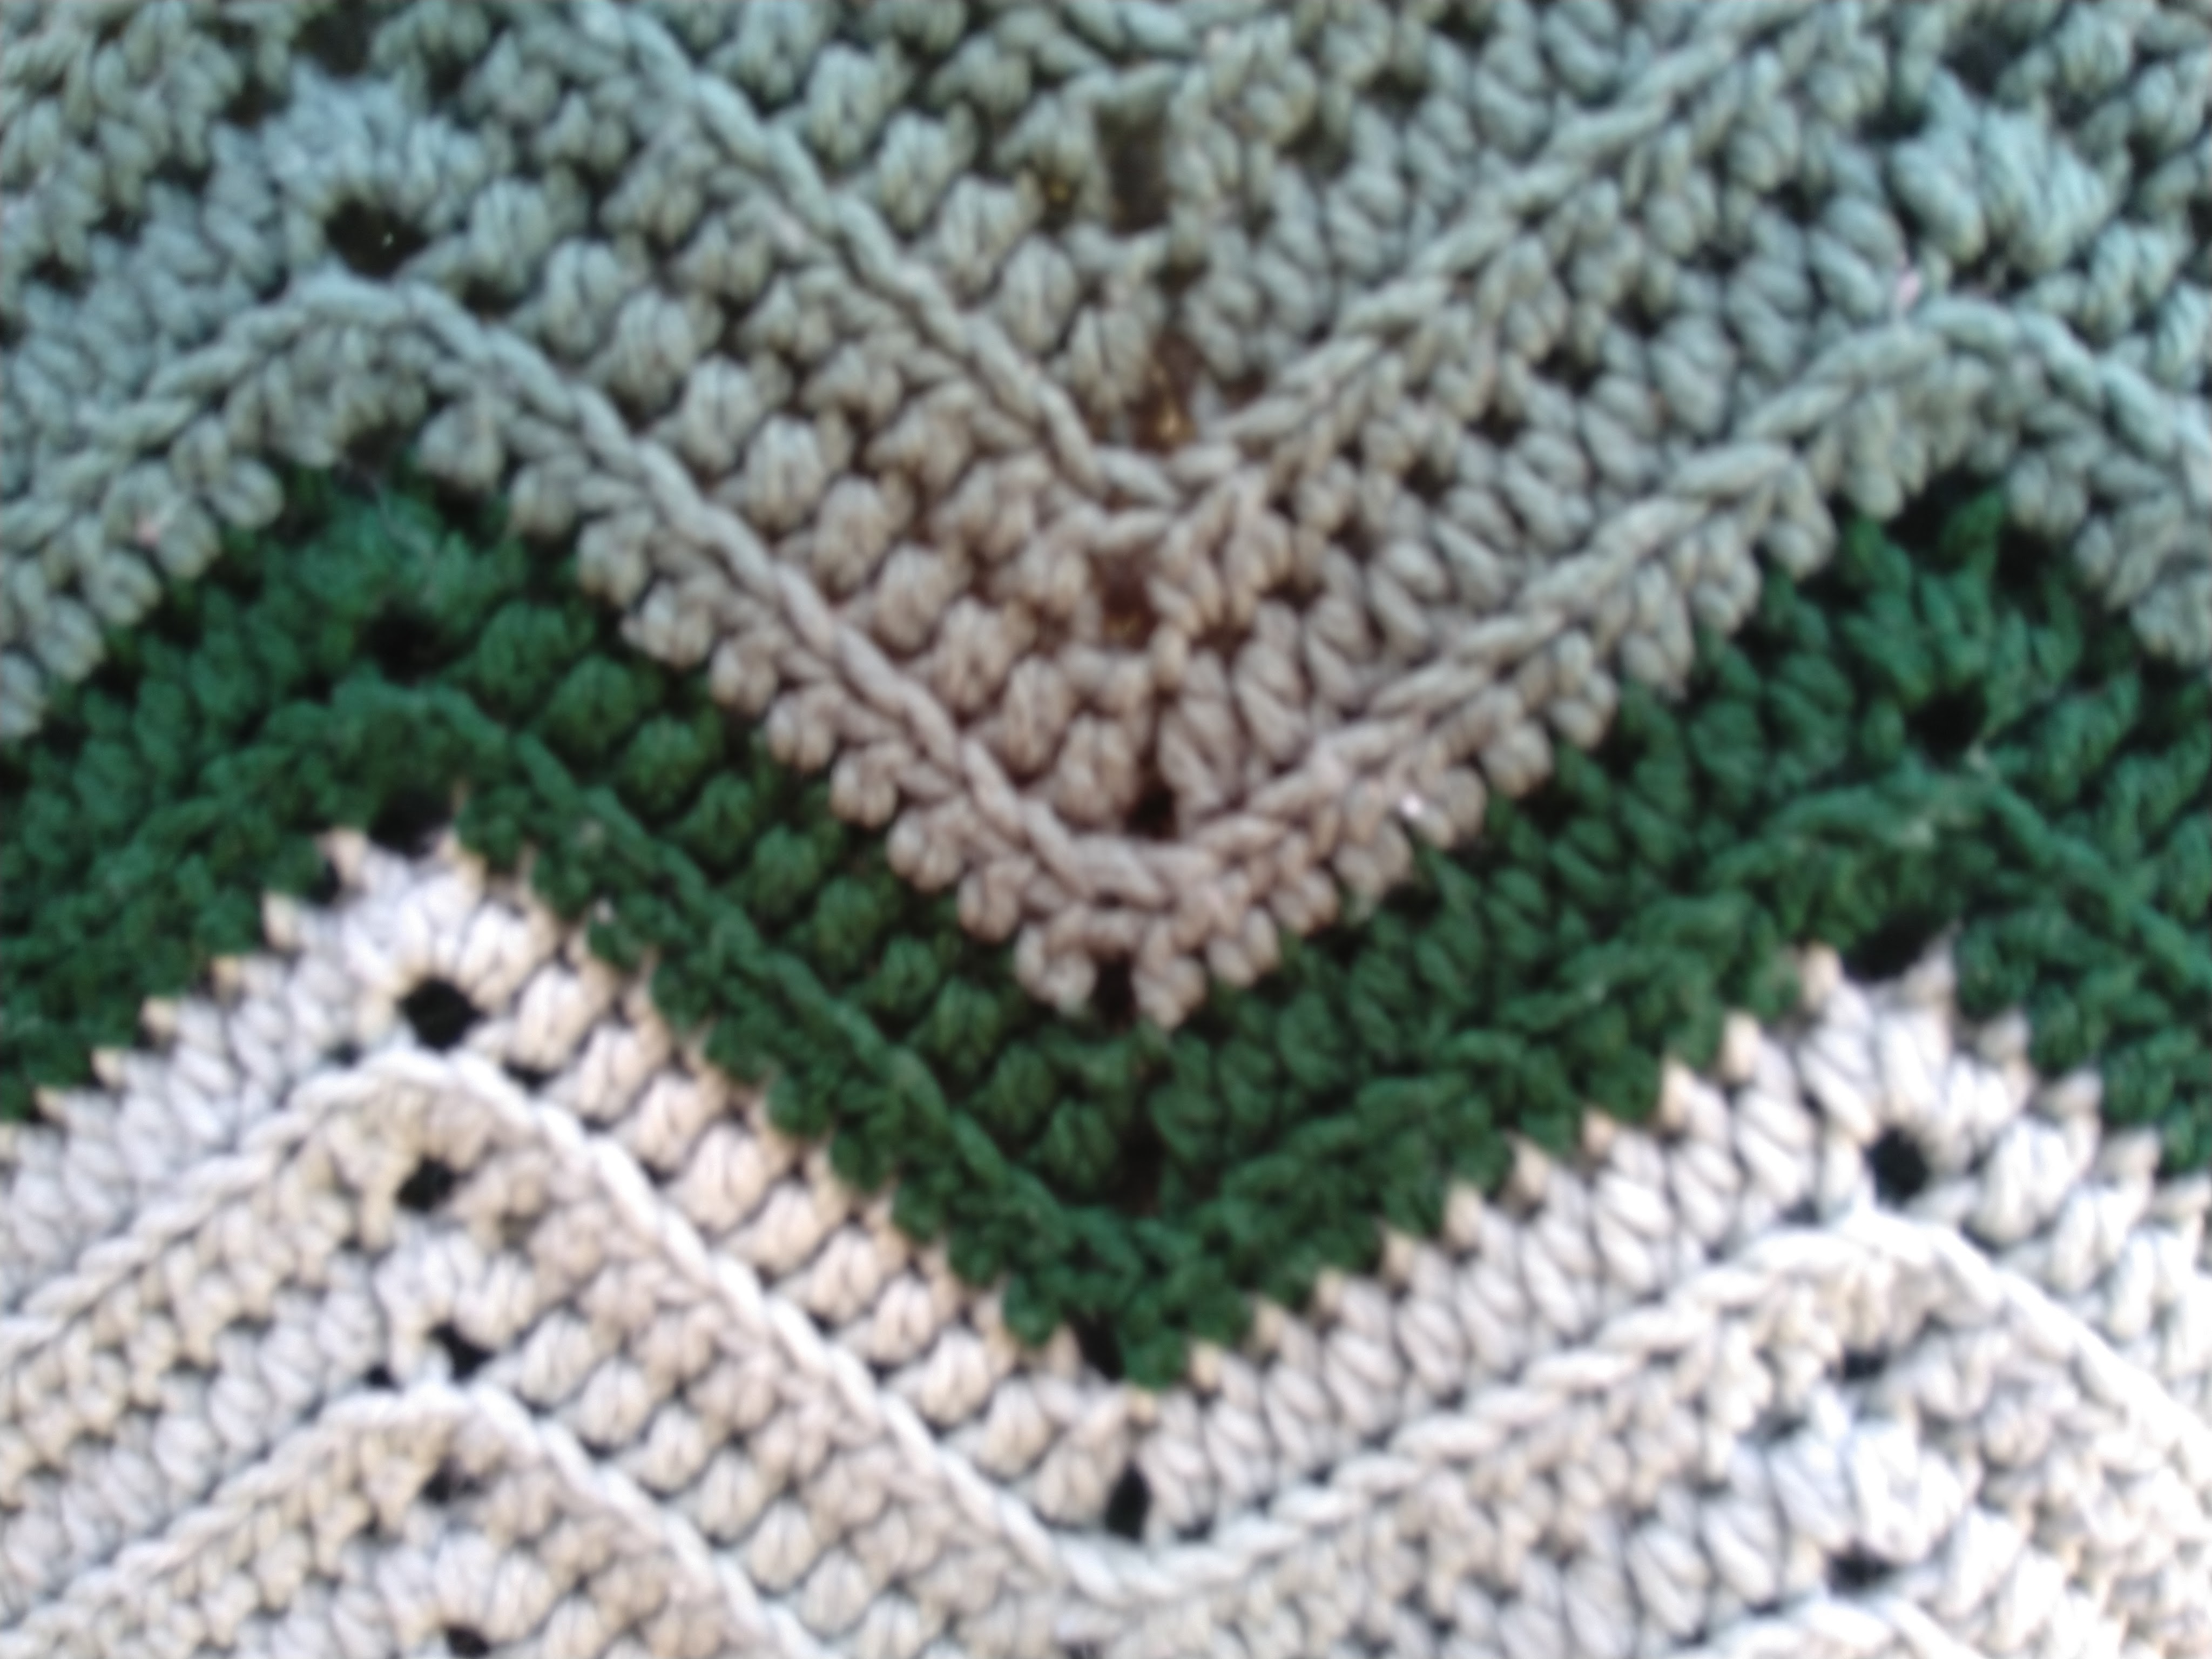
These afghans were stitched in continuous rows. The pink variegated afghan is sets of single crochets, and was made by my grandmother in the early 1970’s. The green stripes are half-double crochets, done in the back loop of the stitch to create a ribbed effect. The look of the “zigzag” is determined by the stitch height, with single crochet being the shortest, and double crochet the tallest. If you look closely you can see small triangular voids that are formed as the rows pivot.
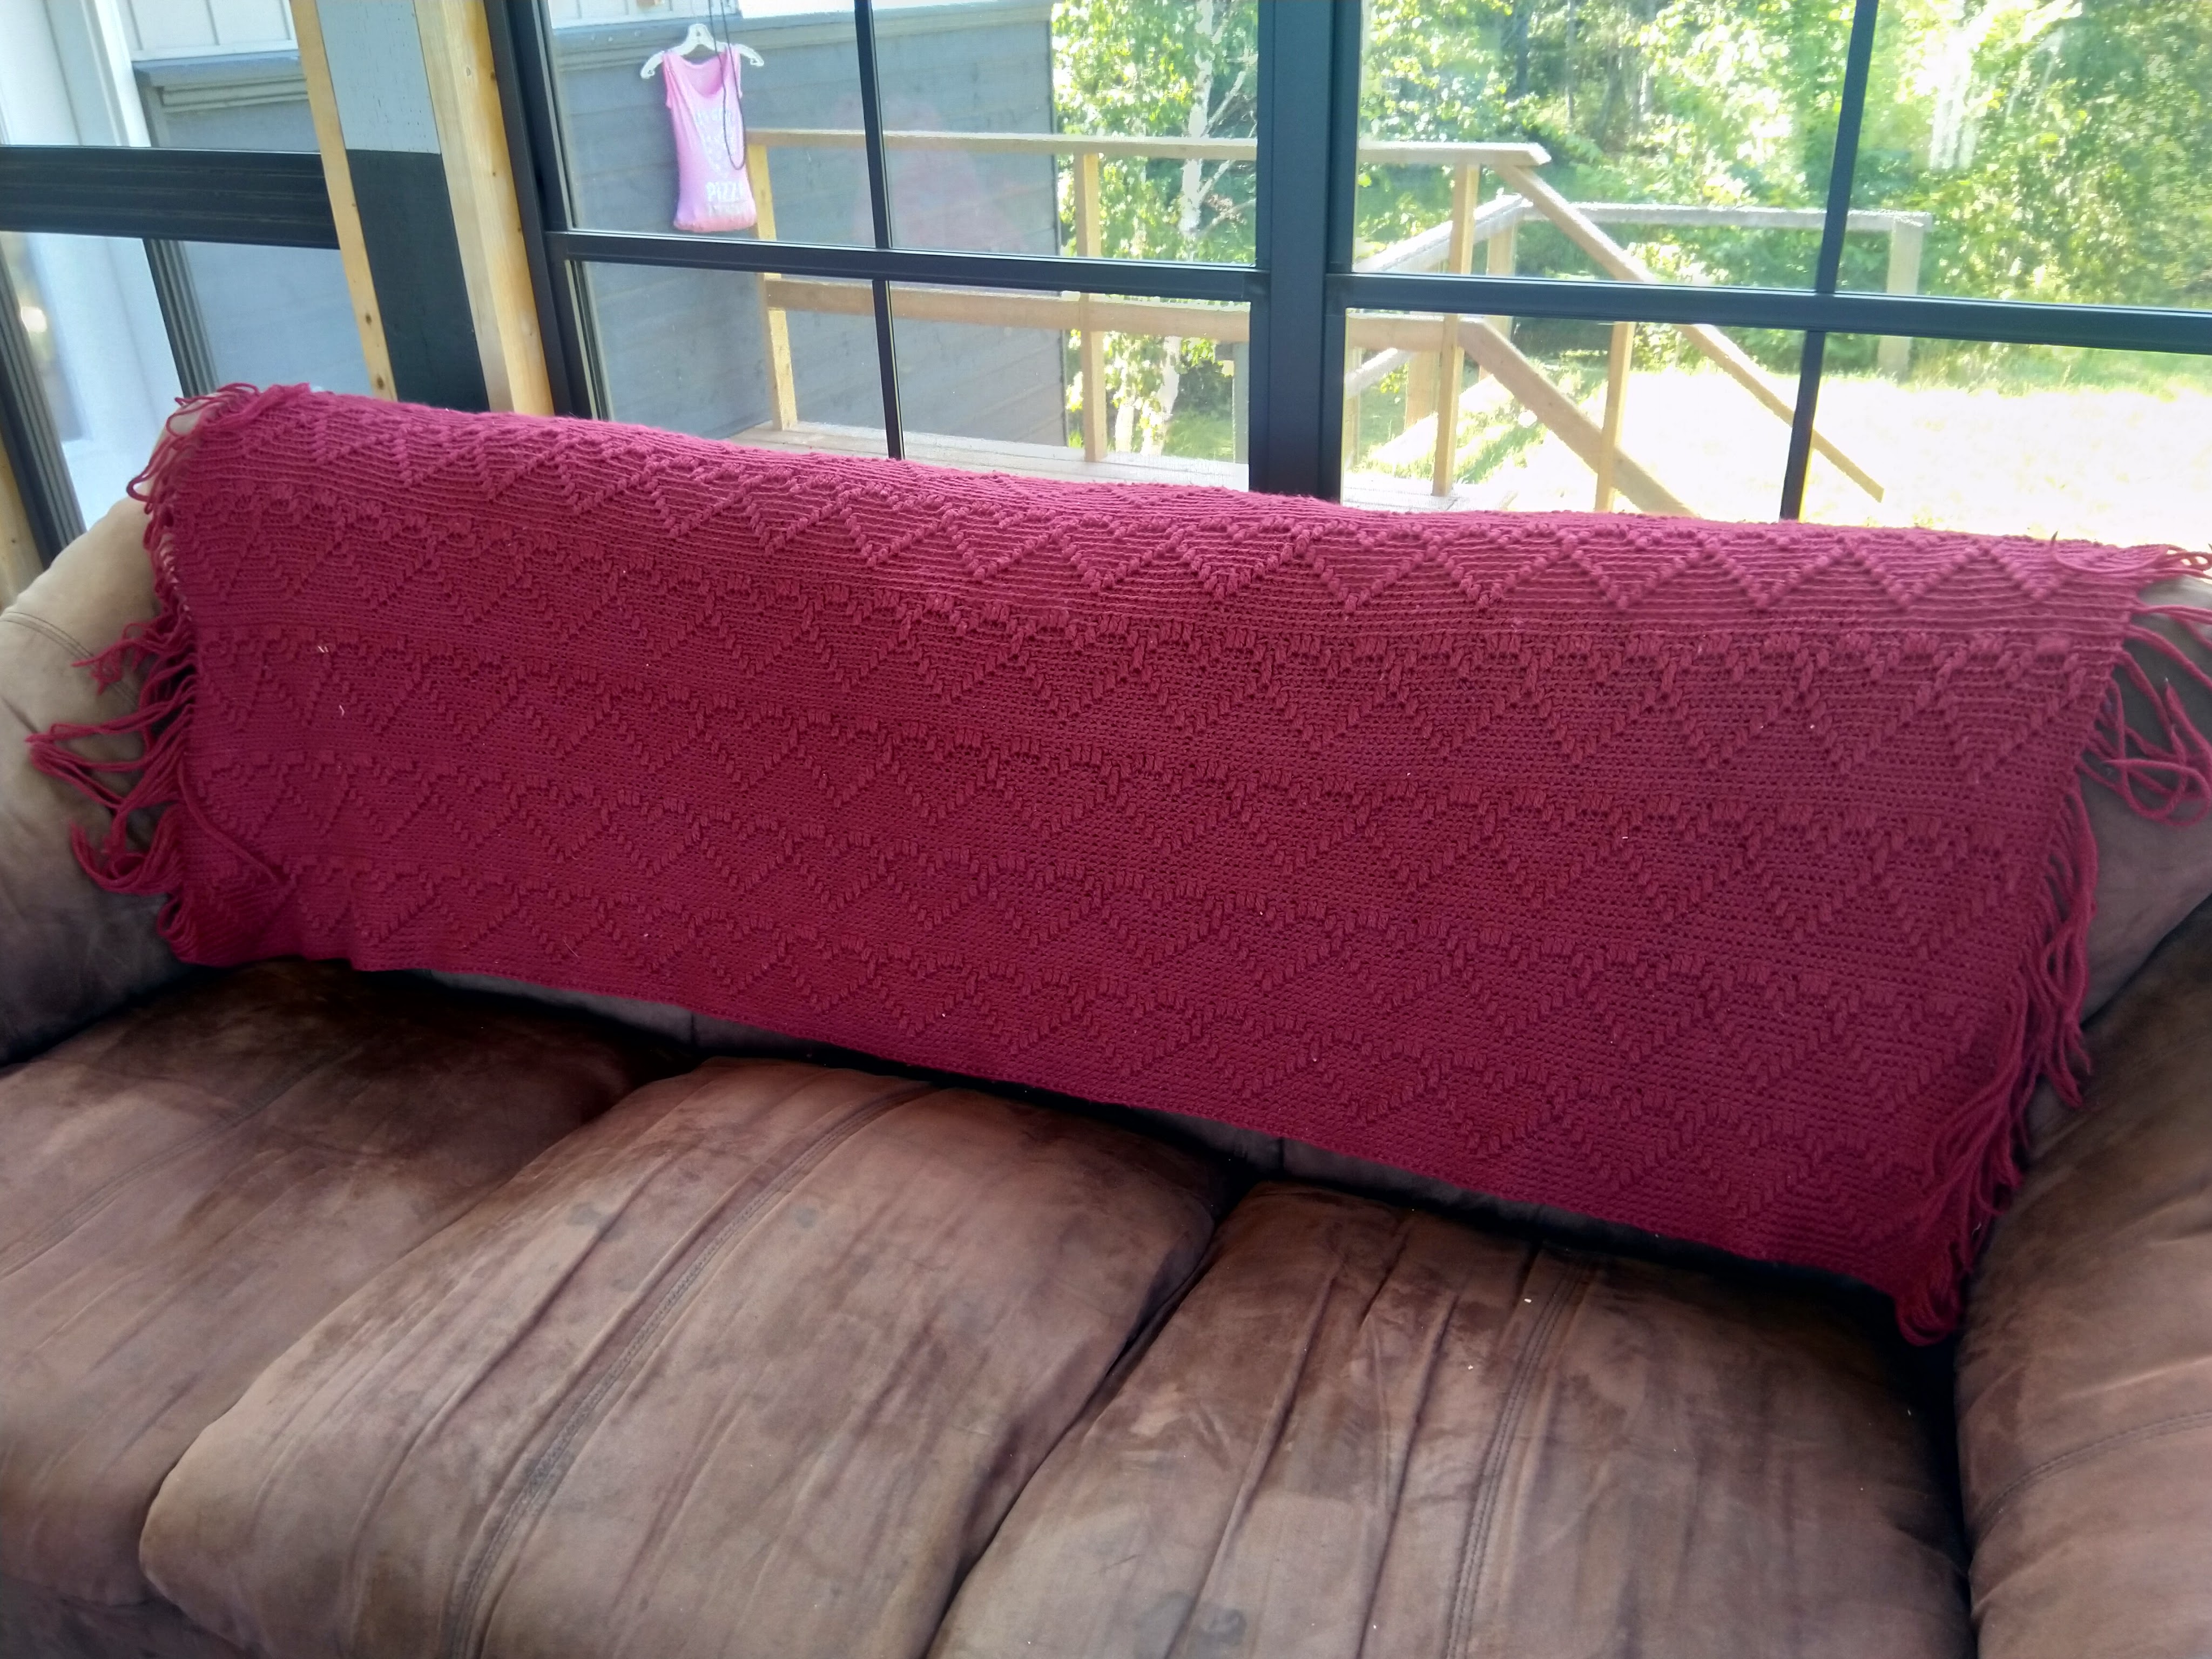
You can also crochet in rows where you always begin at the same side, and cut the yarn at each end to create a fringe. In this case the pattern is based upon single crochet stitches, with double crochet stitches that extend down to previous rows to create the hearts. This technique layers stitches on top of those behind, creating a texture that is very unforgiving if you mis-count your stitches!
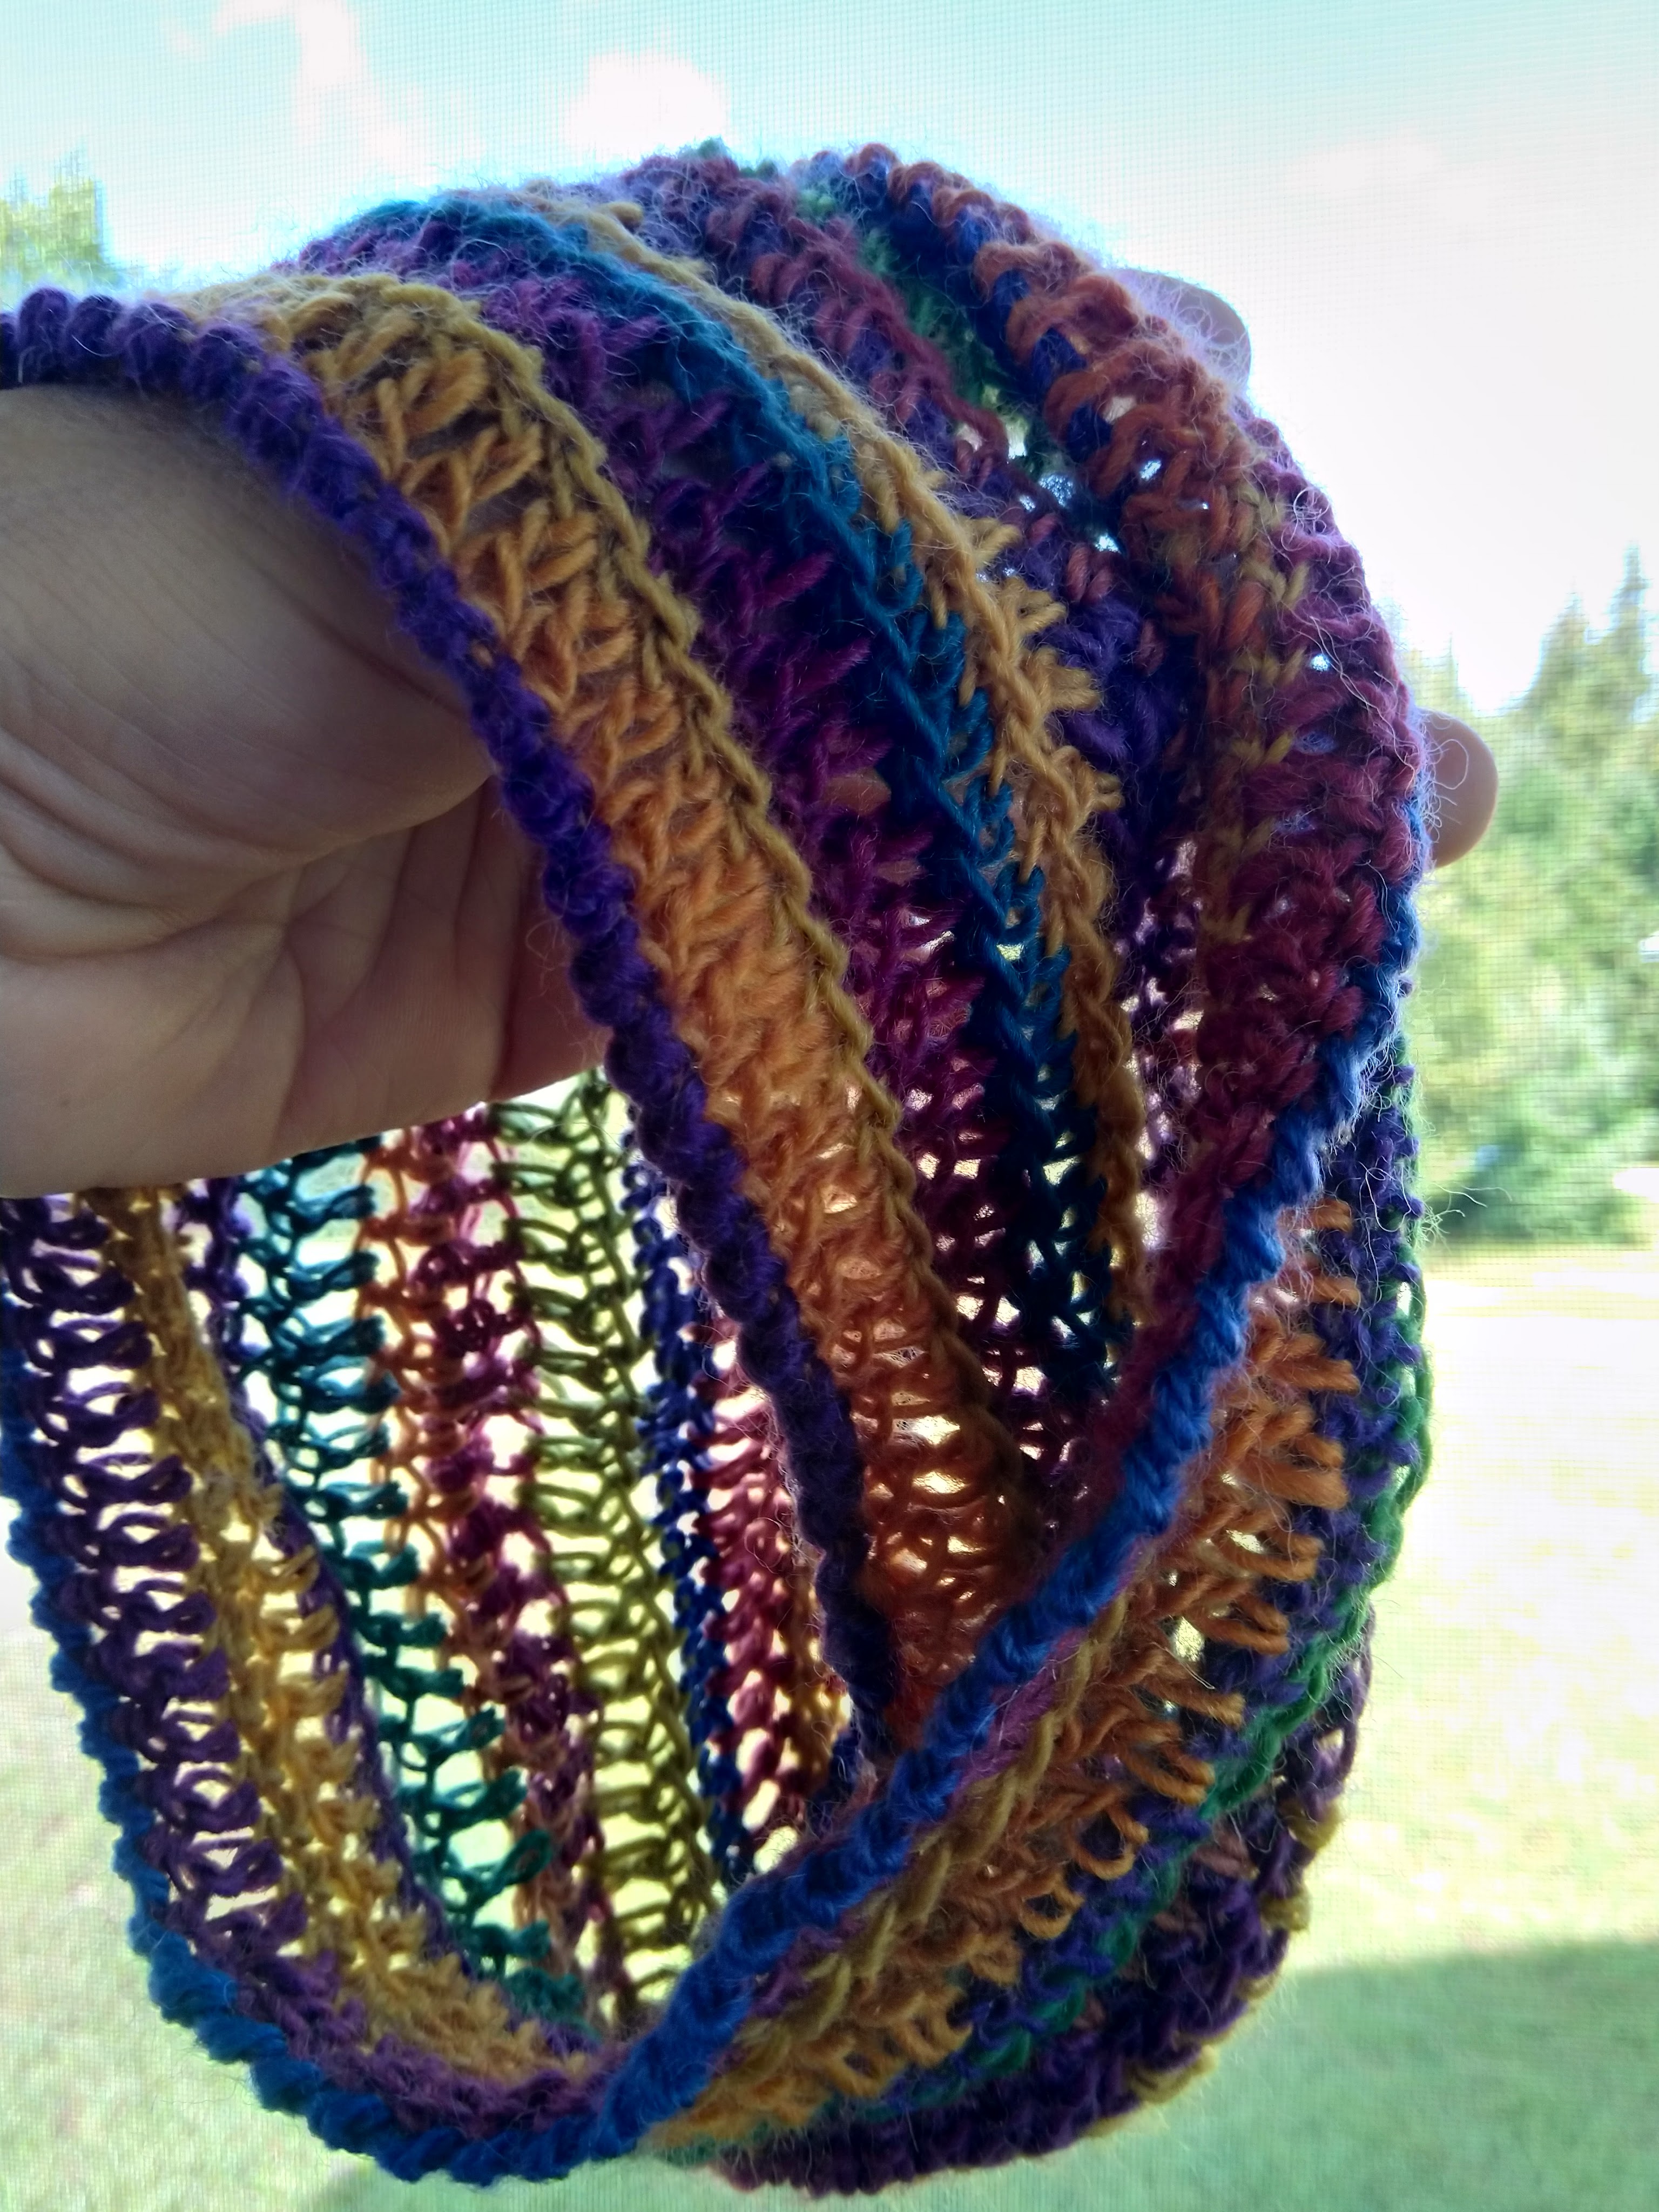
It’s also possible to create a mobius strip, by joining the foundation row of chains with a twist, and then crocheting a single spiraling row:
Mobius Strip Cowl
3D
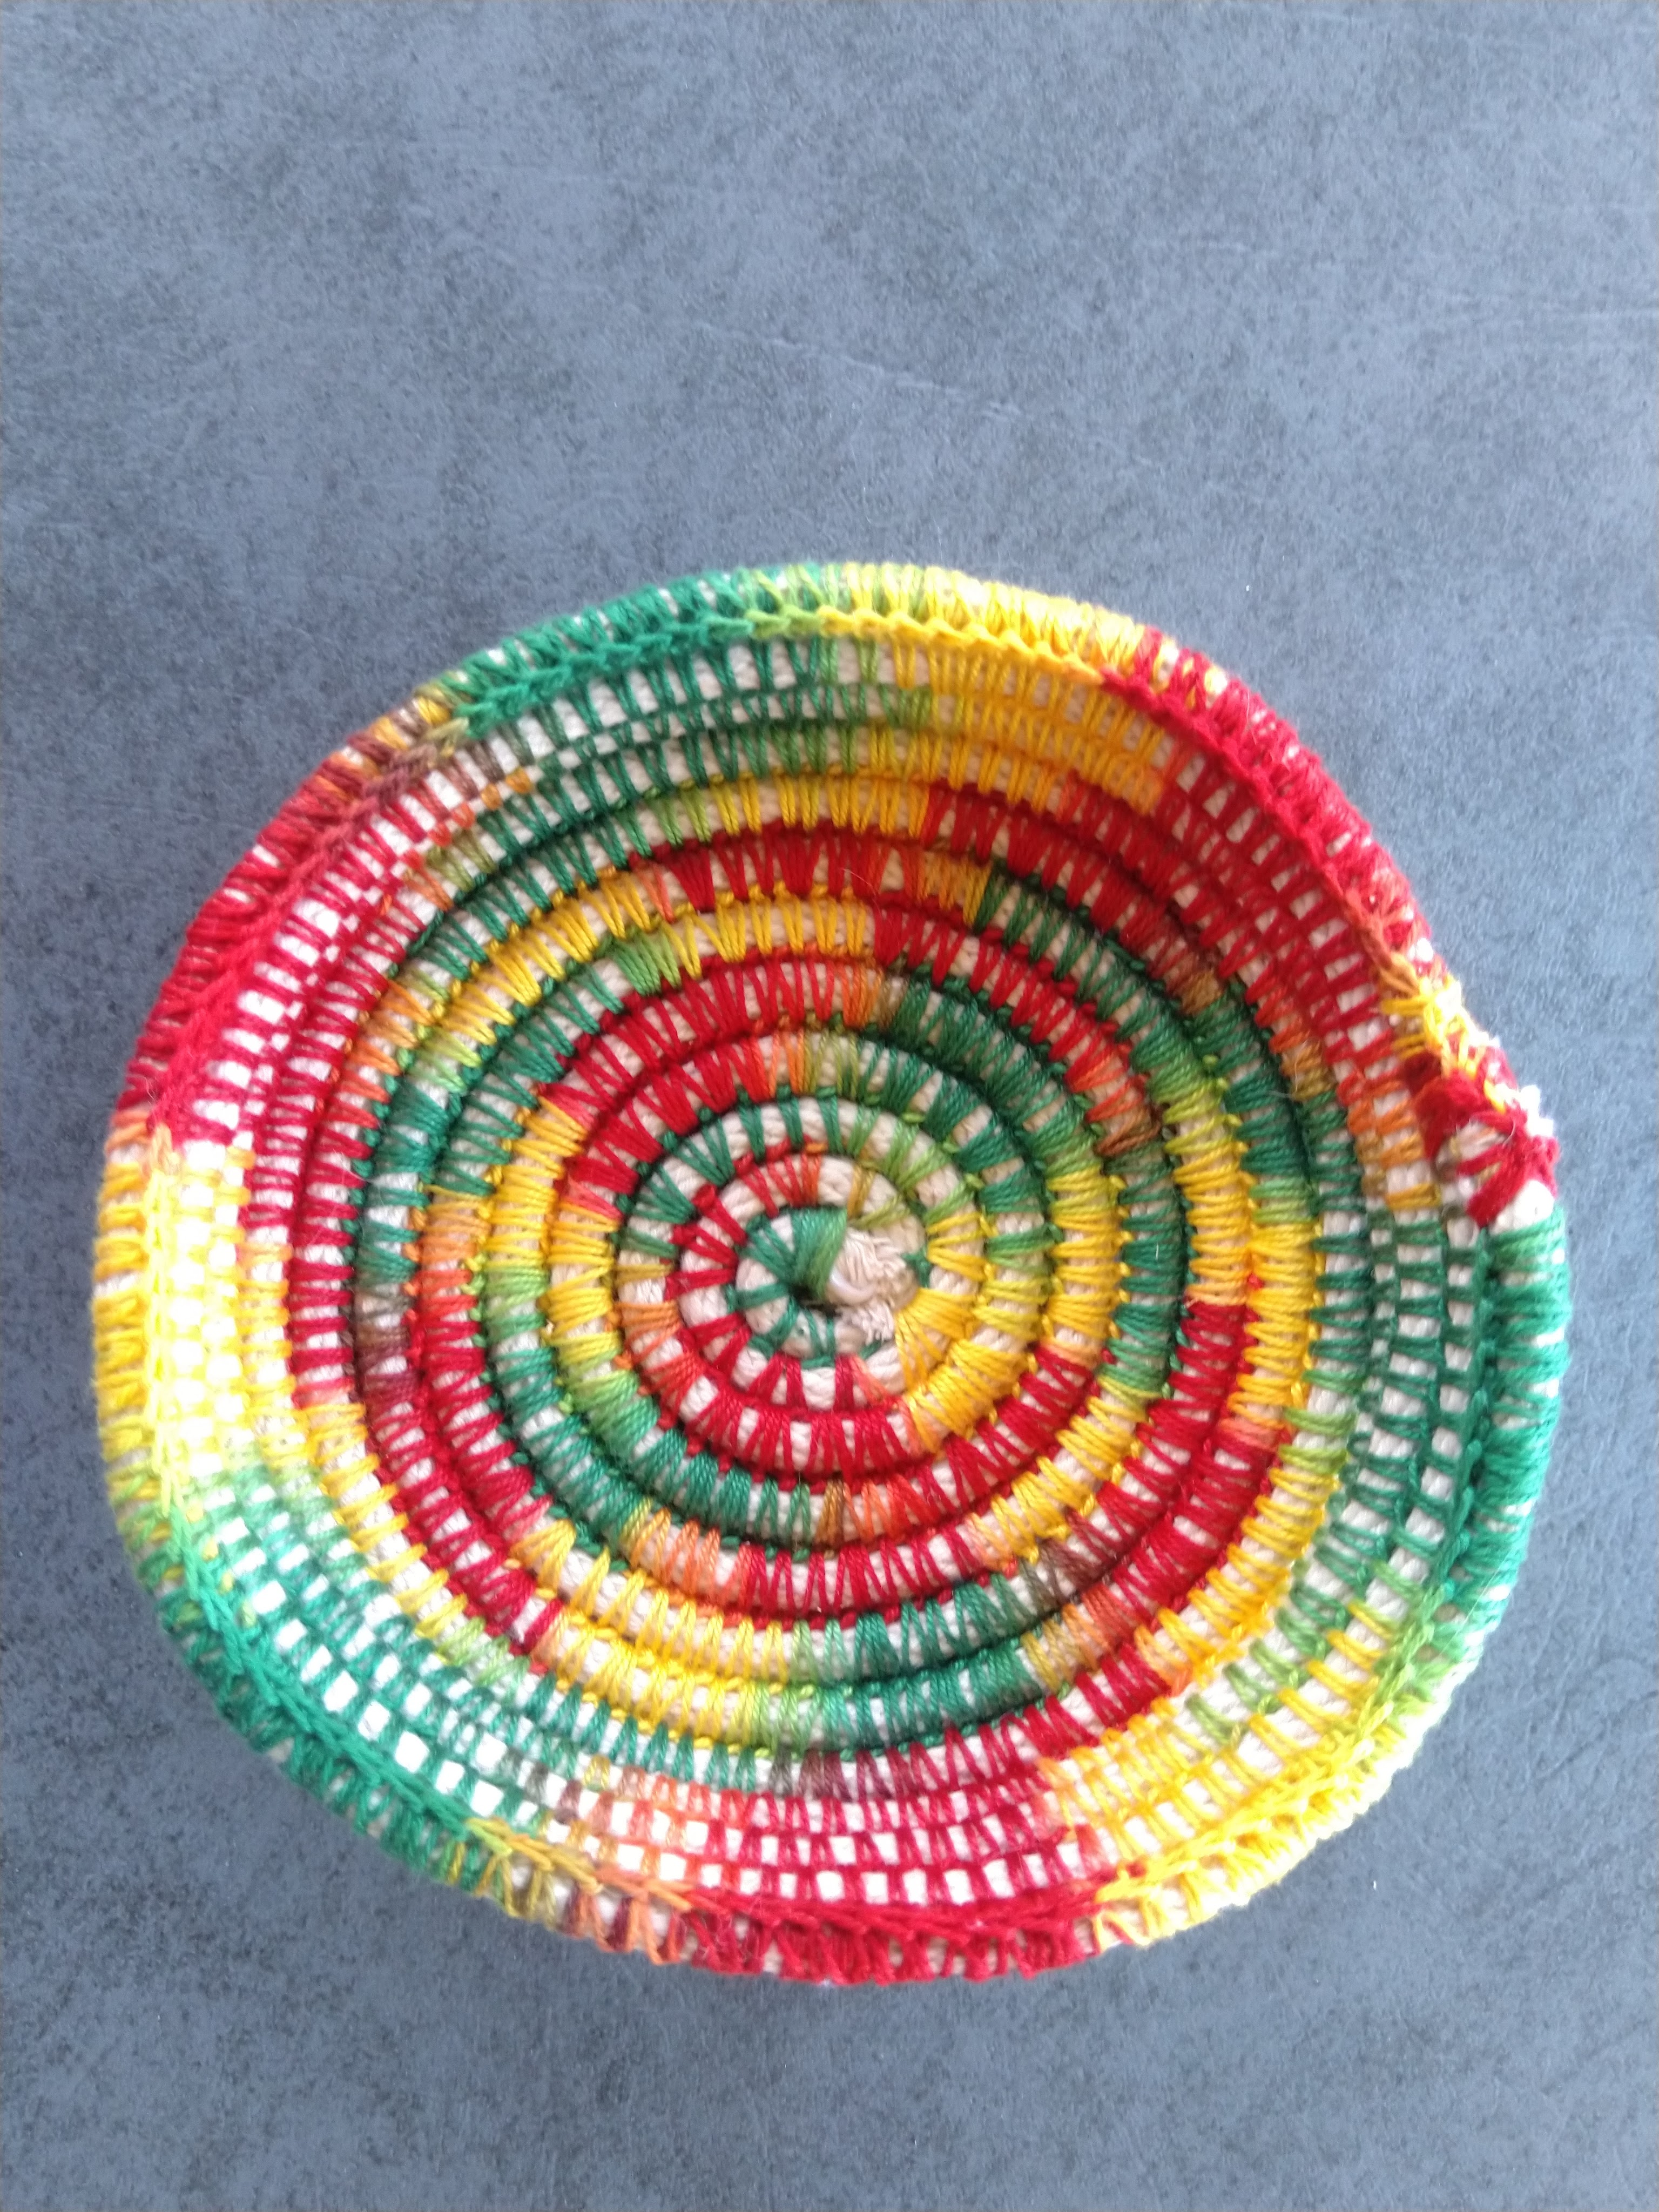
Working in the round is fun, and it even allows you to create three-dimensional works:
It’s fun to play with crochet in the round to create hats. Check out my son’s TikTok videos, where he explains how to create a wizard’s hat. Here’s Part 1:
I also like crocheting in layers, so that you get a different look on either side of the afghan:
The Math
Your building blocks are chains, single crochet, half-double crochet, and double crochet. The chains are wider than they are high, and create thin strands, or are the foundation into which you work your next stitches. Single crochet stitches are the closest to square, so you could imagine that you are adding small cubes. Half-double stitches are almost twice as high as they are wide. And double crochet stitches can stretch to three times higher than they are wide. These last two stitches are also “thicker” at the top, so several of them can be stitches into the same foundation stitch, and then curve around a corner, or create a cluster that begins to look like a trapezoid.
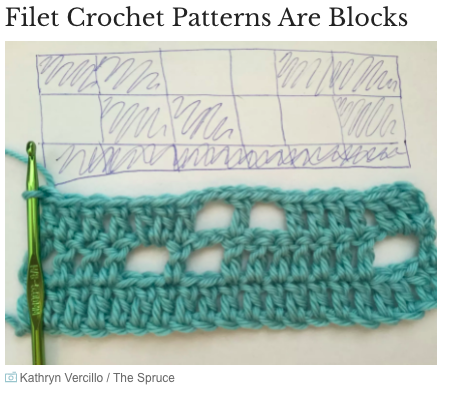
If you put chains between stitches you begin to get a lacy effect, and can create patterns of stitches and gaps. I have given away all of my filet crochet projects, so I don’t have any pictures to share. However, they can be designed in a similar way to the pixel images we create on computers, or on paper using grids. If you want to learn how to do this, check out the Spruce Crafts.
An example of Filet Crochet
Since crochet work involves only a single tool (hook) and a yarn, it’s a great technique for beginners. Preschoolers can learn to chain, and love making long strings. Older kids can easily learn row-based patterns, or simple granny squares. There are lots of tutorials on YouTube, and free patterns on Ravelry.
Data Representation
Because of its stitch structure, and the ability for several stitches to be made into a single foundation stitch, it’s a great way to illustrate concepts, and here are just a few examples from YouTube:
“In this strand, students analyse the properties of shapes – the elements that define a shape and make it unique – and use these properties to define, compare, and construct shapes and objects, as well as to explore relationships among properties. Students begin with an intuition about their surroundings and the objects in them, and learn to visualize objects from different perspectives. Over time, students develop an increasingly sophisticated understanding of size, shape, location, movement, and change, in both two and three dimensions. They understand and choose appropriate units to estimate, measure, and compare attributes, and they use appropriate tools to make measurements. They apply their understanding of the relationships between shapes and measurement to develop formulas to calculate length, area, volume, and more.”
In addition to the obvious spatial skills, students can also estimate yardage required for a project, calculate yardage in a ball of yarn based upon weight, and scale patterns to fit. I’m sure that you will find many other applications, if you embark on crochet in your classroom.
Fidget Toys
And if all else fails, a crochet hook and yarn is the perfect fidget toy in a classroom. It is quiet, you can crochet out of sight under the desk, and it can result in beautiful works of art.
I believe I could continue to write for days on this topic…. so I’ll pause now. If you think mathematically while you “hook”, please share in the comments below.
We’ve all heard about the connection between mathematics and music, and much of my life has been proof of this. I never thought of myself as much of a visual artist, but mathematics has been the basis of much of my enjoyment of cross-stitch, needlepoint, crochet, knitting and quilting.
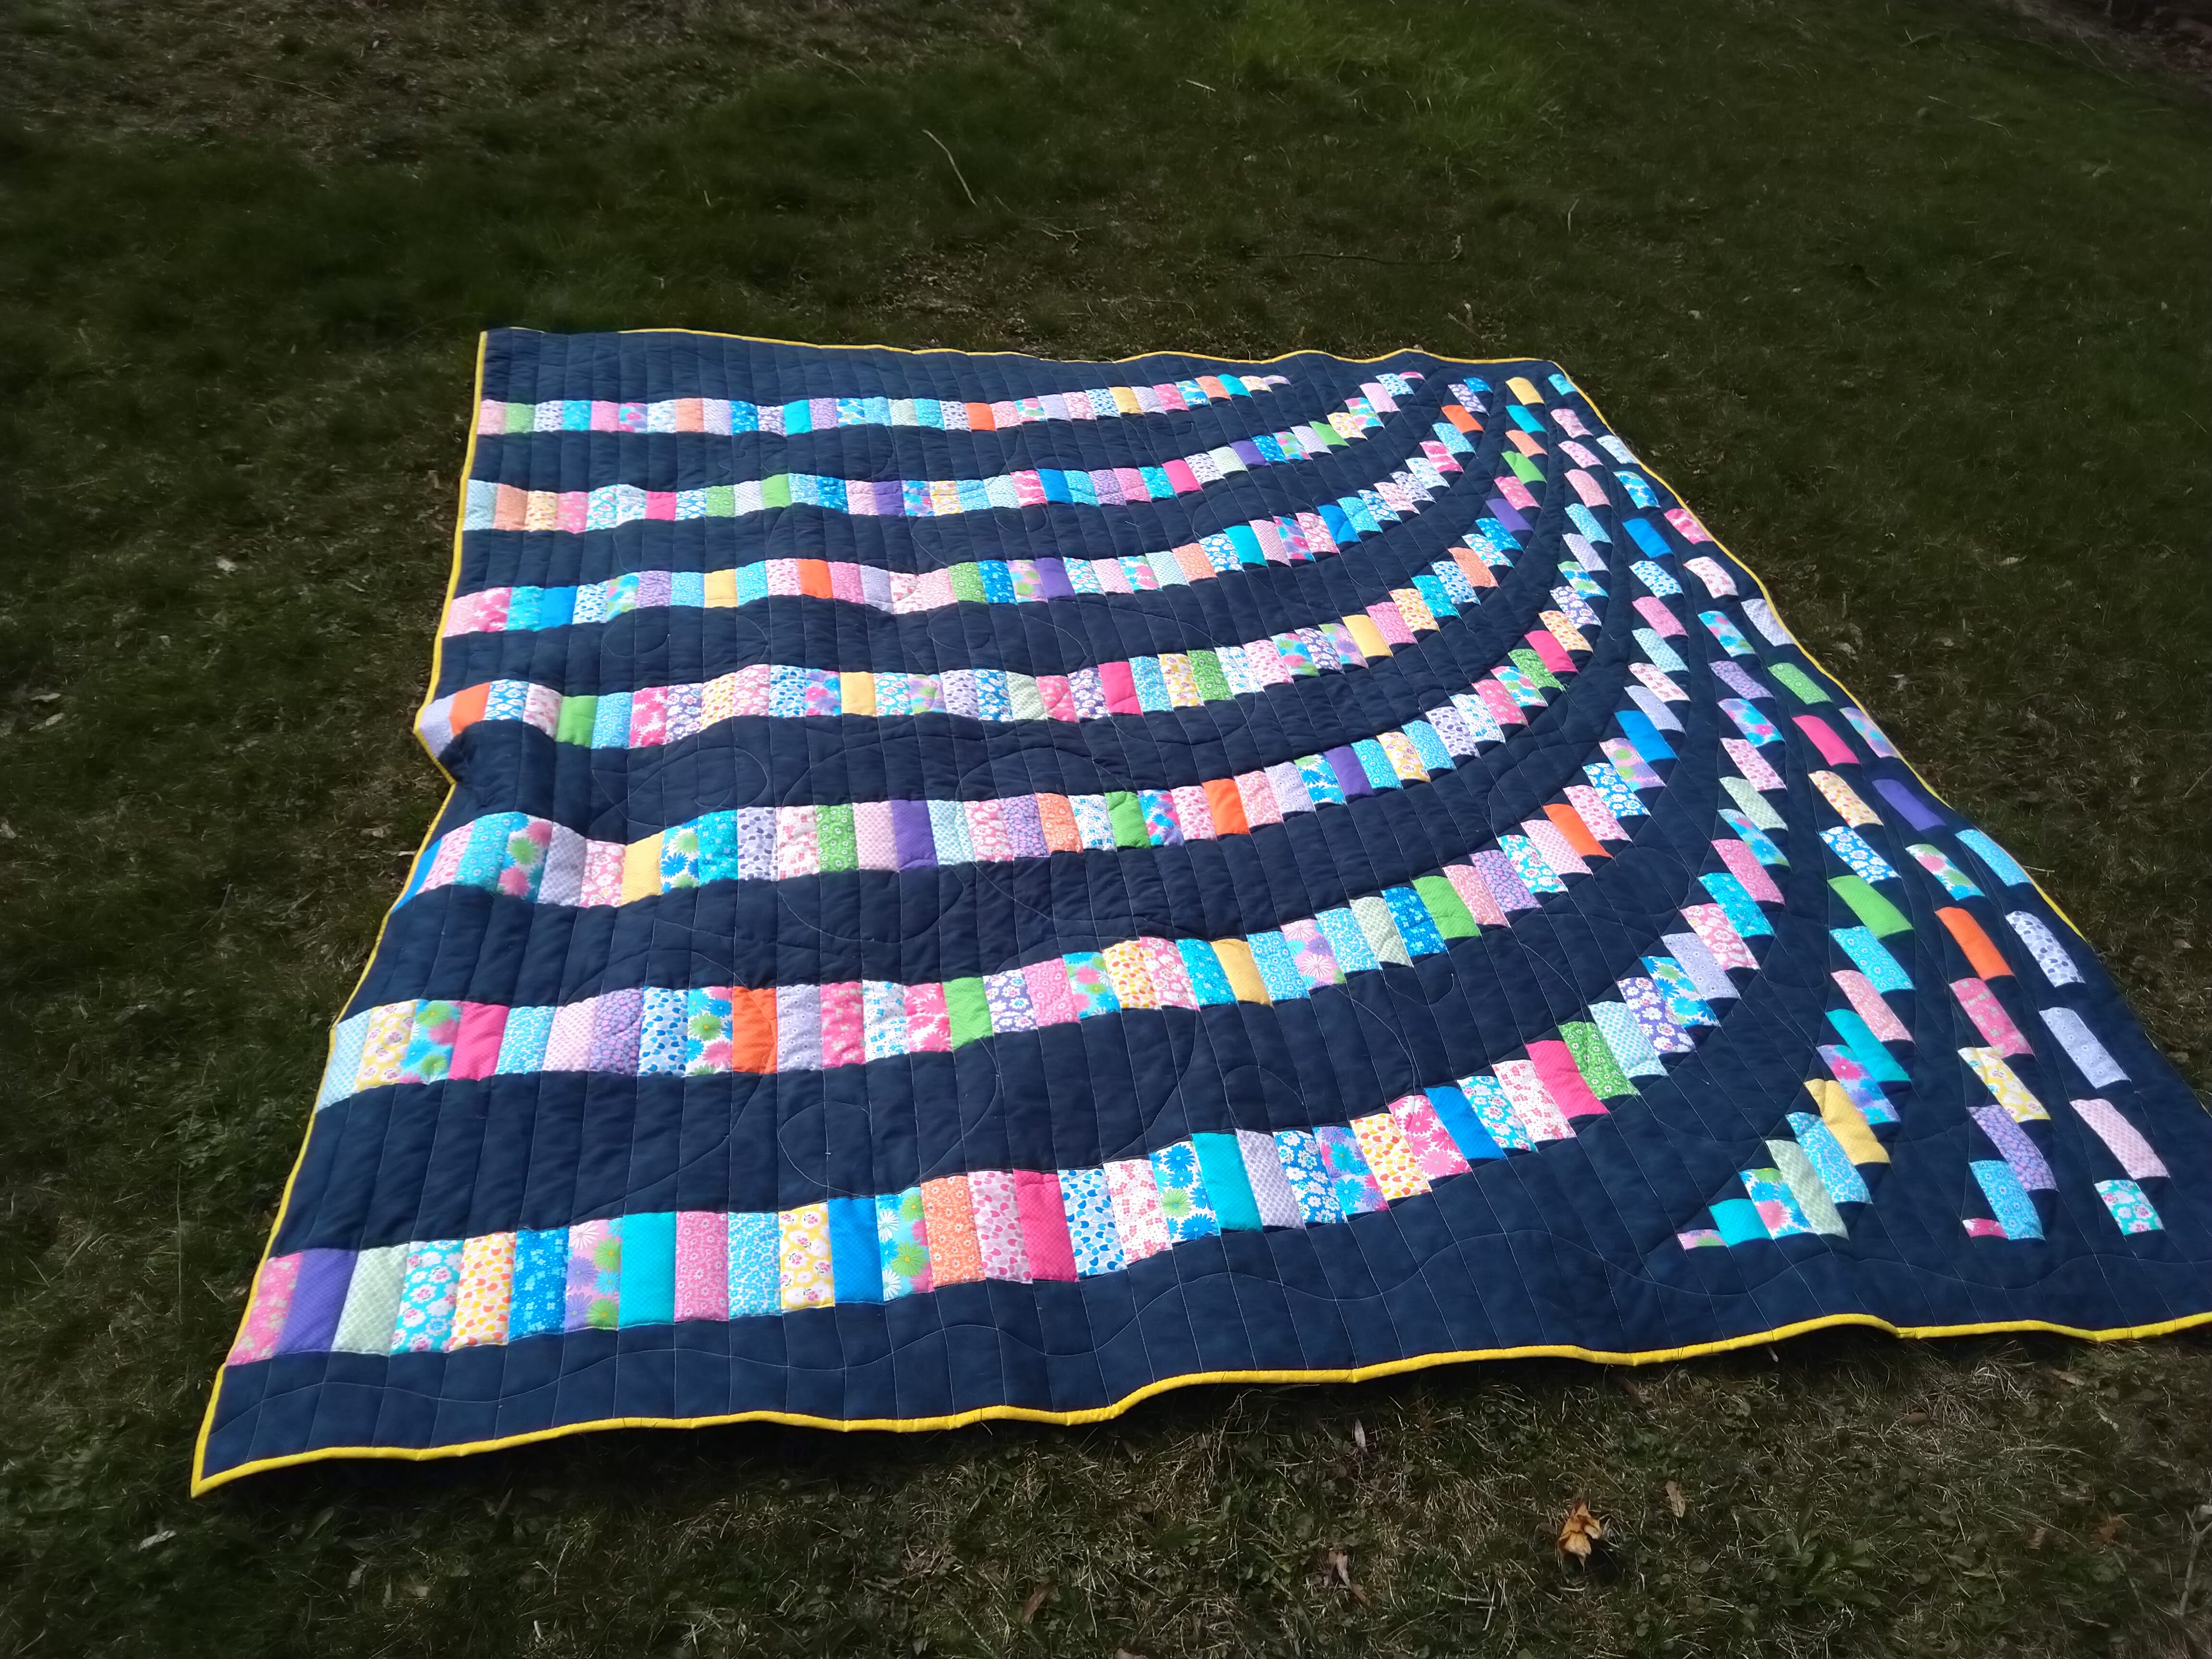
During COVID, this interest blossomed. I began working with numerical sequences as well as exploration of the golden ratio. That resulted last spring in a quilt that features a logarithmic wave on one side, and sets of golden ratio “rectangles” on the reverse:
Golden Ratio QuiltLogarithm Quilt
I designed the golden ratio side, and my son helped me with a table of logarithmic values in Excel, to make the best use of one “jelly roll” of print fabric to fit a Queen-size quilt. I tried out both “walking foot” machine quilting for the stripes and long curves on the logarithmic side, and “free motion quilting” for the spirals through the golden ratios. I love having a reversible quilt, and it’s kept me warm all winter with its wool batting.
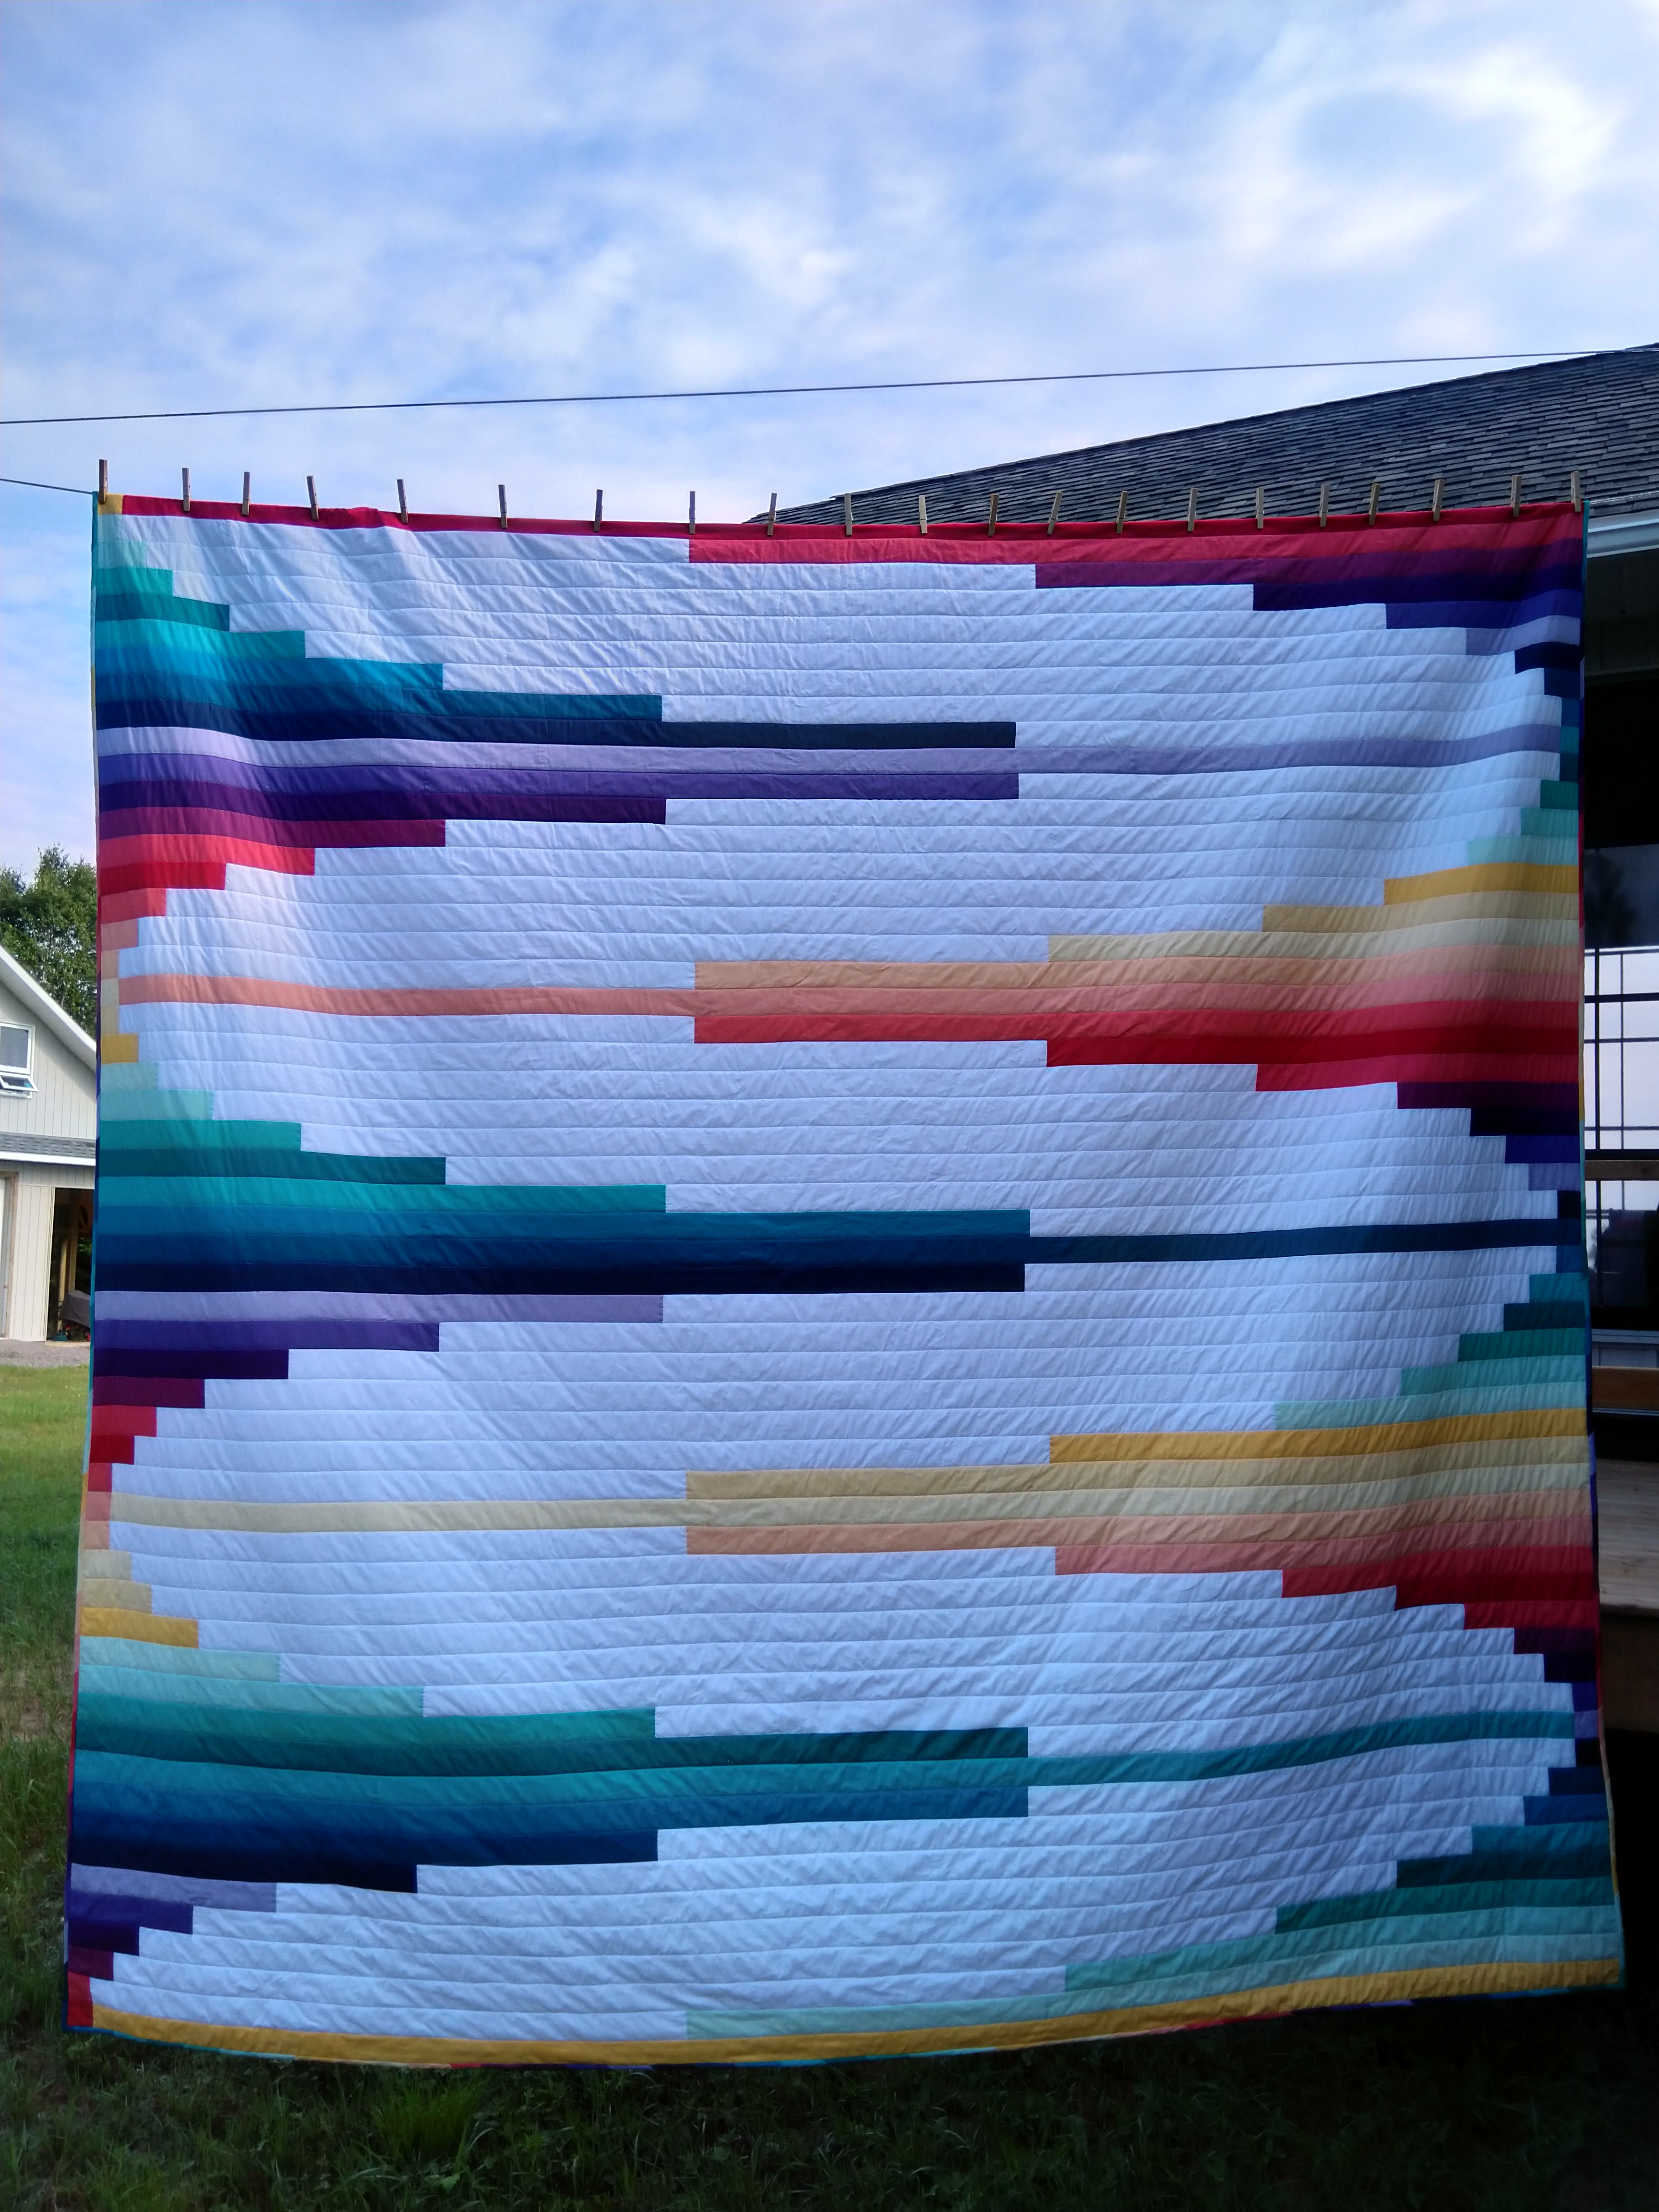
My next challenge was to combine my daughter’s love of Fibonacci sequences with her social justice advocacy. I had two “jelly rolls” to work with, with 22 rainbow colours. And here’s the result:
Fibonacci Rainbow Quilt
This quilt was machine pieced and then hand-quilted. I could have chosen to machine quilt, since the quilting is very simple “stitch in the ditch”, but I needed the meditative process this spring as to balance out my long days online as Principal. As the weather became warmer it was more difficult to sit under the quilt, so it was July before I was able to bind and complete.
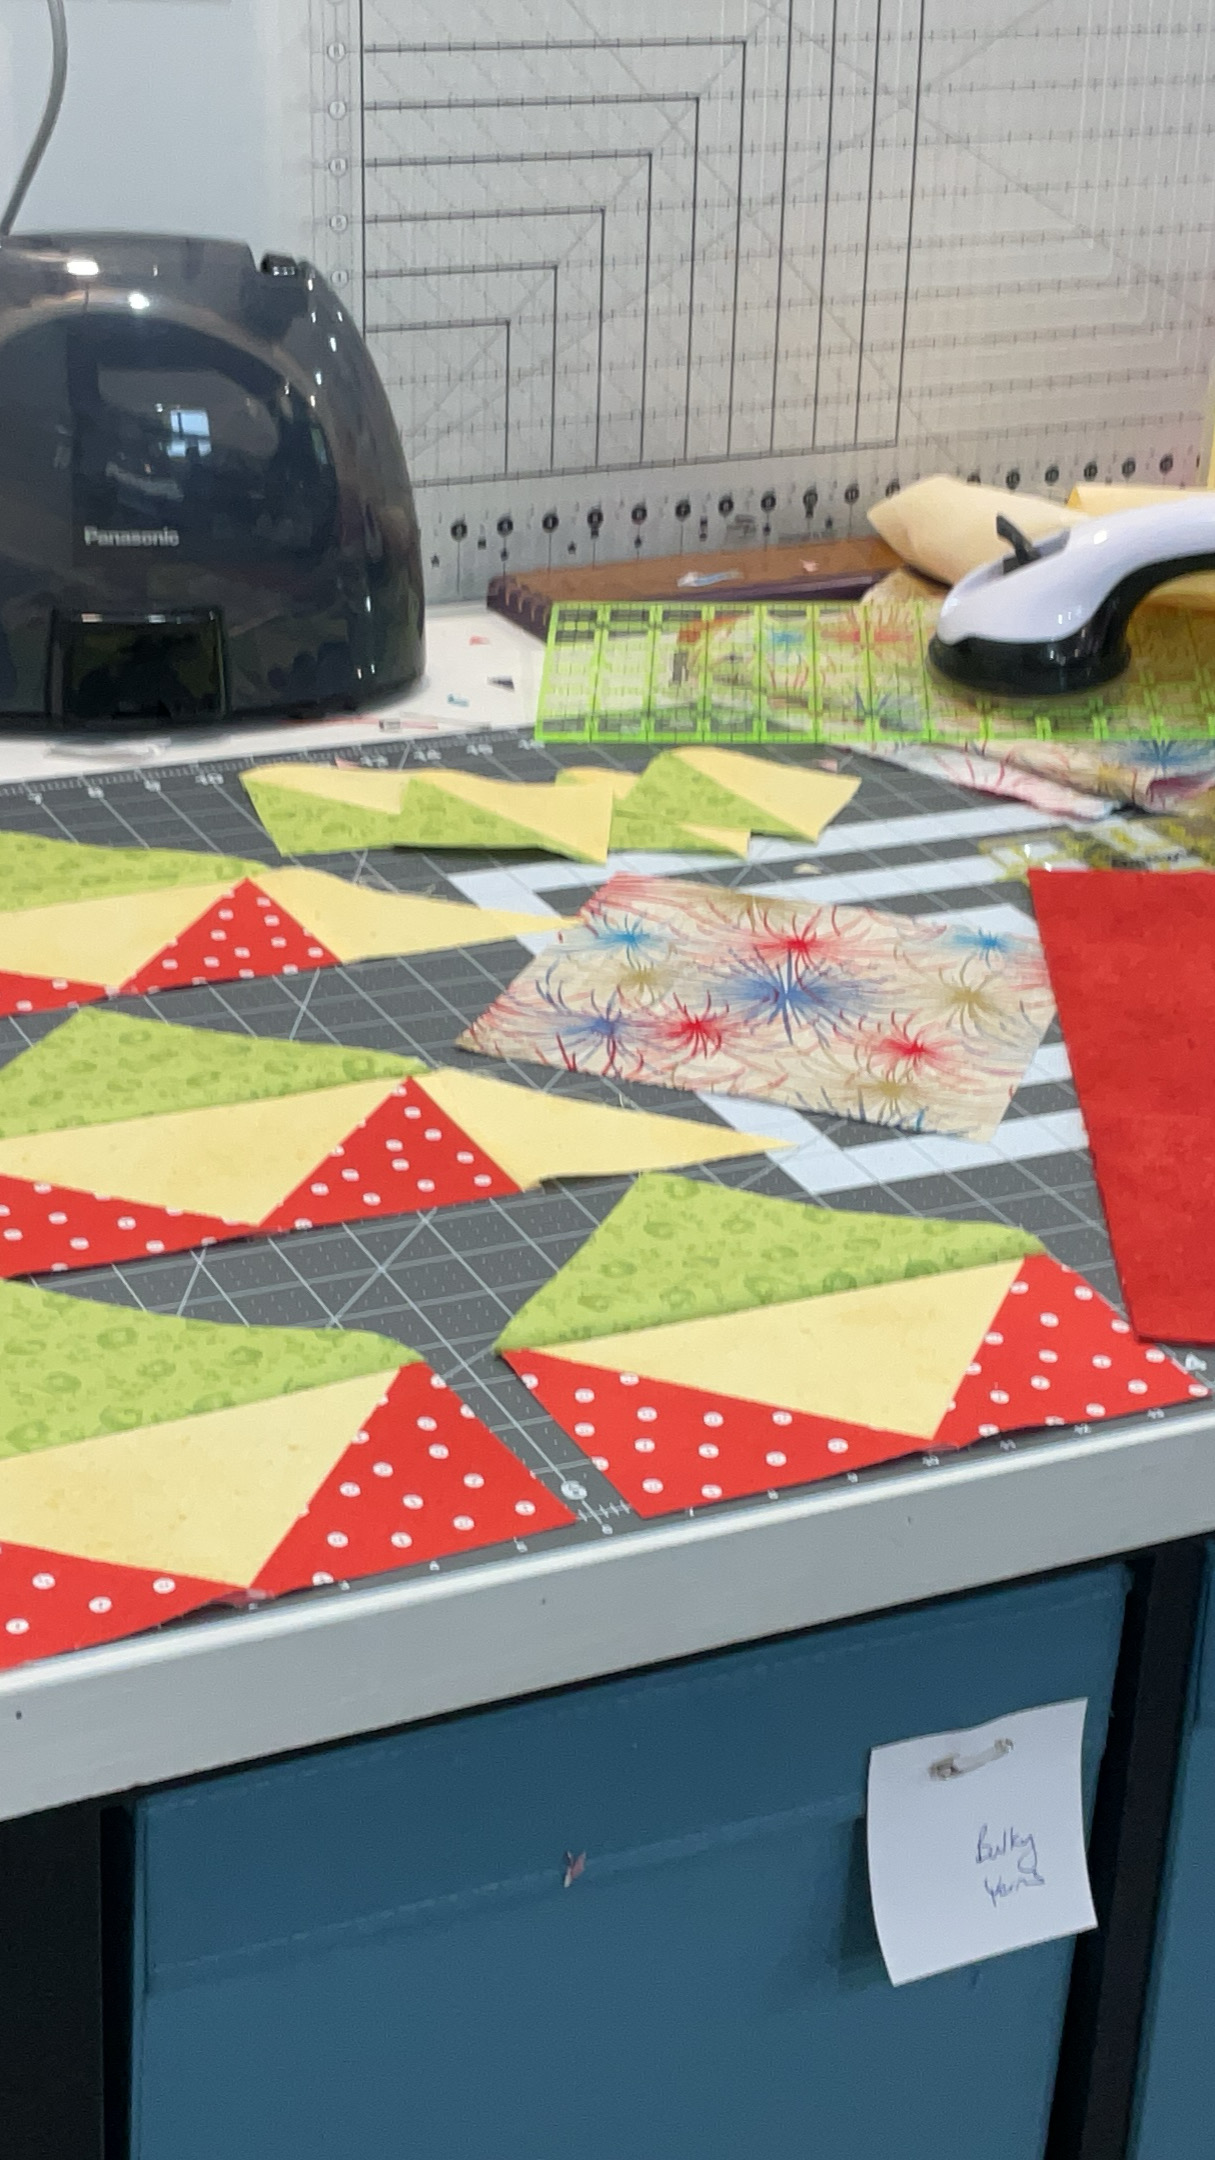
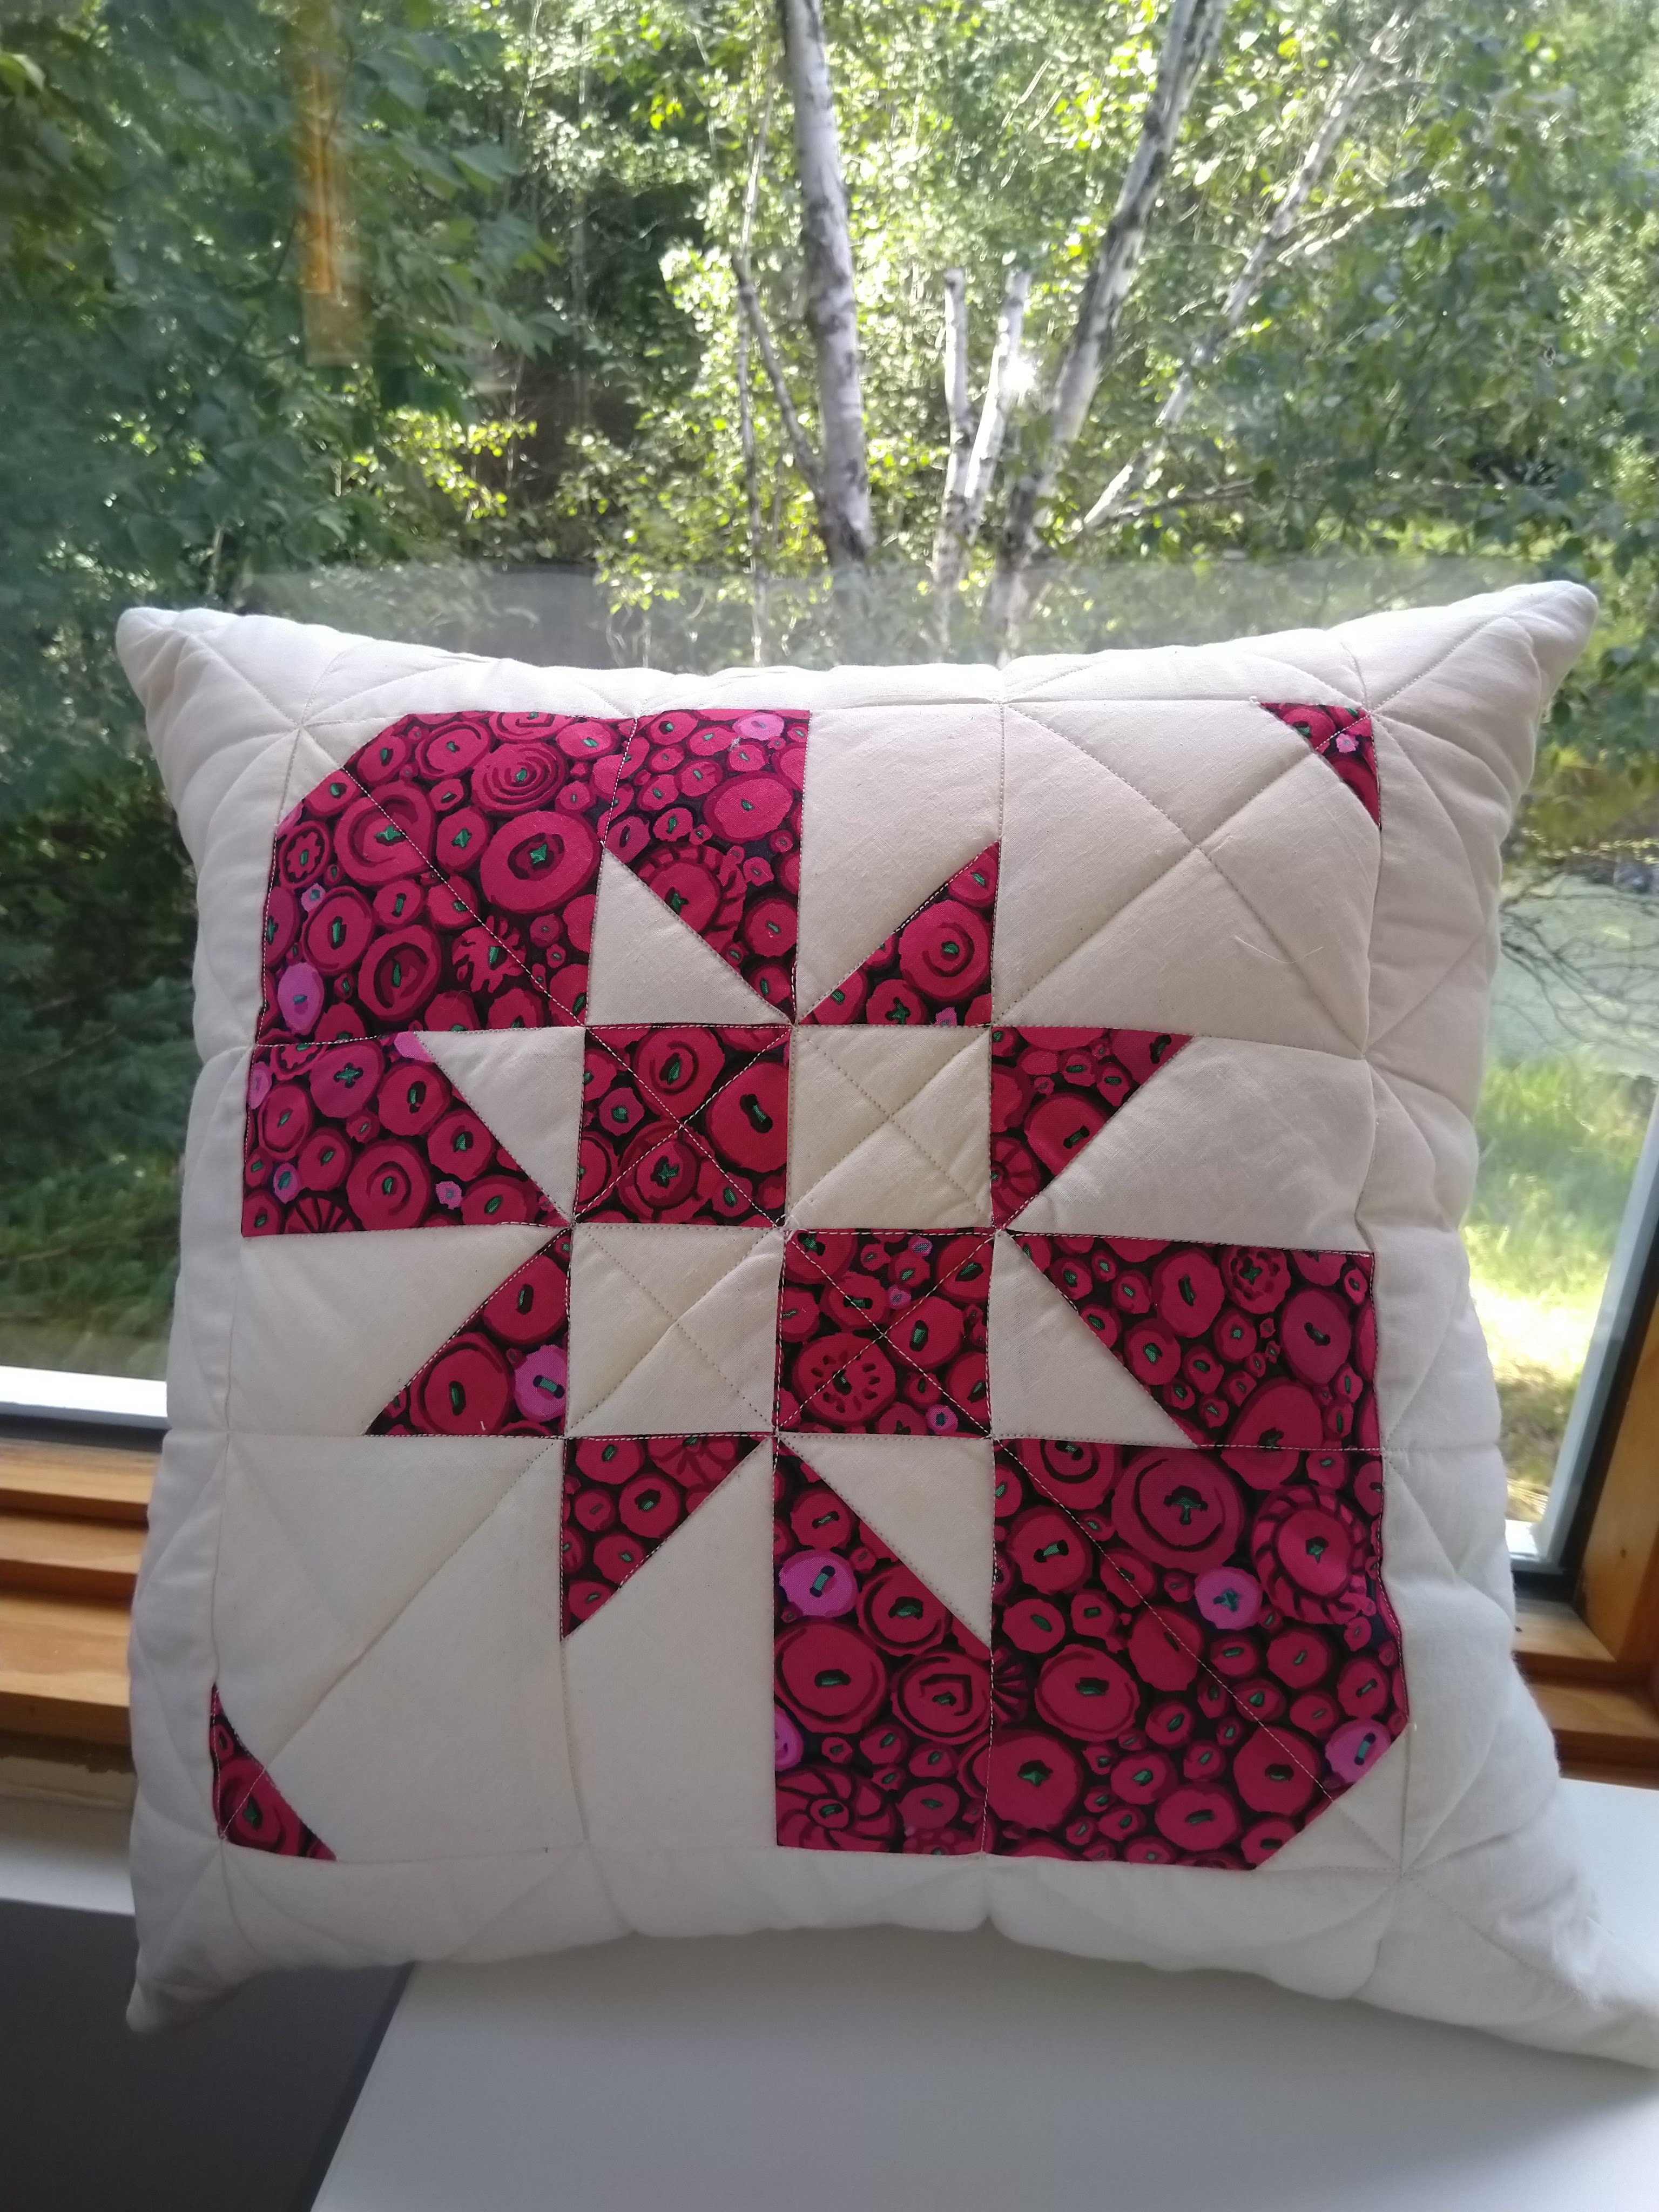
Yesterday I went looking for more challenges, but was hoping for something that wouldn’t take months to complete. I have enjoyed playing with “disappearing” patterns, but had not actually constructed any yet. This is a technique of piecing a simple square, and then cutting it into quarters or ninths, and sewing it together with the pieces rotated. So I tried out the “disappearing hourglass” pattern. You create it by sewing all the way around a pair of squares, cutting them on the diagonal, resewing them into an hourglass shape, and then cutting again into nine-patches.
What do you think?
These were both machine pieced and quilted, so they worked up quickly, and make a bright pillow for my sunroom. They each began with a 10″ square from a “layer cake”, so I have 40 more possible “disappearing” squares to construct. If I can find enough background fabric for the contrast to these wonderful Kaffe Fassett prints I might just make this my next “mathematical” quilt.
It’s the first week of July, and perhaps a little early for our teachers to begin planning for September.
But, before the planning for September begins, I am hoping that I can plant a few seeds to help teachers move away from grades and marks, and towards a model of feedback-based assessment. Here are a few suggestions to prepare for this process:
Design “Backwards”
Begin with the curriculum documents, and list all of the main standards, or overall expectations.
Rewrite in Student-Friendly Language
This is a task that will be most valuable if done with your students, so begin be re-writing a few as models to use in September. You may choose to re-write all of the standards or expectations, but your students will buy in more fully if they have a voice in the process. These could be printed, and then cut into sections. Or you might put them on “post-its”: either physical, or within Jamboard.
Group
Re-arrange your standards or expectations, grouping them in to related clusters. You may be able to label your groupings, and perhaps even write an over-arching expectation or goal. Prepare to facilitate this same process with your students; don’t assume that their groupings will be the same as yours. Remember, your goal is to have them invested in their learning, so try this process out for yourself, but leave the real work for your class in September.
Determine Evidence of Learning
For each group, decide what might be used as evidence of successful achievement of the expectation, standard, or goal. And then list both the task criteria (what will need to be done) and the achievement criteria (what knowledge, understanding and skills will be demonstrated). These criteria can then be used as the basis for feedback, single-point rubrics, or four-point rubrics.
Plan the Flow
Order your groupings in such a way that one leads to the next, and supports the skills and knowledge necessary for progress. Consider reporting periods, and ensure that you have paced your groupings and built in conferencing time so that you will have a mark to put on report cards, if required in your jurisdiction.
Bonus: Connect it all with a Theme
When I was in grade 11, our English teacher structured our course around the theme of “Love”. She was able to connect our study of “that Scottish play” to a poetry unit on ballads, and tease out references to “Love” in almost all of our readings. I still remember how eager we were to talk about “Love” (and then, of course, “Sex”) and make connections between our readings and our current, teenaged lives.
As I designed our first semester of “Introduction to Information and Communications Technology”, which was offered within the Ontario Business Studies curriculum I looked for a unifying theme that would inspire our grade 9 students to continue within the business program. So, we took a course that was heavy on technical skills, and united all the units through the creation of a “Business Plan”. Our students did Internet research to decide on a business. They built an Access database of computer equipment to equip their new business. They designed a style sheet, and then implemented their style in both Word and Publisher. A company logo was developed in a graphics application, and then converted to work both in print and on the web. Their financial projections were developed in Excel. They developed business websites, to promote their new business. And they created PowerPoint presentations to convince their class VCs to invest in their new business.
You may have a theme in mind, or your students may be able to see new themes as they work through the process of rewriting the expectations and standards in the first few days of class. Be prepared to (happily) throw all of your planning and hard work out the window if your students come up with something better. You never know what they might create, and how it might make your semester much more fun for all of you.
Over the past two weeks I have been engaged in the process of application to a position at a Faculty of Education at one of our Ontario universities. It has been a very different experience than any other educational job application I’ve had, and has given me a great deal to think about.
Process
The process began with what was called the “long short list” interview, which was 30 minutes long and conducted in a very traditional manner: five questions presented verbally, with a “hand wave” when I was nearing the end of the allotted time. I was invited to pose any questions I might have at the end.
When I made the “short list”, the process was very different. For our second interview I was asked for a 20-minute presentation to share my approach to a concept from one of the courses. This presentation was open to all faculty, and there were two attendees who weren’t on the committee who viewed my Zoom presentation, and could participate in the 10-minute Q&A that followed. Immediately after this session was an additional 30-minute interview, much like the first. And after a break I met with the Dean for a 20-minute conversation, which was unstructured and quite enjoyable.
I had provided the names of five references, of which three would be contacted. And then, based upon my CV, two interviews, and the references, I was told that a decision would be reached.
Results
Ten days after the second interview I received an email indicating that I had not been successful, and sharing that “The APC was very impressed with your leadership background and your teaching skills. A key differentiator was that the candidate who was offered the position has worked in multiple university contexts in full-time roles and has a significant record of scholarship in curriculum studies.”
It is obvious that I cannot remedy my lack of full-time university teaching experience; I have been a K-12 teacher, leader and administrator since 1983, with only maternity leaves and my Ph.D. research as gaps in service. As a late-in-life academic (Masters in 2007, Ph.D. in 2020), my record of scholarship is sparse. And, as my colleagues will know, running a school leaves very little time for scholarship!
This area of scholarship is certainly one that I can augment, and so my goals this summer will be to look for opportunities to write. I have been told that I should be able to turn my dissertation into two or three articles, so I will look for some assistance to help me clarify how this might work. I am also going to look for colleagues to collaborate with, hopefully within their research at their institutions. And I will continue to speak at conferences, meet with teams, and support teachers directly where possible.
Making K-12 Interviews Better
One key learning for me from this process is the value of the second interview’s “presentation” component. By having to examine the curriculum, design an approach, and share my “lesson plan” with the committee, I was able to solidify my understanding of the course, and begin to prepare a framework that would have been very useful, had I been successful.
Perhaps, instead of reinstating Reg 274, we could work on a process for candidates to our teaching positions that includes “real teaching”? The presentation process was much closer to the real experience of teaching than is a traditional interview. And since I was given clear criteria, I embedded within my presentation what would have been the answers to many questions that would have been asked in the interview. Since I had time to prepare, as I would as a classroom teacher, I shared who I was and what I could do in a clearer, more effective and efficient manner.
I’m also wondering about the disconnect between the world of universities, and the reality of K-12 education. While “curriculum studies” is valuable work, I am not convinced that studying curriculum is better than delivering it. And I certainly do not believe that years of study are better than decades of supporting teachers as they work with the curriculum to plan, instruct, assess and evaluate. And the “action research” that every teacher undertakes each day in their classroom is in some cases more relevant than the research conducted by external parties. Perhaps this should become part of our criteria, so that we better prepare our young teachers to consider a move to higher education later in their careers.
I am not going to be able to change academia. But perhaps I can work with my K-12 colleagues to enhance our selection process, and do our best job to match teacher candidates to our teaching positions. The next time I am part of a hiring team, I will look to incorporate an aspect of the process from higher education, and “see our teachers in action”.
Our students will win, our schools will win, and our teachers will win.