I am trying to catch up, after a couple of weeks away from the sewing machine. G-13 is one of the blocks from the Dear Jane Stitch Along on Facebook, and BR-11 looked like another fun FPP.
Successes:
Tartan came together well, despite having seven FPP blocks to join together.
I was able to get a more consistent curve on the applique in G-13, using freezer paper and glue.
I appliqued each half-circle before piecing, so I was able to use the machine to secure the straight edges.
Challenges:
I think I should have printed on the lighter, newsprint paper. With so many parts, there were a lot of thick seams to sew in Tartan, and some lost their accuracy.
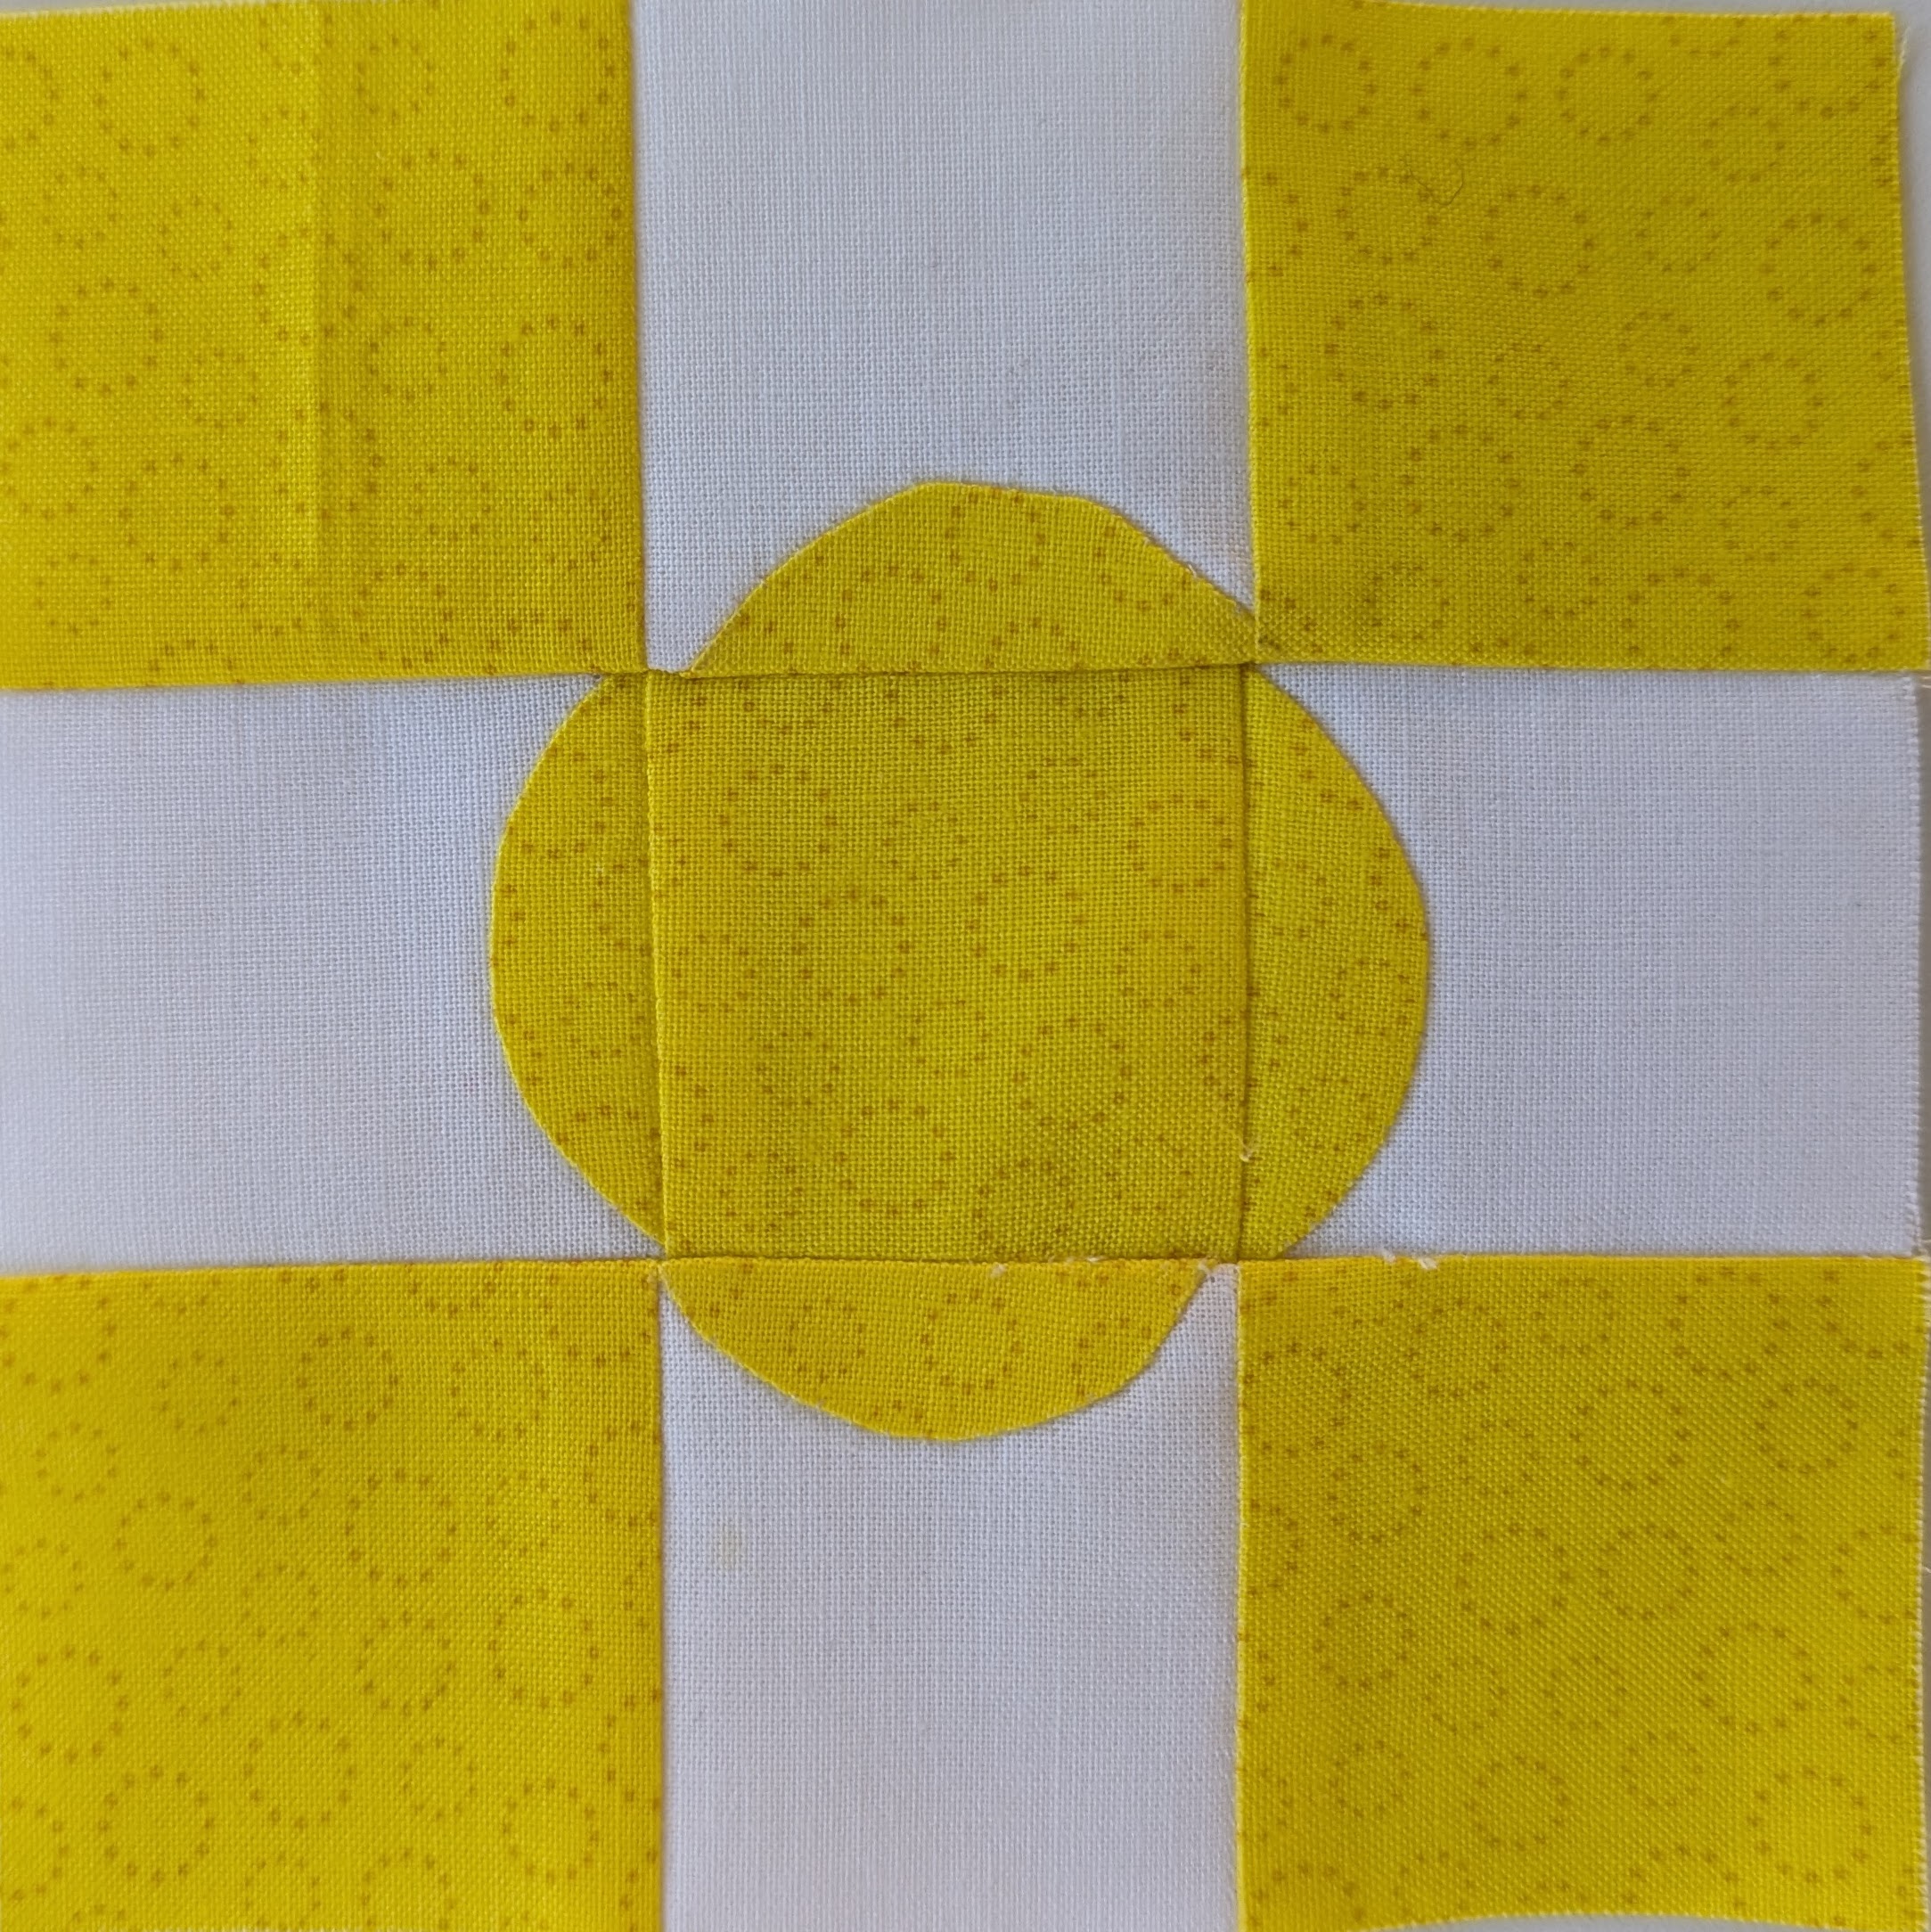
I didn’t place the applique well in Molly’s Muffins, so the curves don’t intersect at the corners accurately.
When I began to wash out the washable glue used in the applique, it turned purple again, and I thought I had ruined the pieces. However, use of Dawn and warm water removed all the purple!
It’s been a busy couple of weeks, with the Ontario Association of Agricultural Societies annual Convention taking up much of my time. We had a beautiful quilt competition, with fourteen machine-quilted quilts, and seven quilted by hand. So I had my “quilt” fix, without doing any sewing.
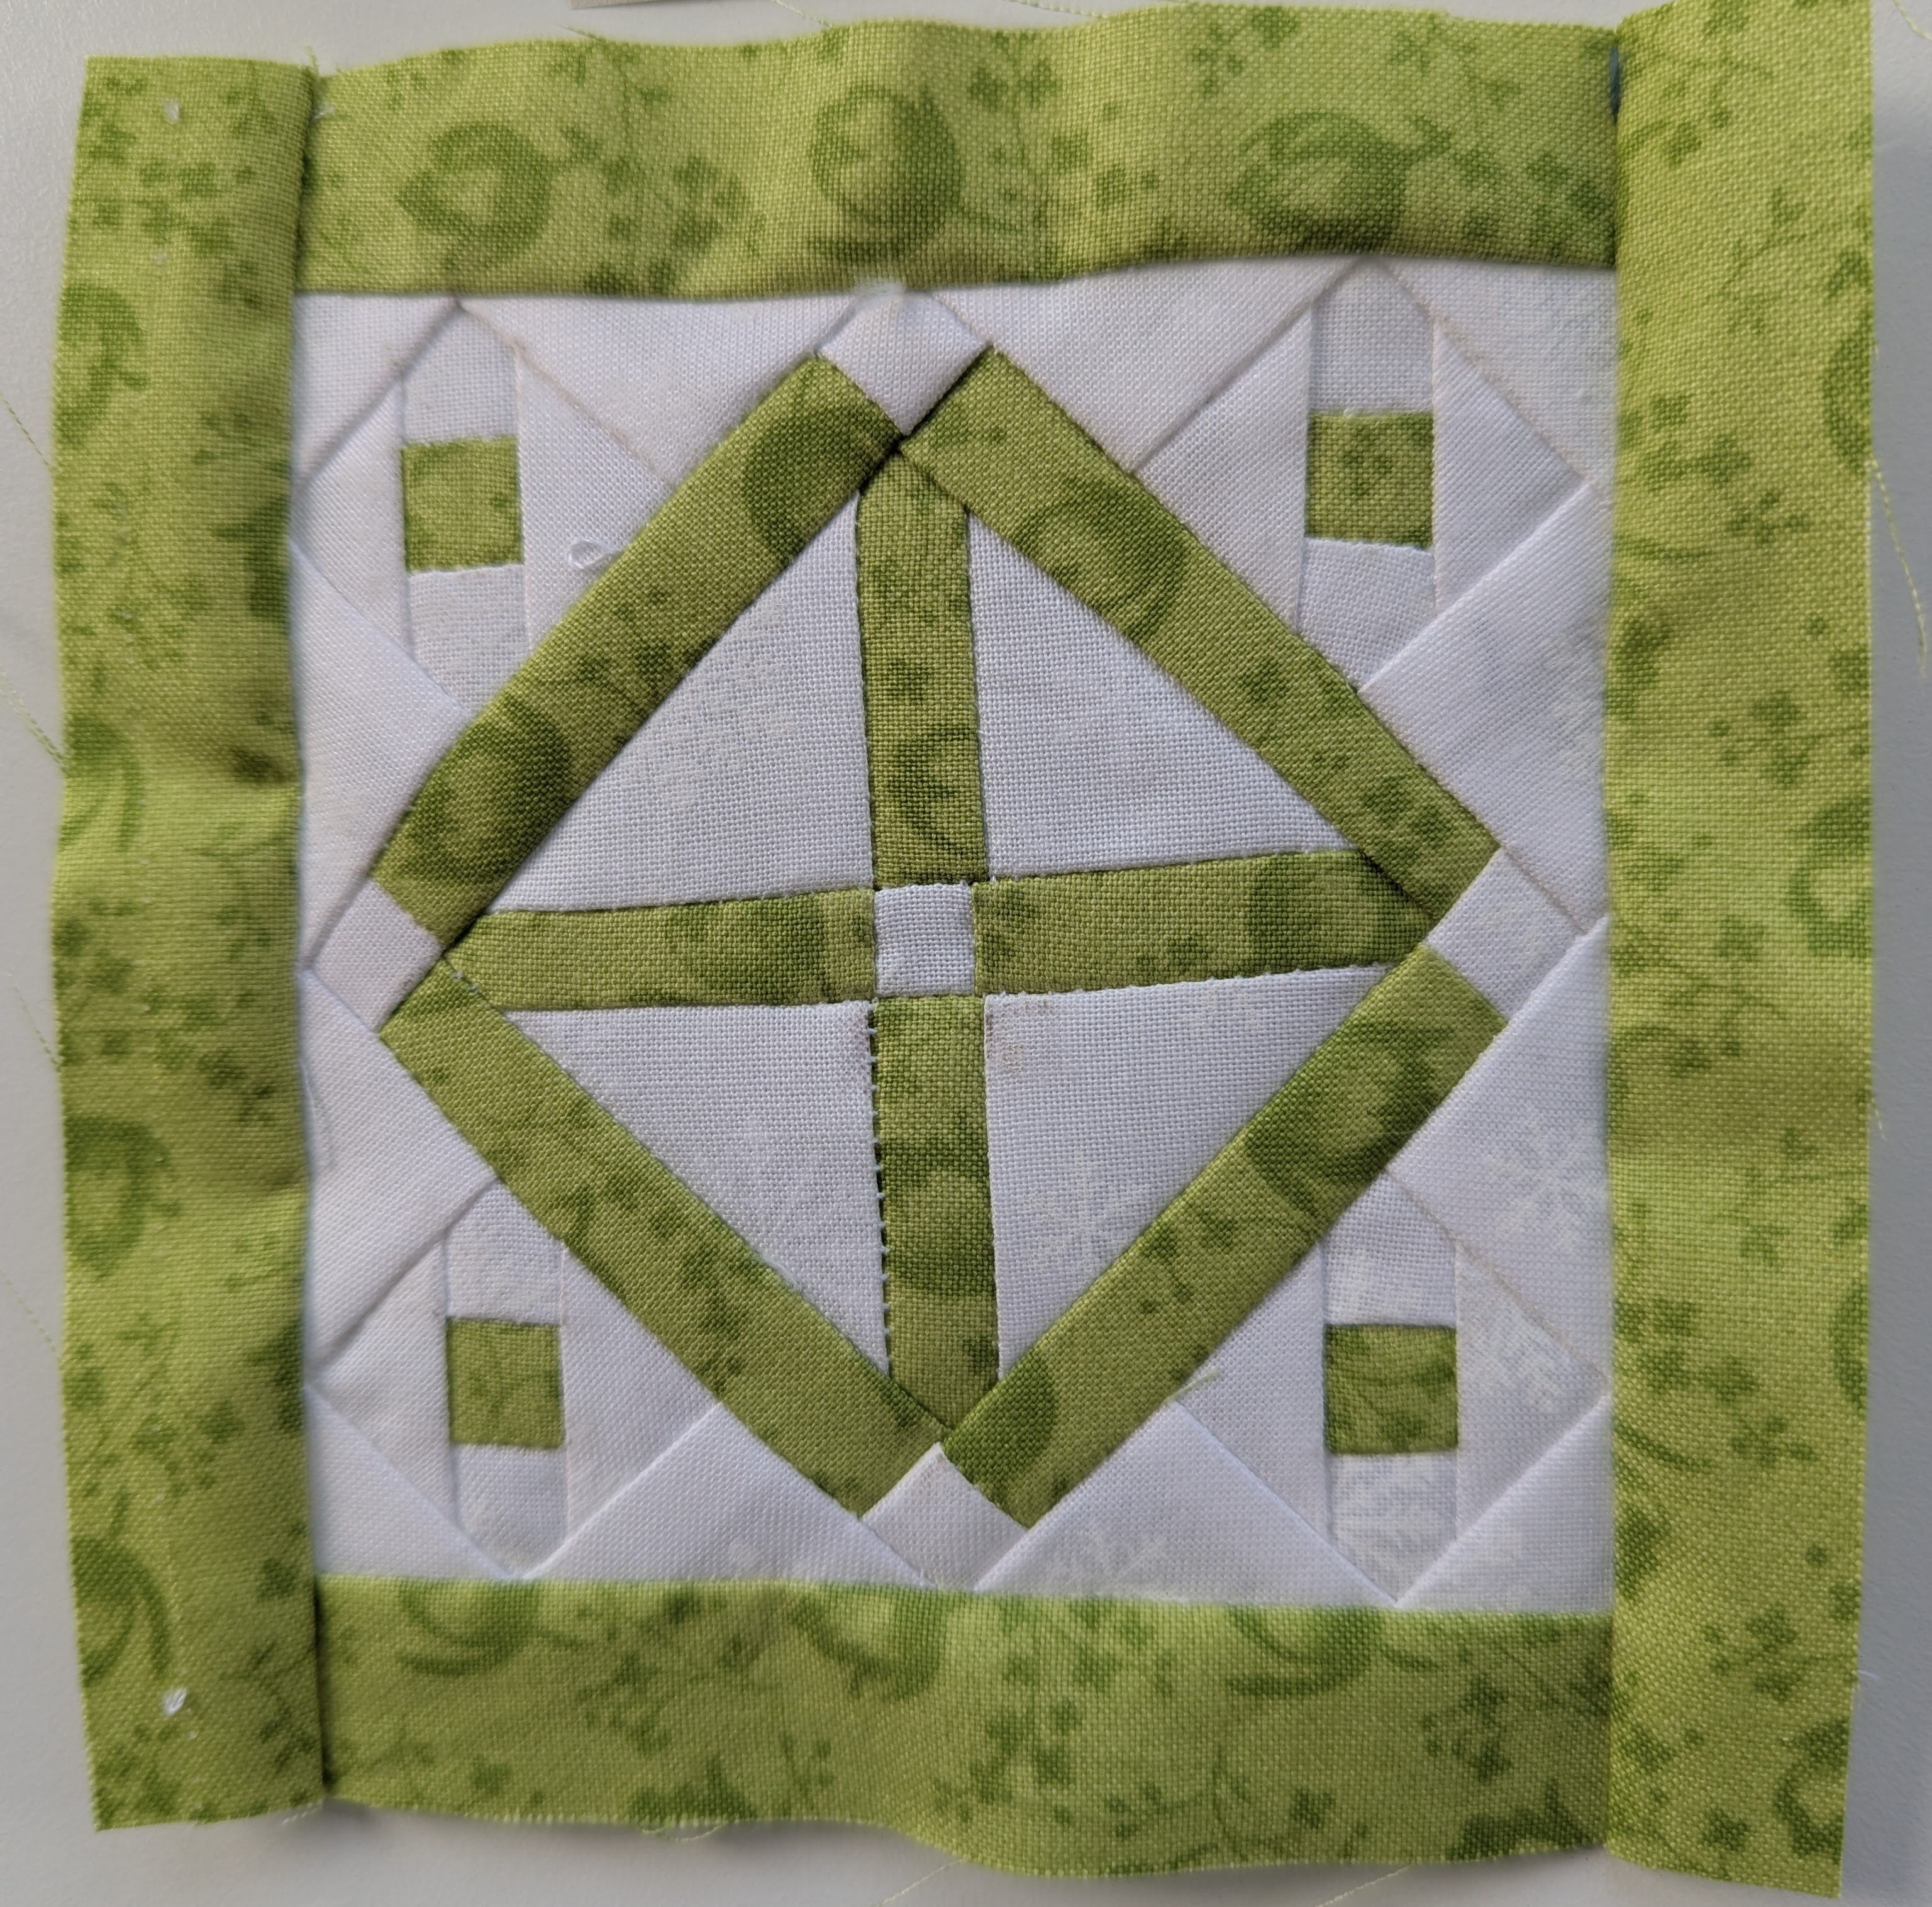
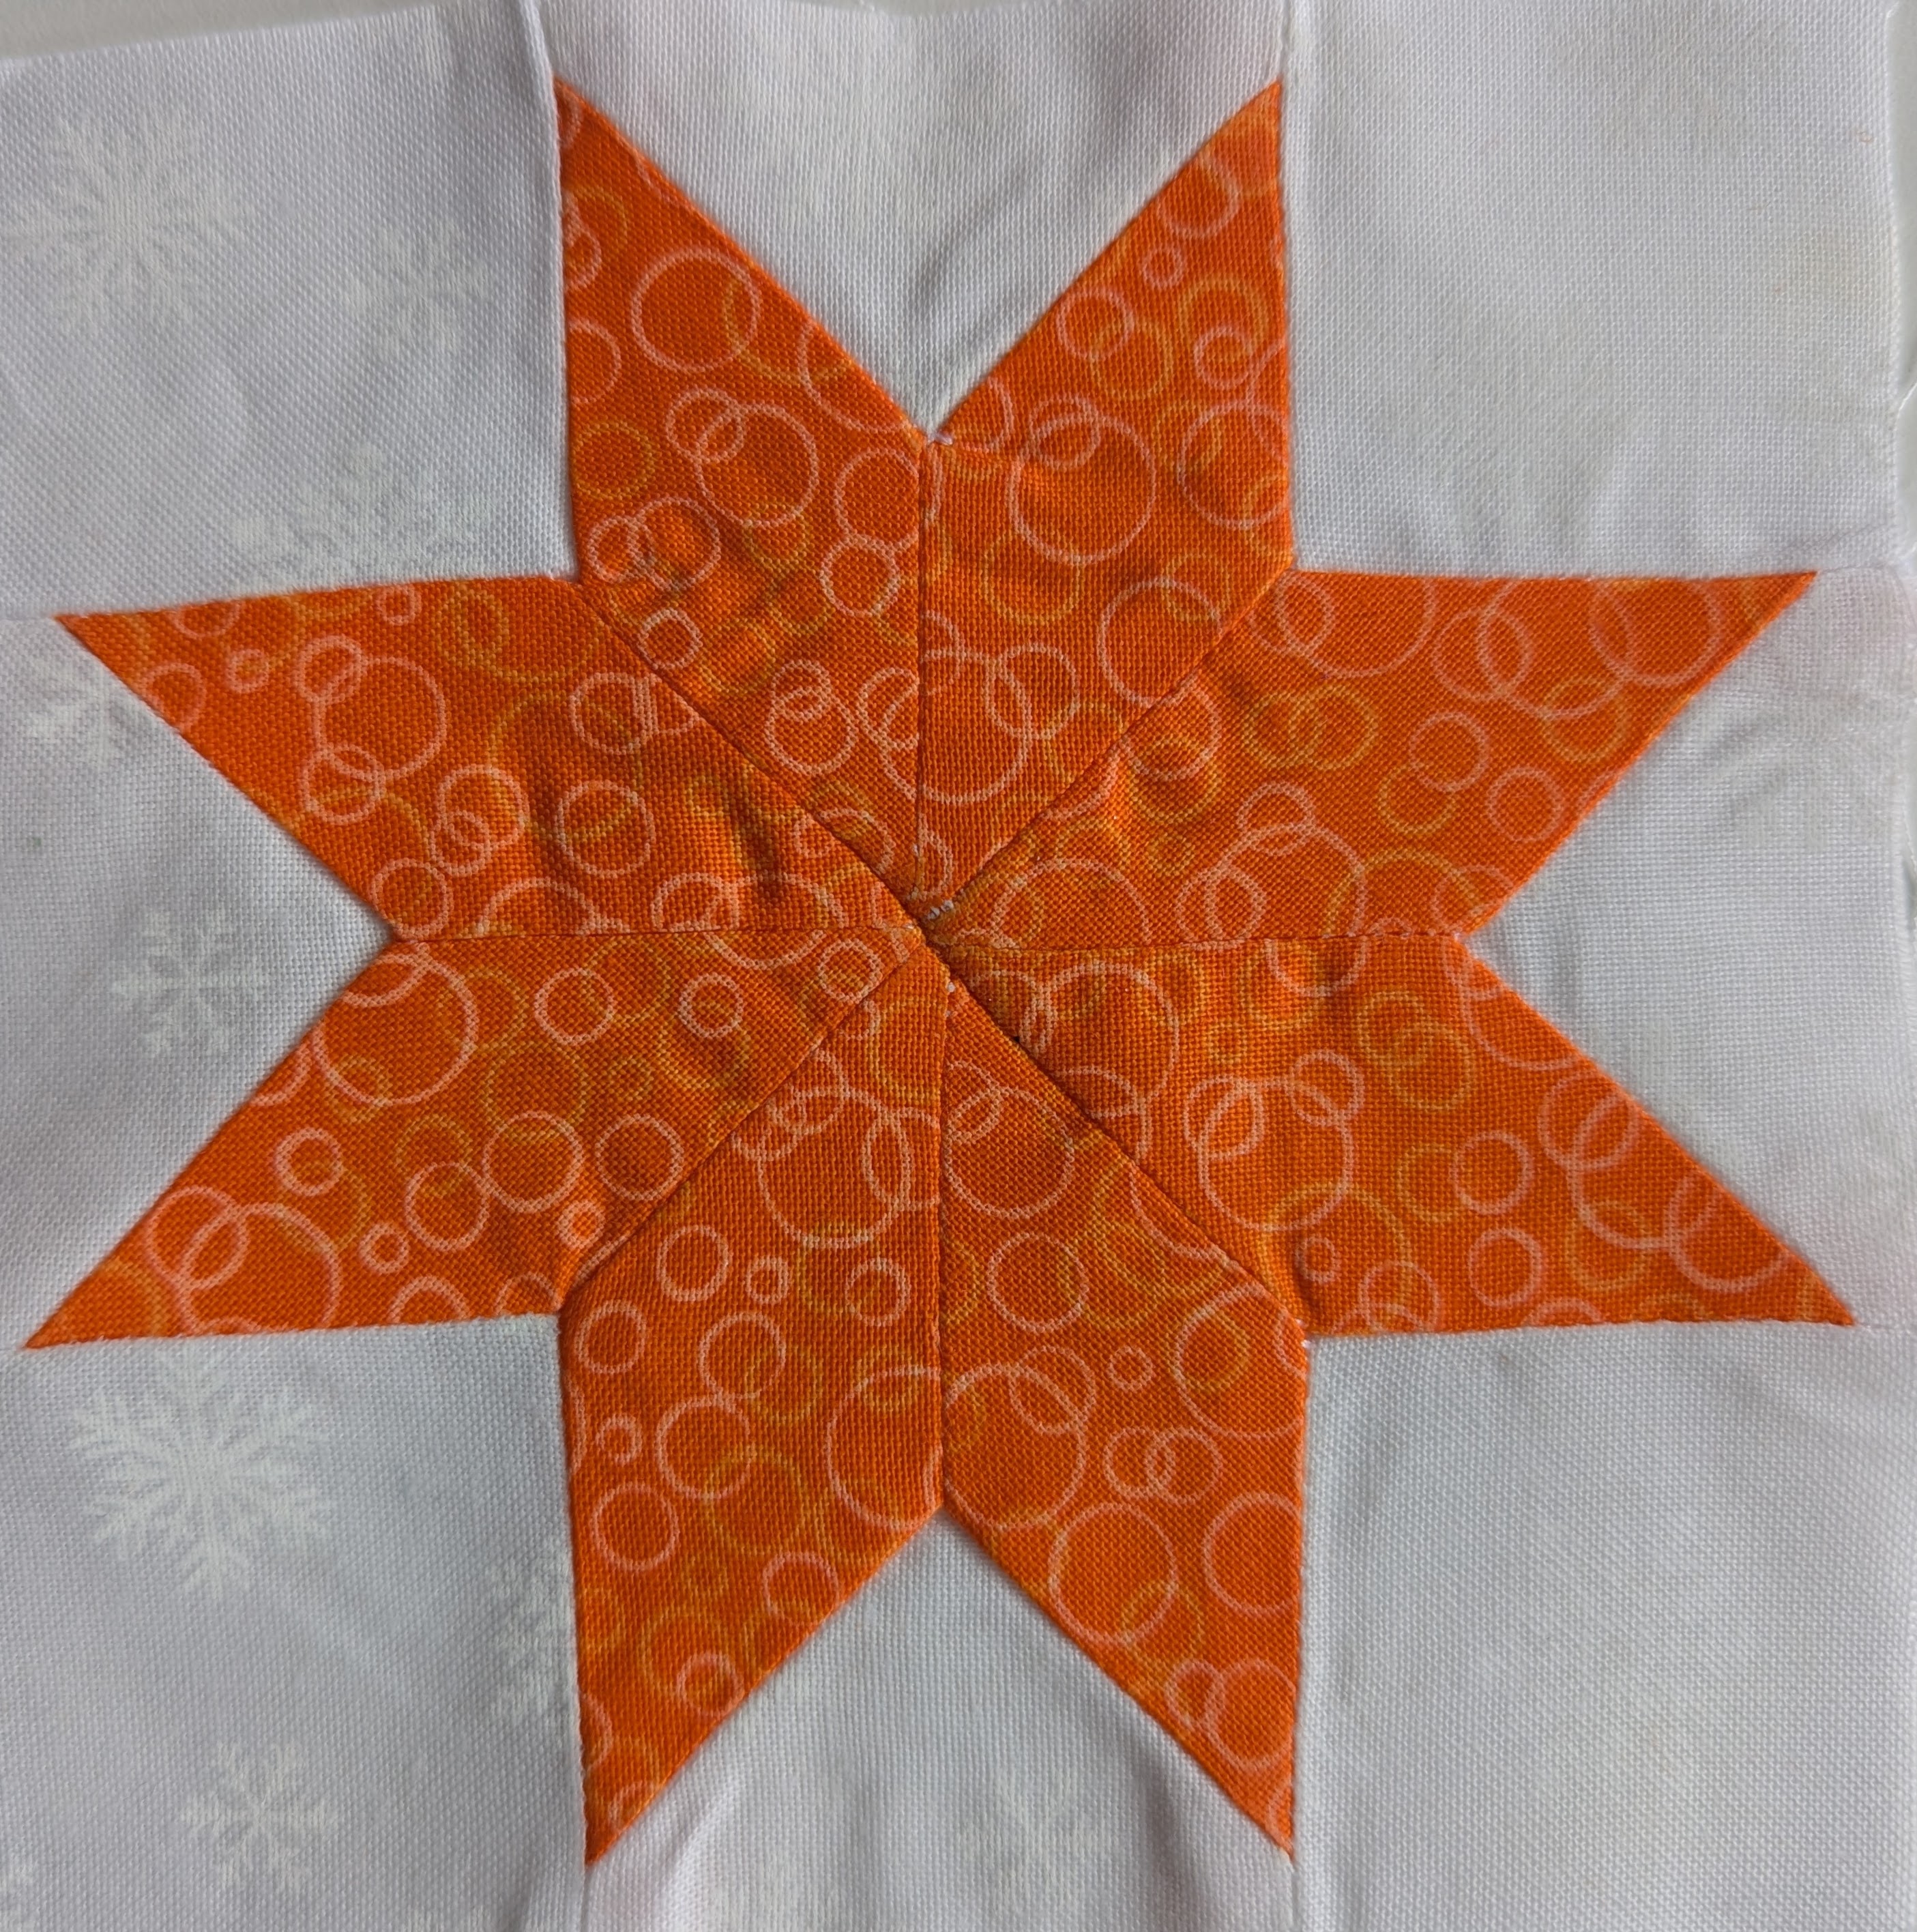
This block was chosen to balance out the green fabric I had used in two other blocks. And it was a return to FPP, since I am enjoying the results best. Today’s photo was not taken exactly “square”, but I can assure you that the block is fairly accurate in dimension and proportion.
Successes:
Again, the FPP process worked well.
I was able to get fairly accurate 3/8″ sections, which would have been impossible with traditional piecing.
Challenges:
I tried using Carol Doak’s Foundation Paper, and found it more difficult to remove from the tiny seams than theordinary copy paper that I had been using.
It is still difficult to keep these tiny blocks square, but I believe much of that will be remedied with the addition of the one-inch sashing, and a good application of the iron!
I had been following the plan from the Facebook group: Dear Jane Stitch Along, but am now behind by four blocks. Look for them in future posts!
And to top things off, our power supply on our Starlink died last week, so I have been without internet and home network. So I haven’t been able to access my printer to print out my next blocks. I did have one in reserve, and will begin on it shortly. And hopefully the power supply will arrive soon. “We don’t know what we’ve got, ’til it’s gone!”
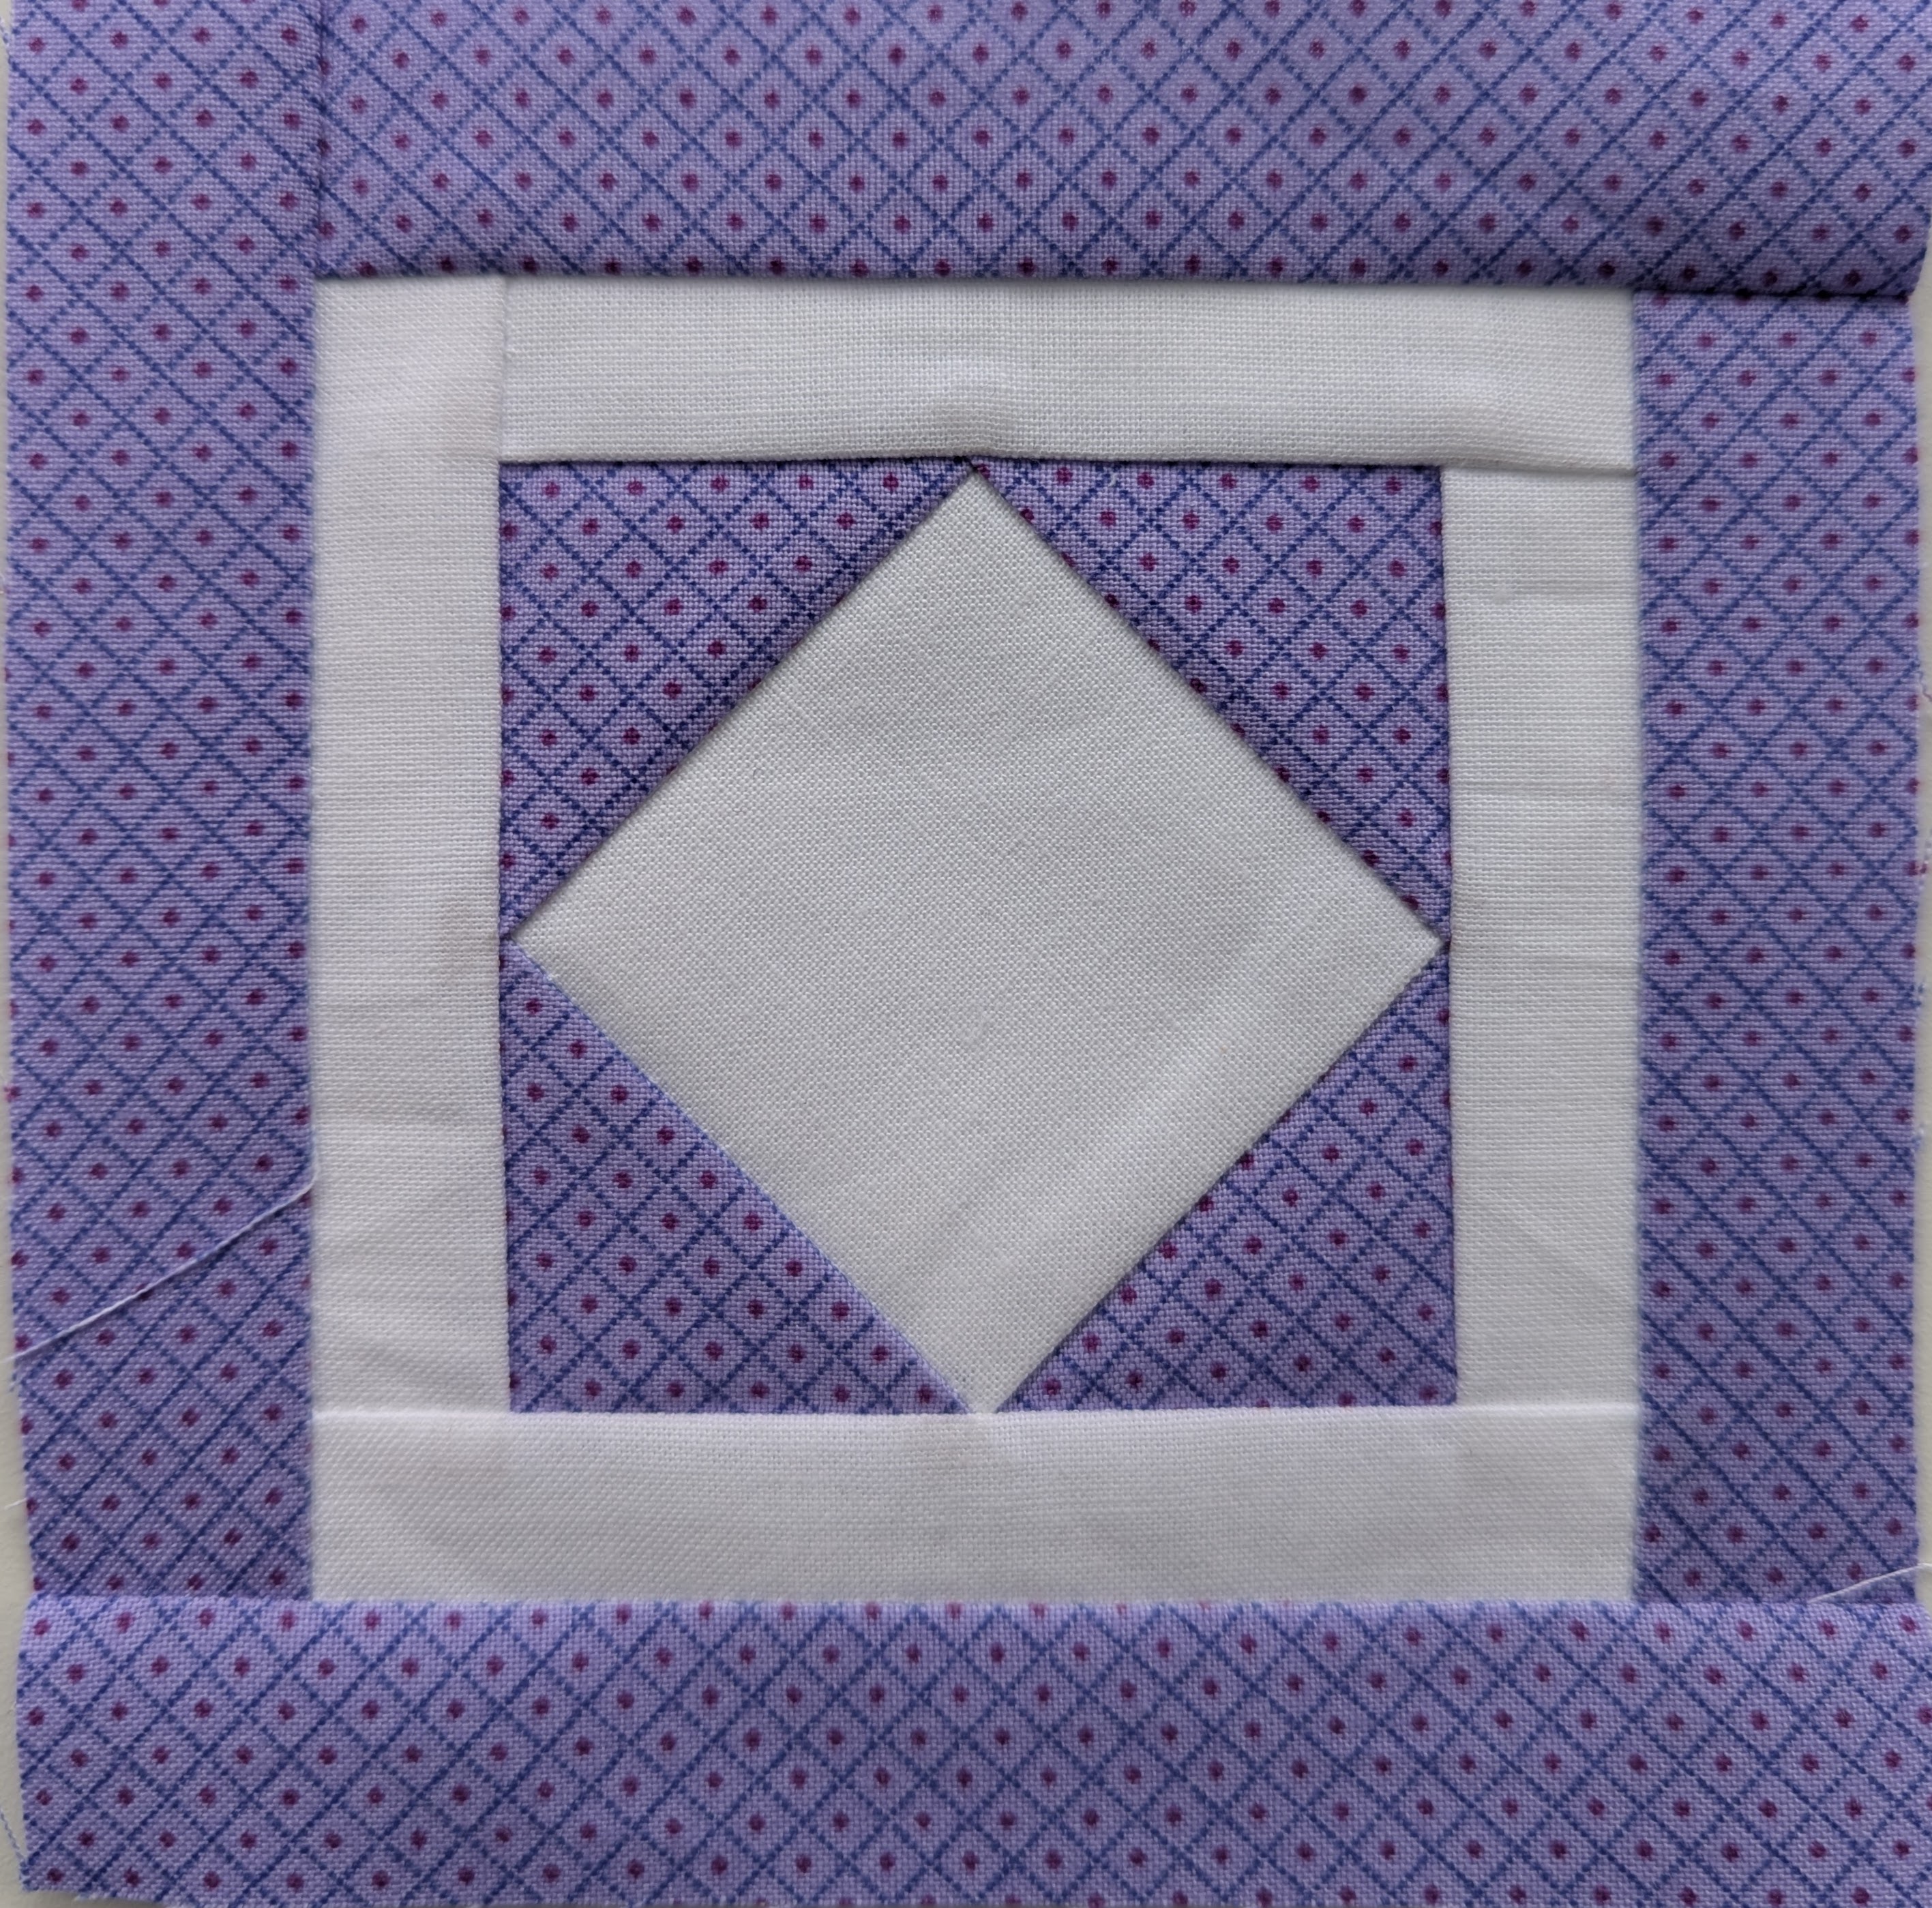
This one took some time. I first thought I needed matching thread, so waited to get to a fabric store to buy some royal blue. Then I decided the my light gray Invisifil would look better, so then I could proceed with the applique.
Successes:
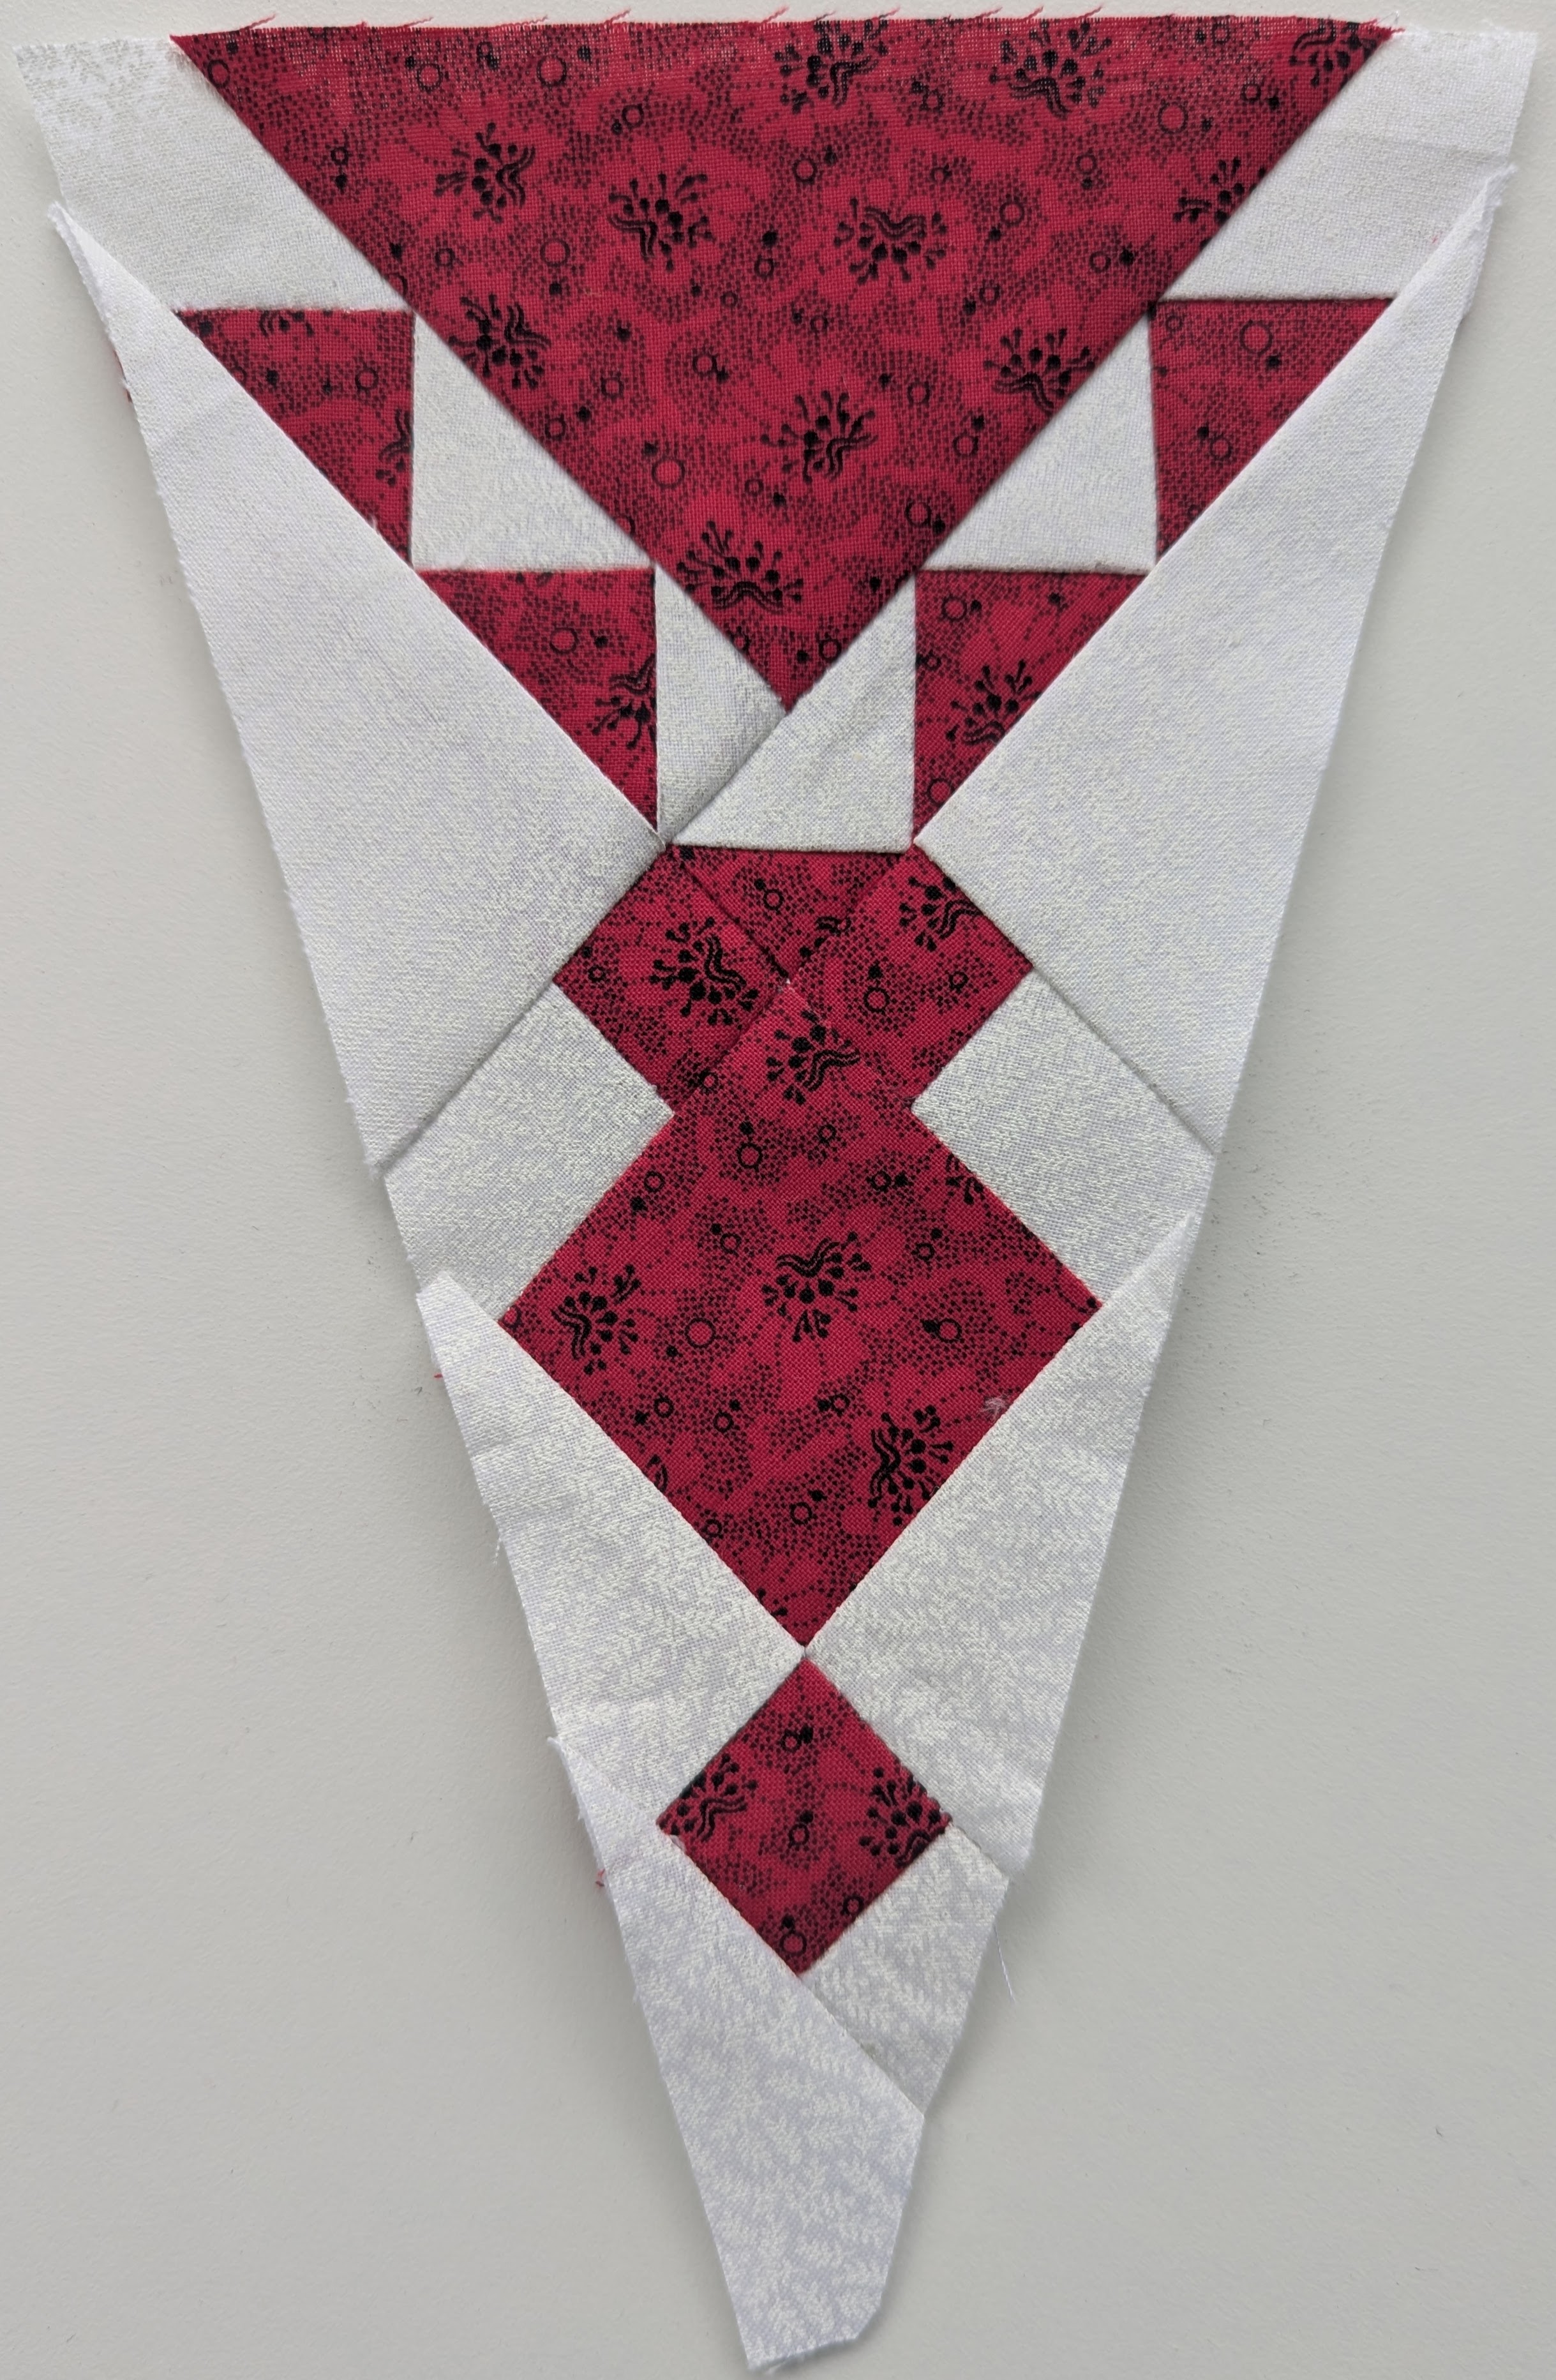
The Foundation Paper Piecing worked well, except at the top, where I didn’t leave enought fabric for the seam allowance.
I have added a strip of white, that I will remove when I apply the actual sashing at the end. It will keep the edges from deteriorating, and will maintain the size where the edges are on bias.
The Invisifil thread is beautiful for the needle-turn applique. I am feeling a little guilty that it’s not “cotton”, but the results are good.
Challenges:
I decided to try the fusible interfacing plus glue technique for the one piece of applique. It was much better than the last technique I used (interfacing layered, then turned inside out). Next try will be freezer paper and starch…..
Back to Foundation Paper Piecing for a hit of success! While Trooper Green’s Badge would have worked fine with rotary cut pieces, Reflections Abound would have been a challenge to cut and piece, with such narrow pieces.
Successes:
Crisp corners and points.
By pre-cutting according to the rotary cutting instructions, I am being very frugal with my fabric.
Challenges:
My only challenge I anticipate is that I might find myself left with the most difficult blocks at the end, with the fabrics that I dislike, and so my motivation might suffer.
I’m actually working on a hand-pieced block that is testing my spatial abilities. So I decided to set it aside, and choose a simpler block that I could Foundation Paper Piece.
Successes:
This is ONE piece of paper, with triangles added to a central strip. VERY ease to piece.
I was able to use the rotary cutting instructions to cut the fabric, then the paper to do the actual sewing.
Challenges:
Despite pre-cutting, I seem to be a little short on the border. I will have to be careful when I add sashing to ensure that my blocks finish consistently at 4.5″
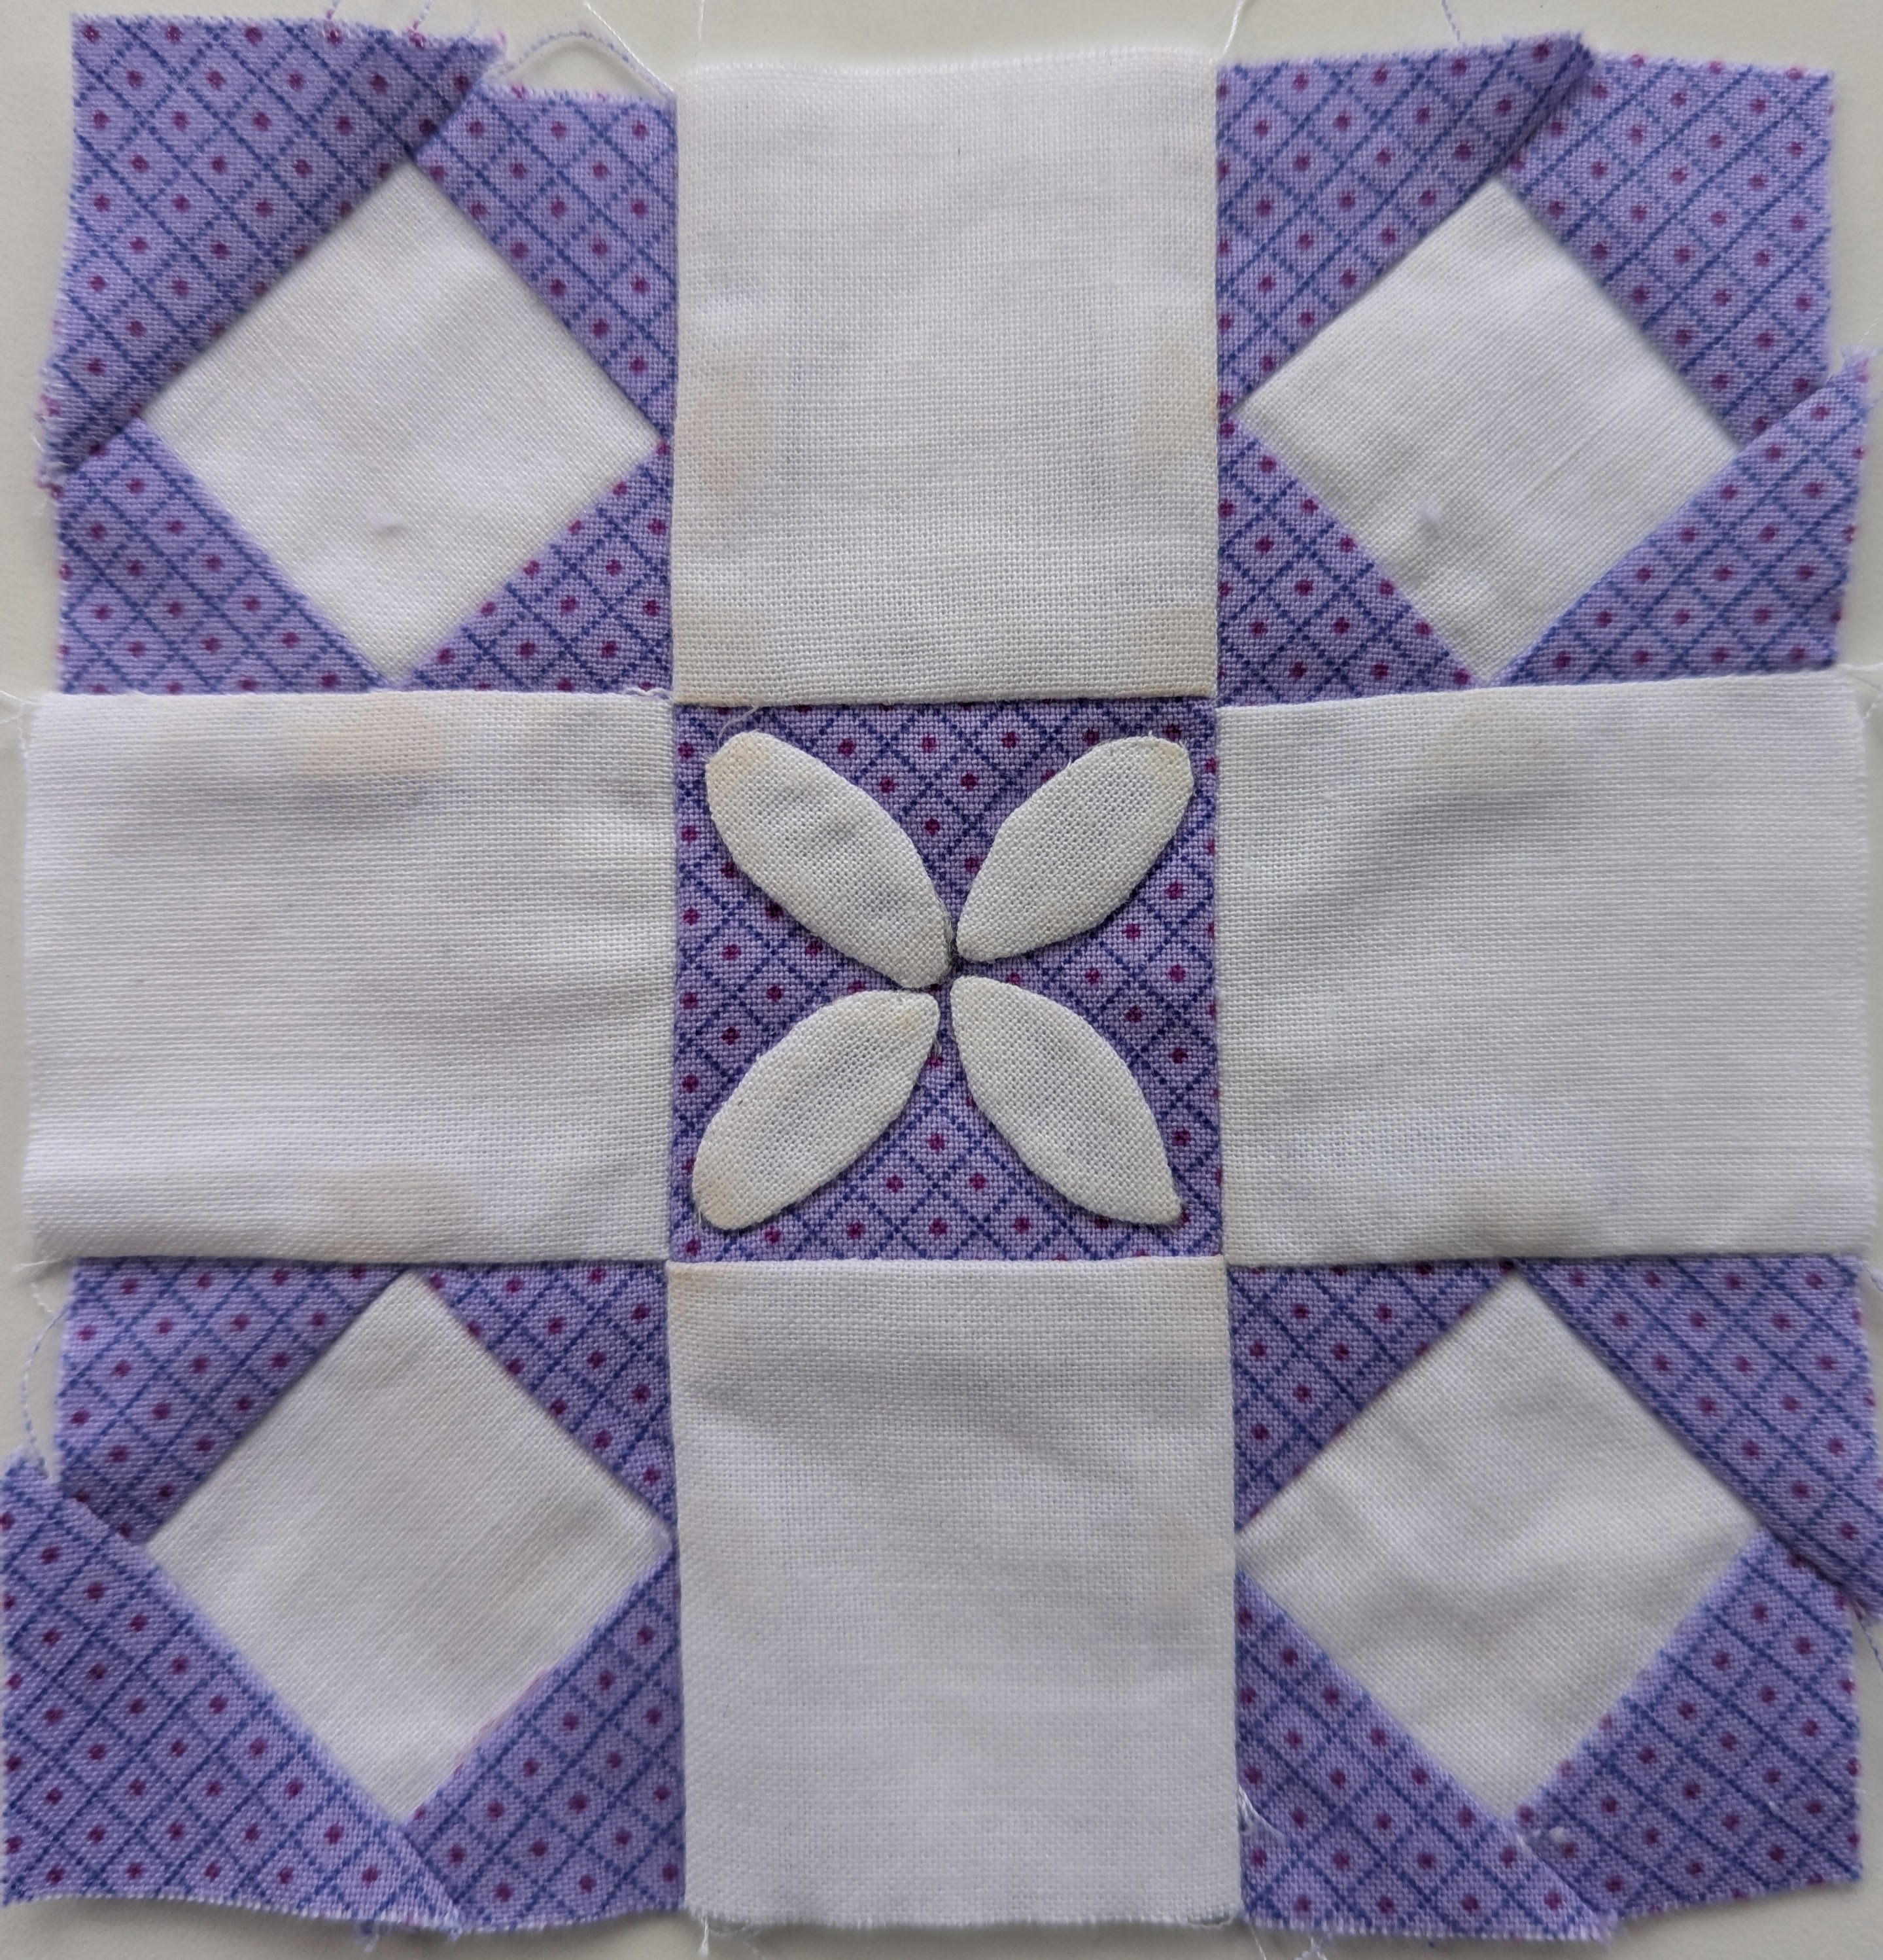
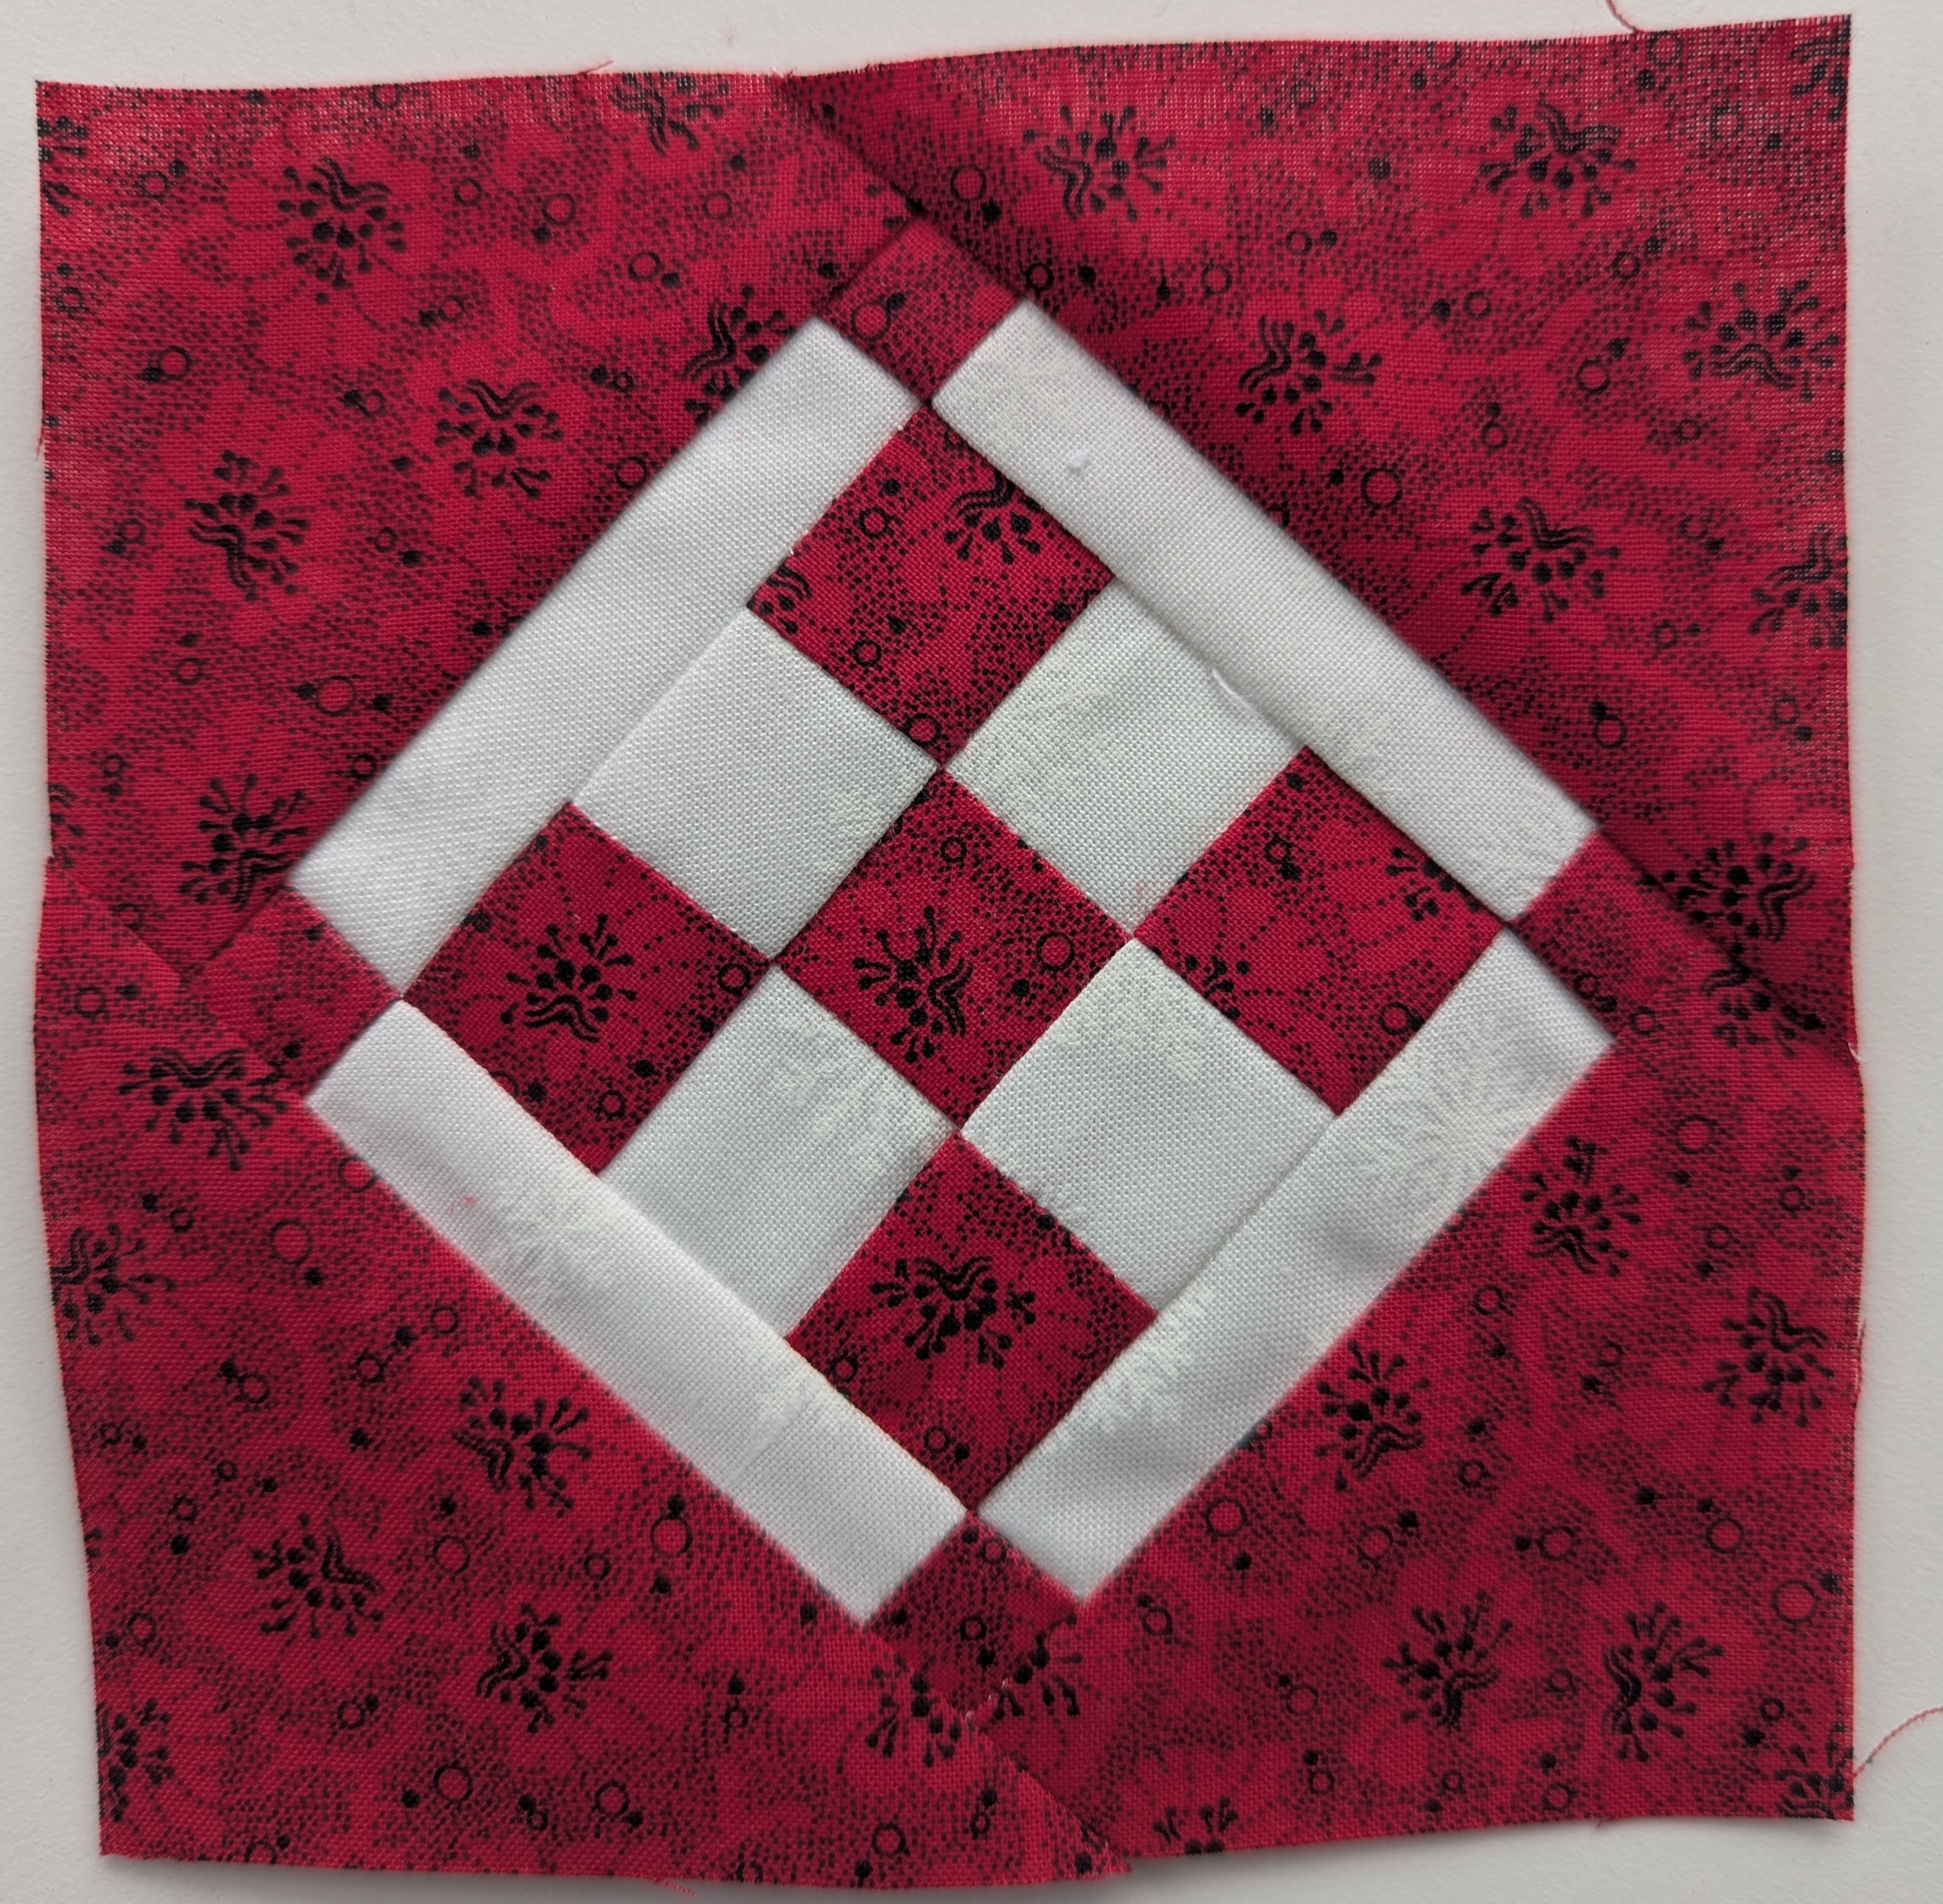
This is Week 6 of the Dear Jane Stitch Along, and this group is continuing to work from the centre of the quilt top out. I was looking for a colour that would work next to the red and yellow, that I hadn’t used before. This purple may be a little light in tone, but I think it will work well as I add more blocks scattered throughout the layout.
Successes:
I did actually successfully make the petals in the middle, using light interfacing, sewing the shape, then cutting a slit and turning it inside out.
The Invisifil thread works beautifully to attach the applique.
Challenges:
I thought I could snowball the corners, but didn’t do the math correctly, and then actually cut off one of my triangles. So I then cut according to the rotary cutting instructions, and was able to sew the triangles on to the centre diamonds.
The sew and turn technique for applique is very difficult to do with these tiny pieces. The curved sides worked beautifully, but the sharp end points were lost.
So, for the next applique block, I think I will try cutting the template pieces out of fusible interfacing, and apply them to the back of the fabric. Then I will try using fabric glue to fold down the sides.
And even though they would have been “fiddly”, I think that the four corner blocks would have been much more precise had I chosen to do Foundation Paper Piecing.
I pressed the star seams “open”, so that I had a clean corner into which I could set the white triangles and squares.
I made a conversion chart for all the measurements from 1/16″ to 15/16″, so that I could estimate the cutting size when using my rotary cutter and ruler.
I pressed the all the perimeter triangles and squares towards the “dark” star, so there is only a tiny bit at the end of the point where the orange might shadow through the white.
Challenges:
The star points are all on the bias, so they have a tendency to stretch. When first pieced together, they made a “cup”, and required pressing to lay flat.
There are many seams coming together in the middle, but with all seams pressed open, it helped even out the thickness
This is a very strong colour, sitting to the right of the centre block. I will have to plan to balance this out as I construct the other blocks near the centre.
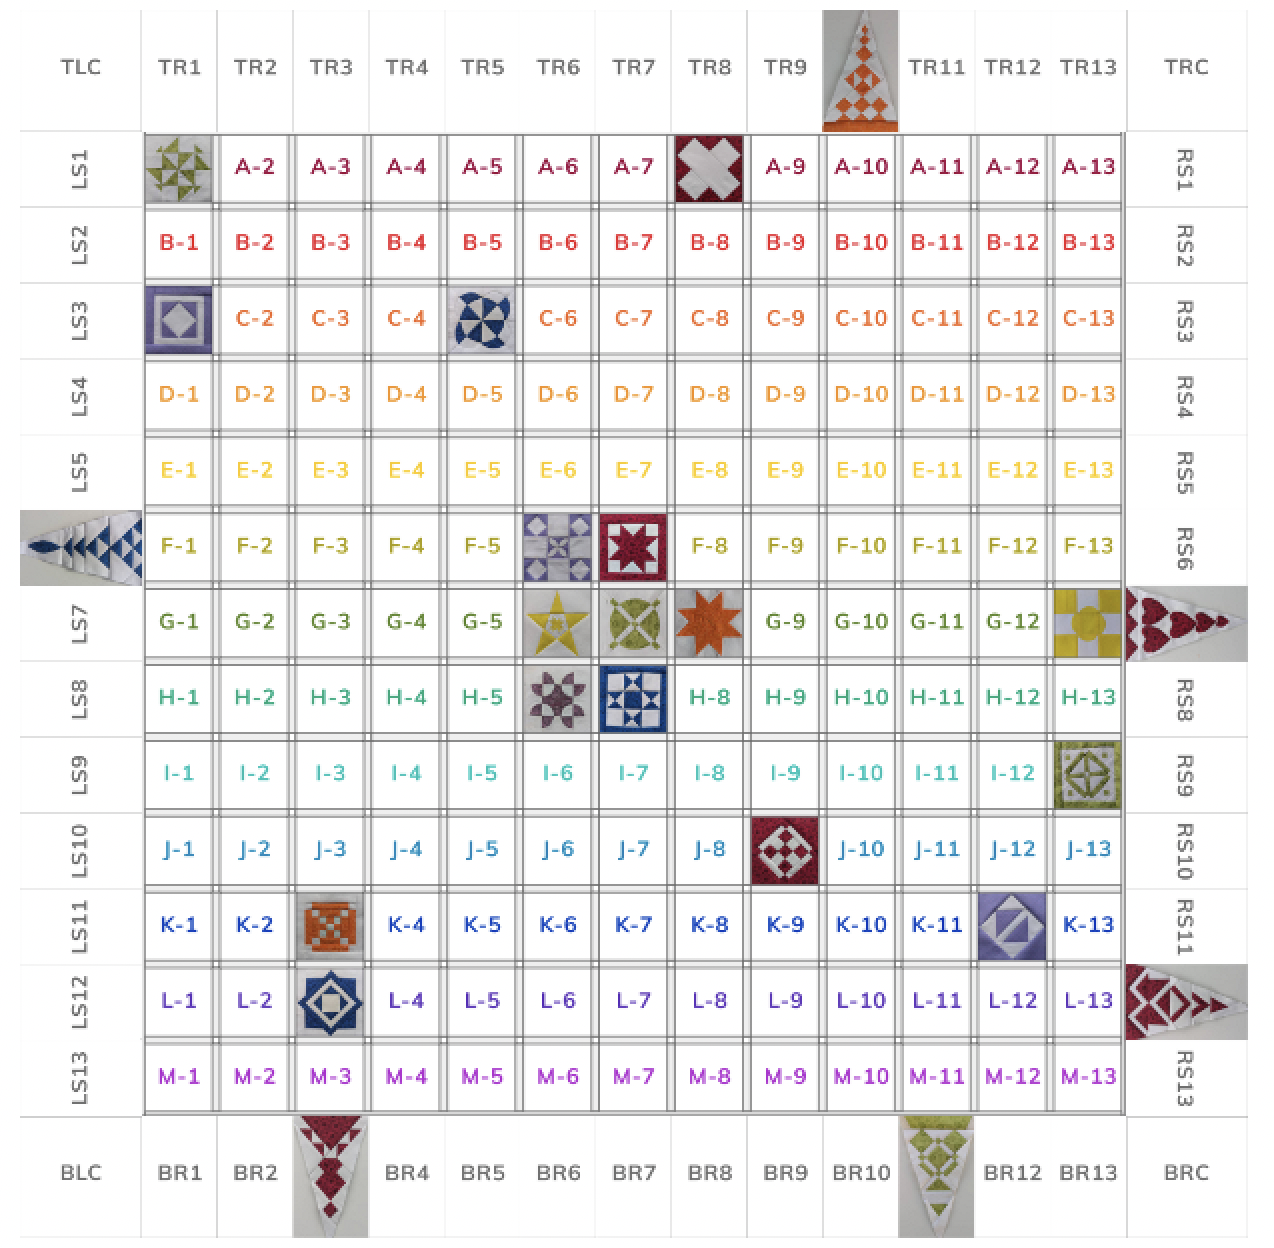
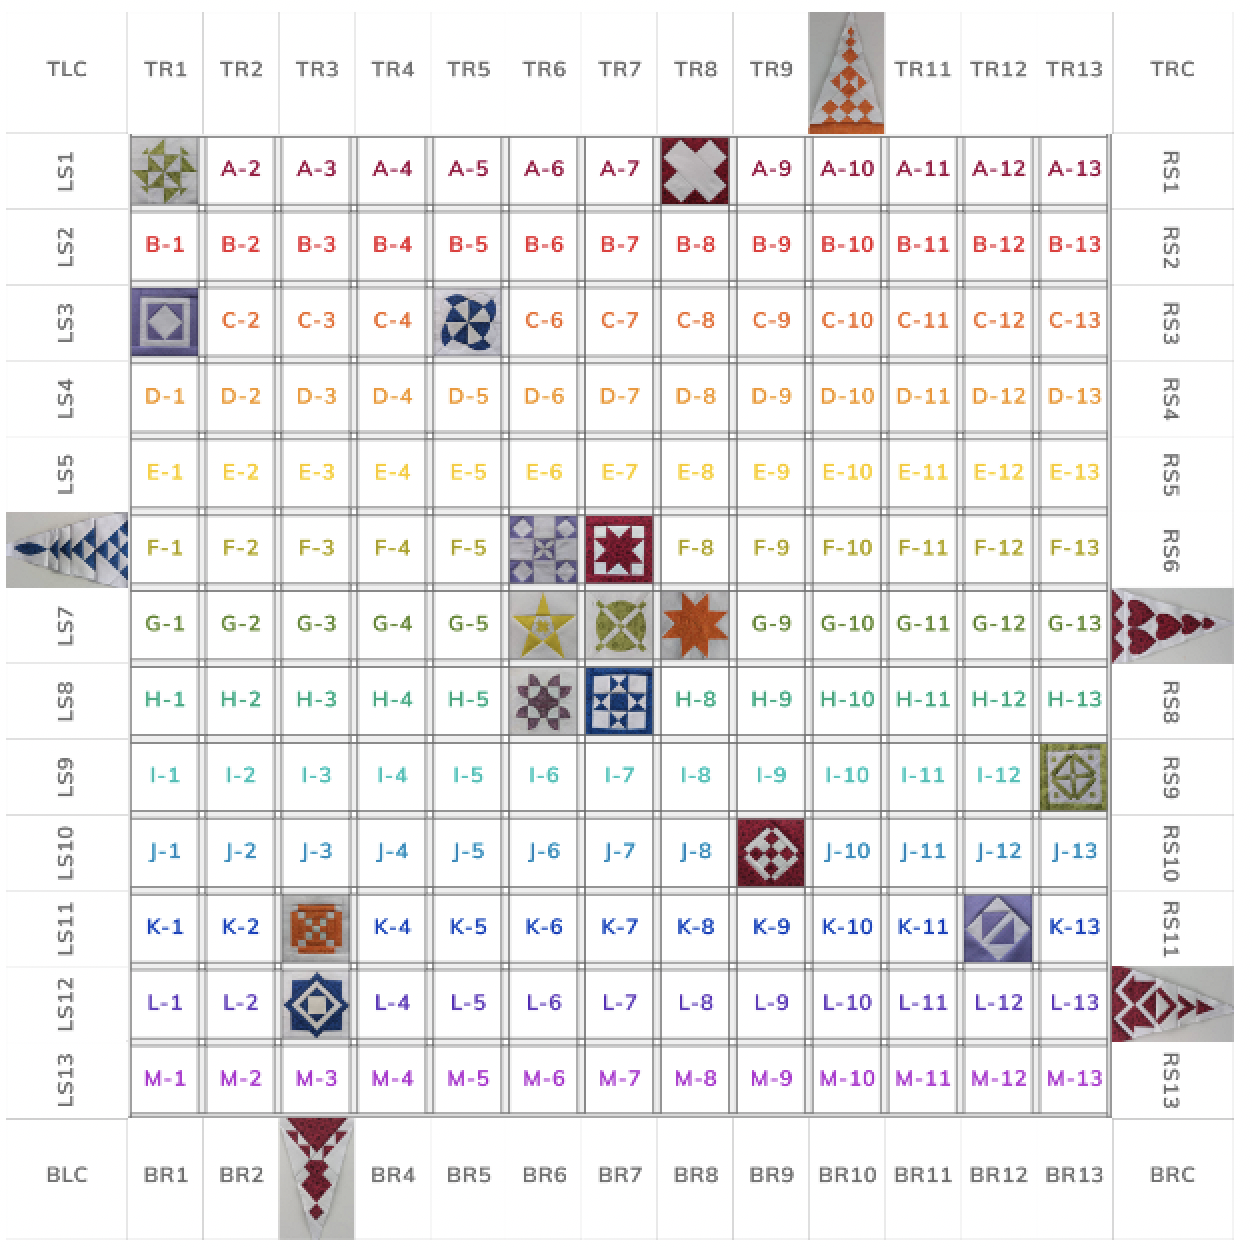
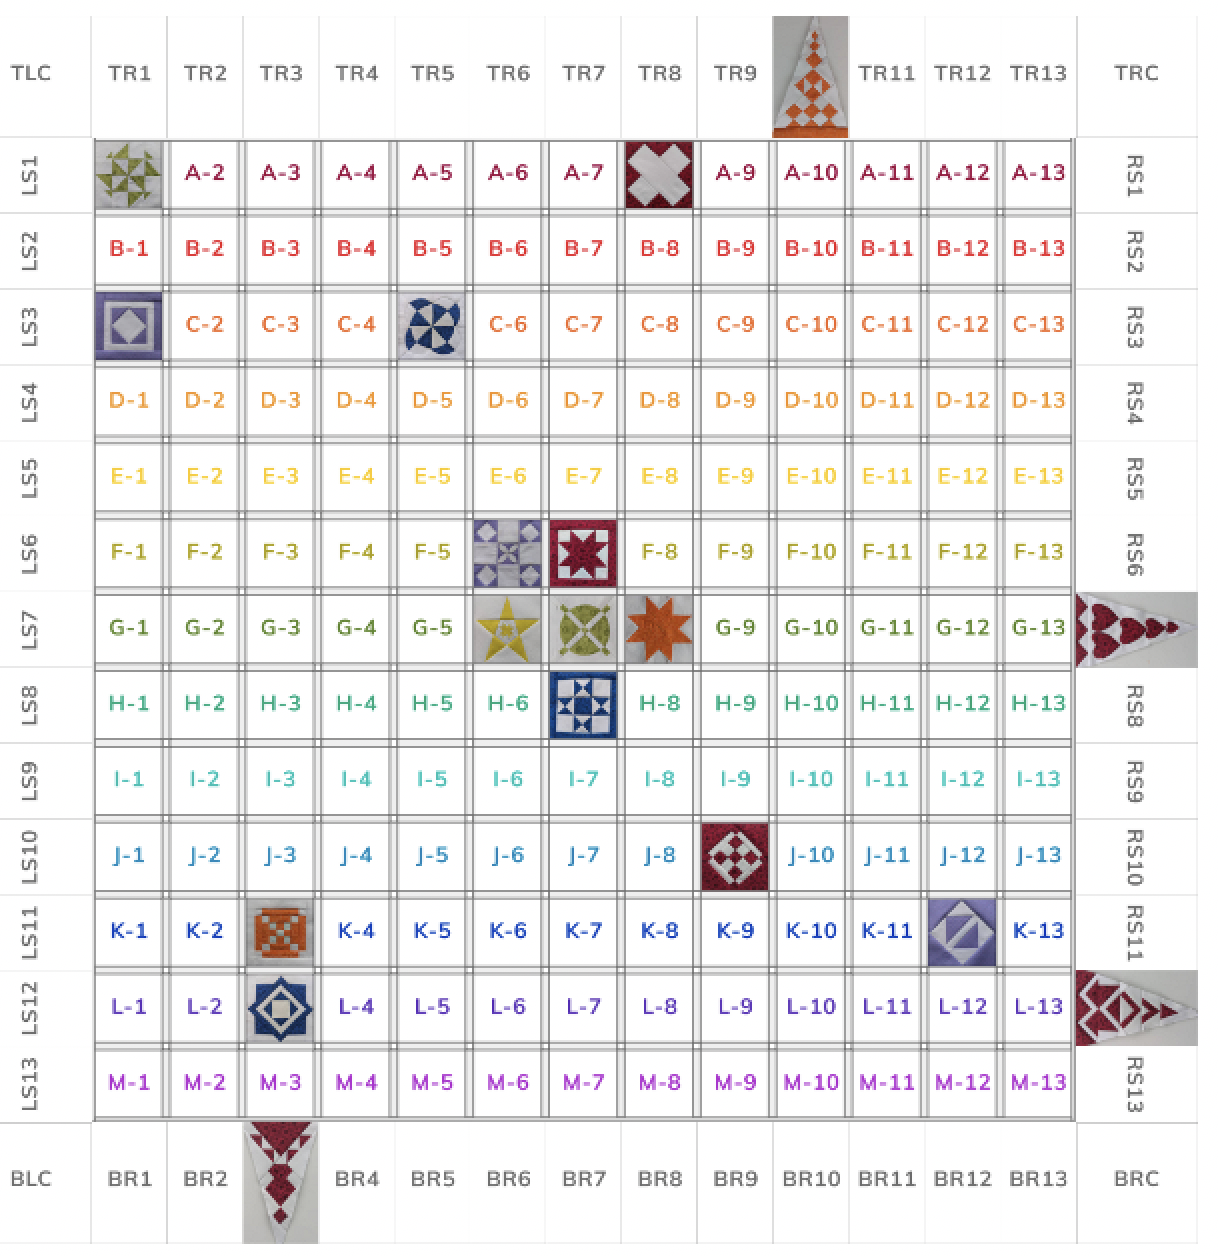
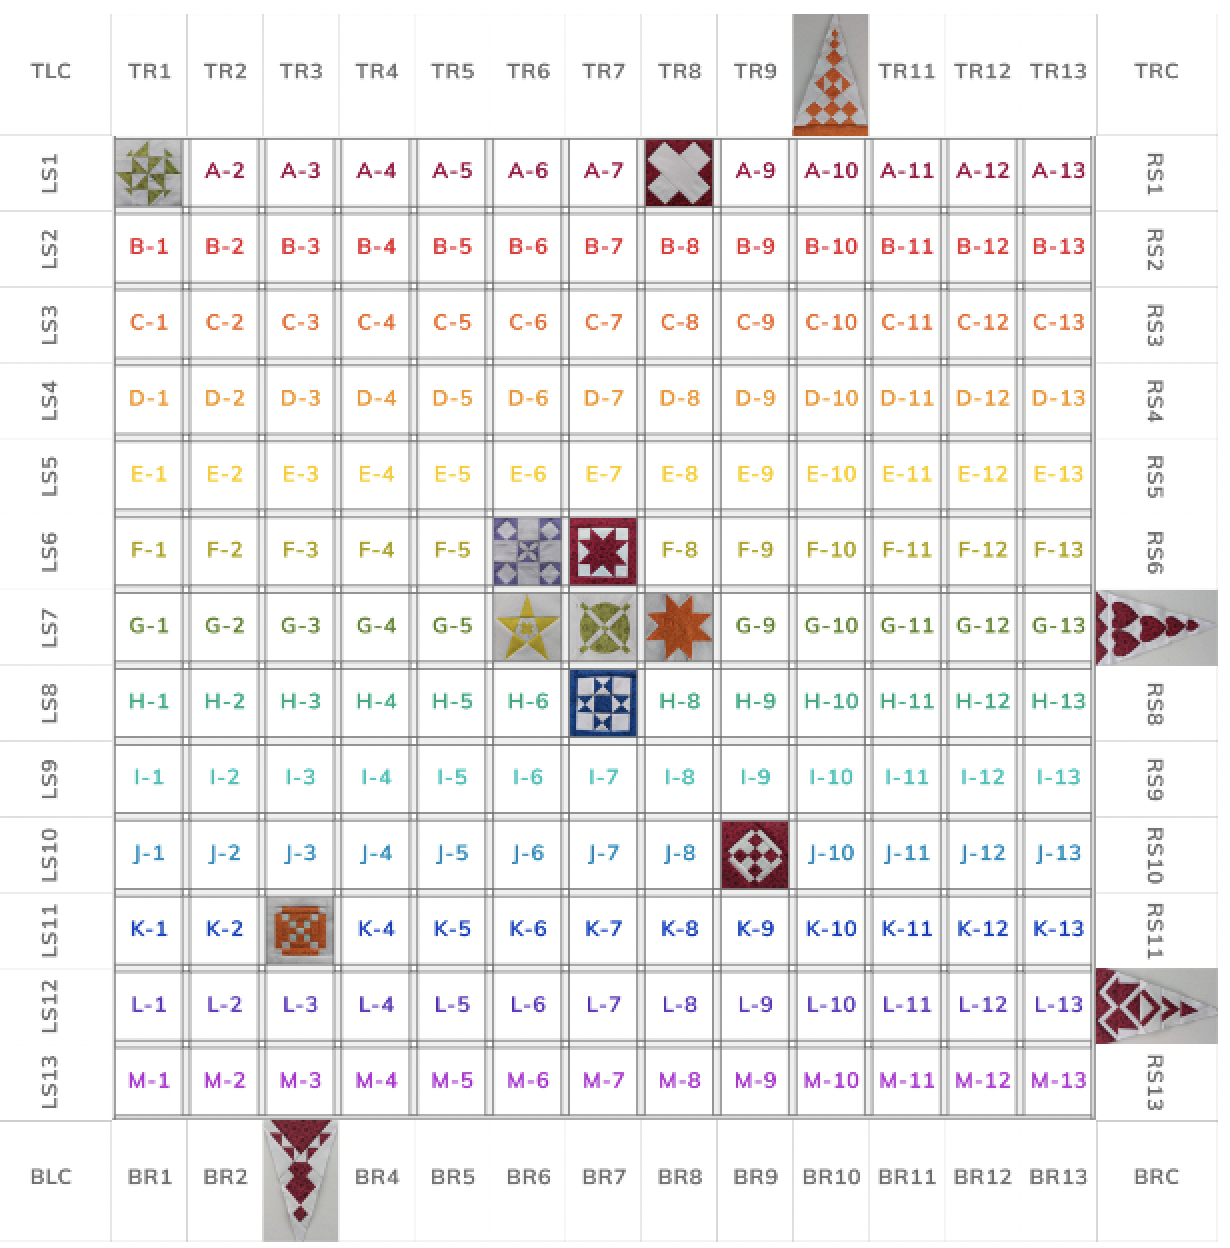
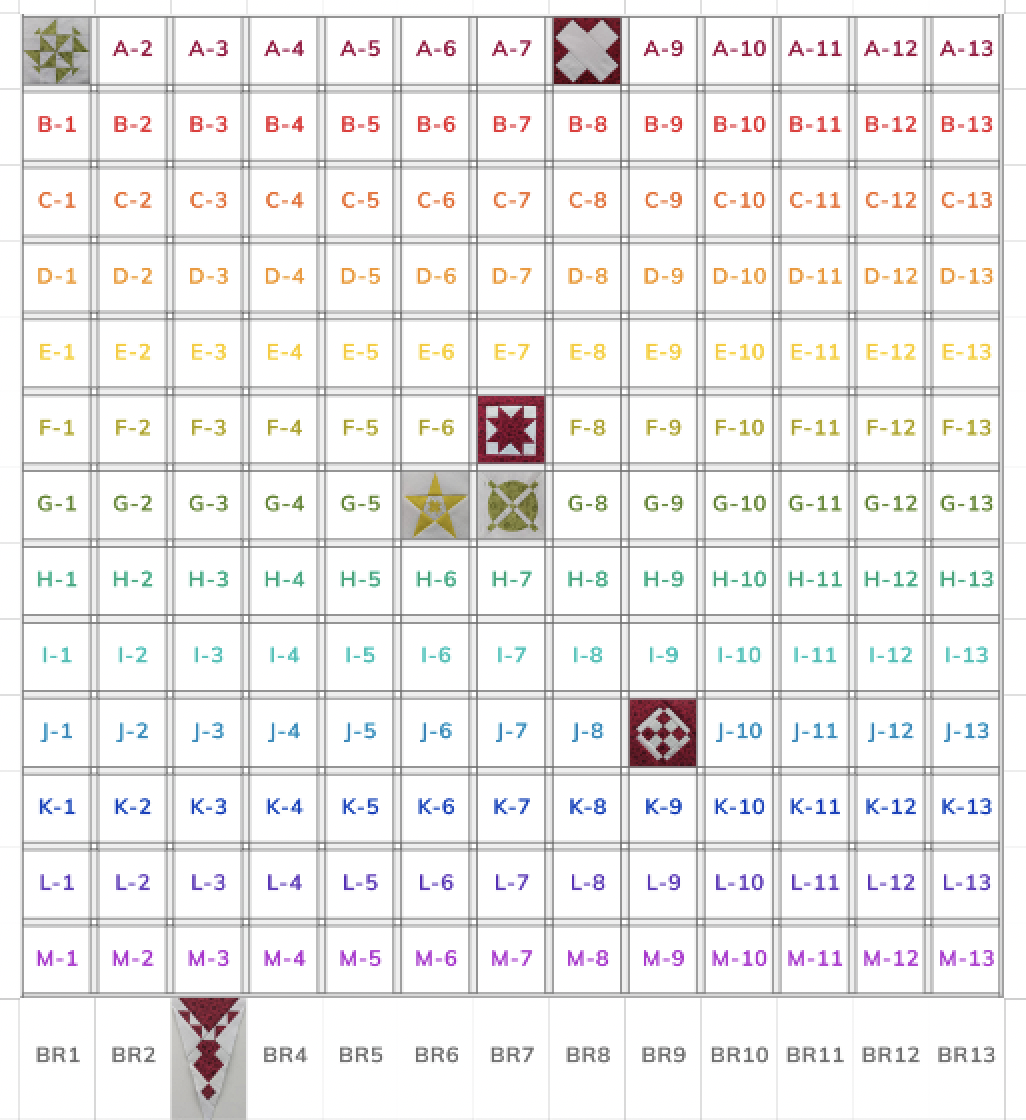
Here’s what the quilt looks like so far:
This traditional block features Y-seams, the bane of many quilters. I watched a few YouTube videos, but they didn’t really add anything that I hadn’t already tried.
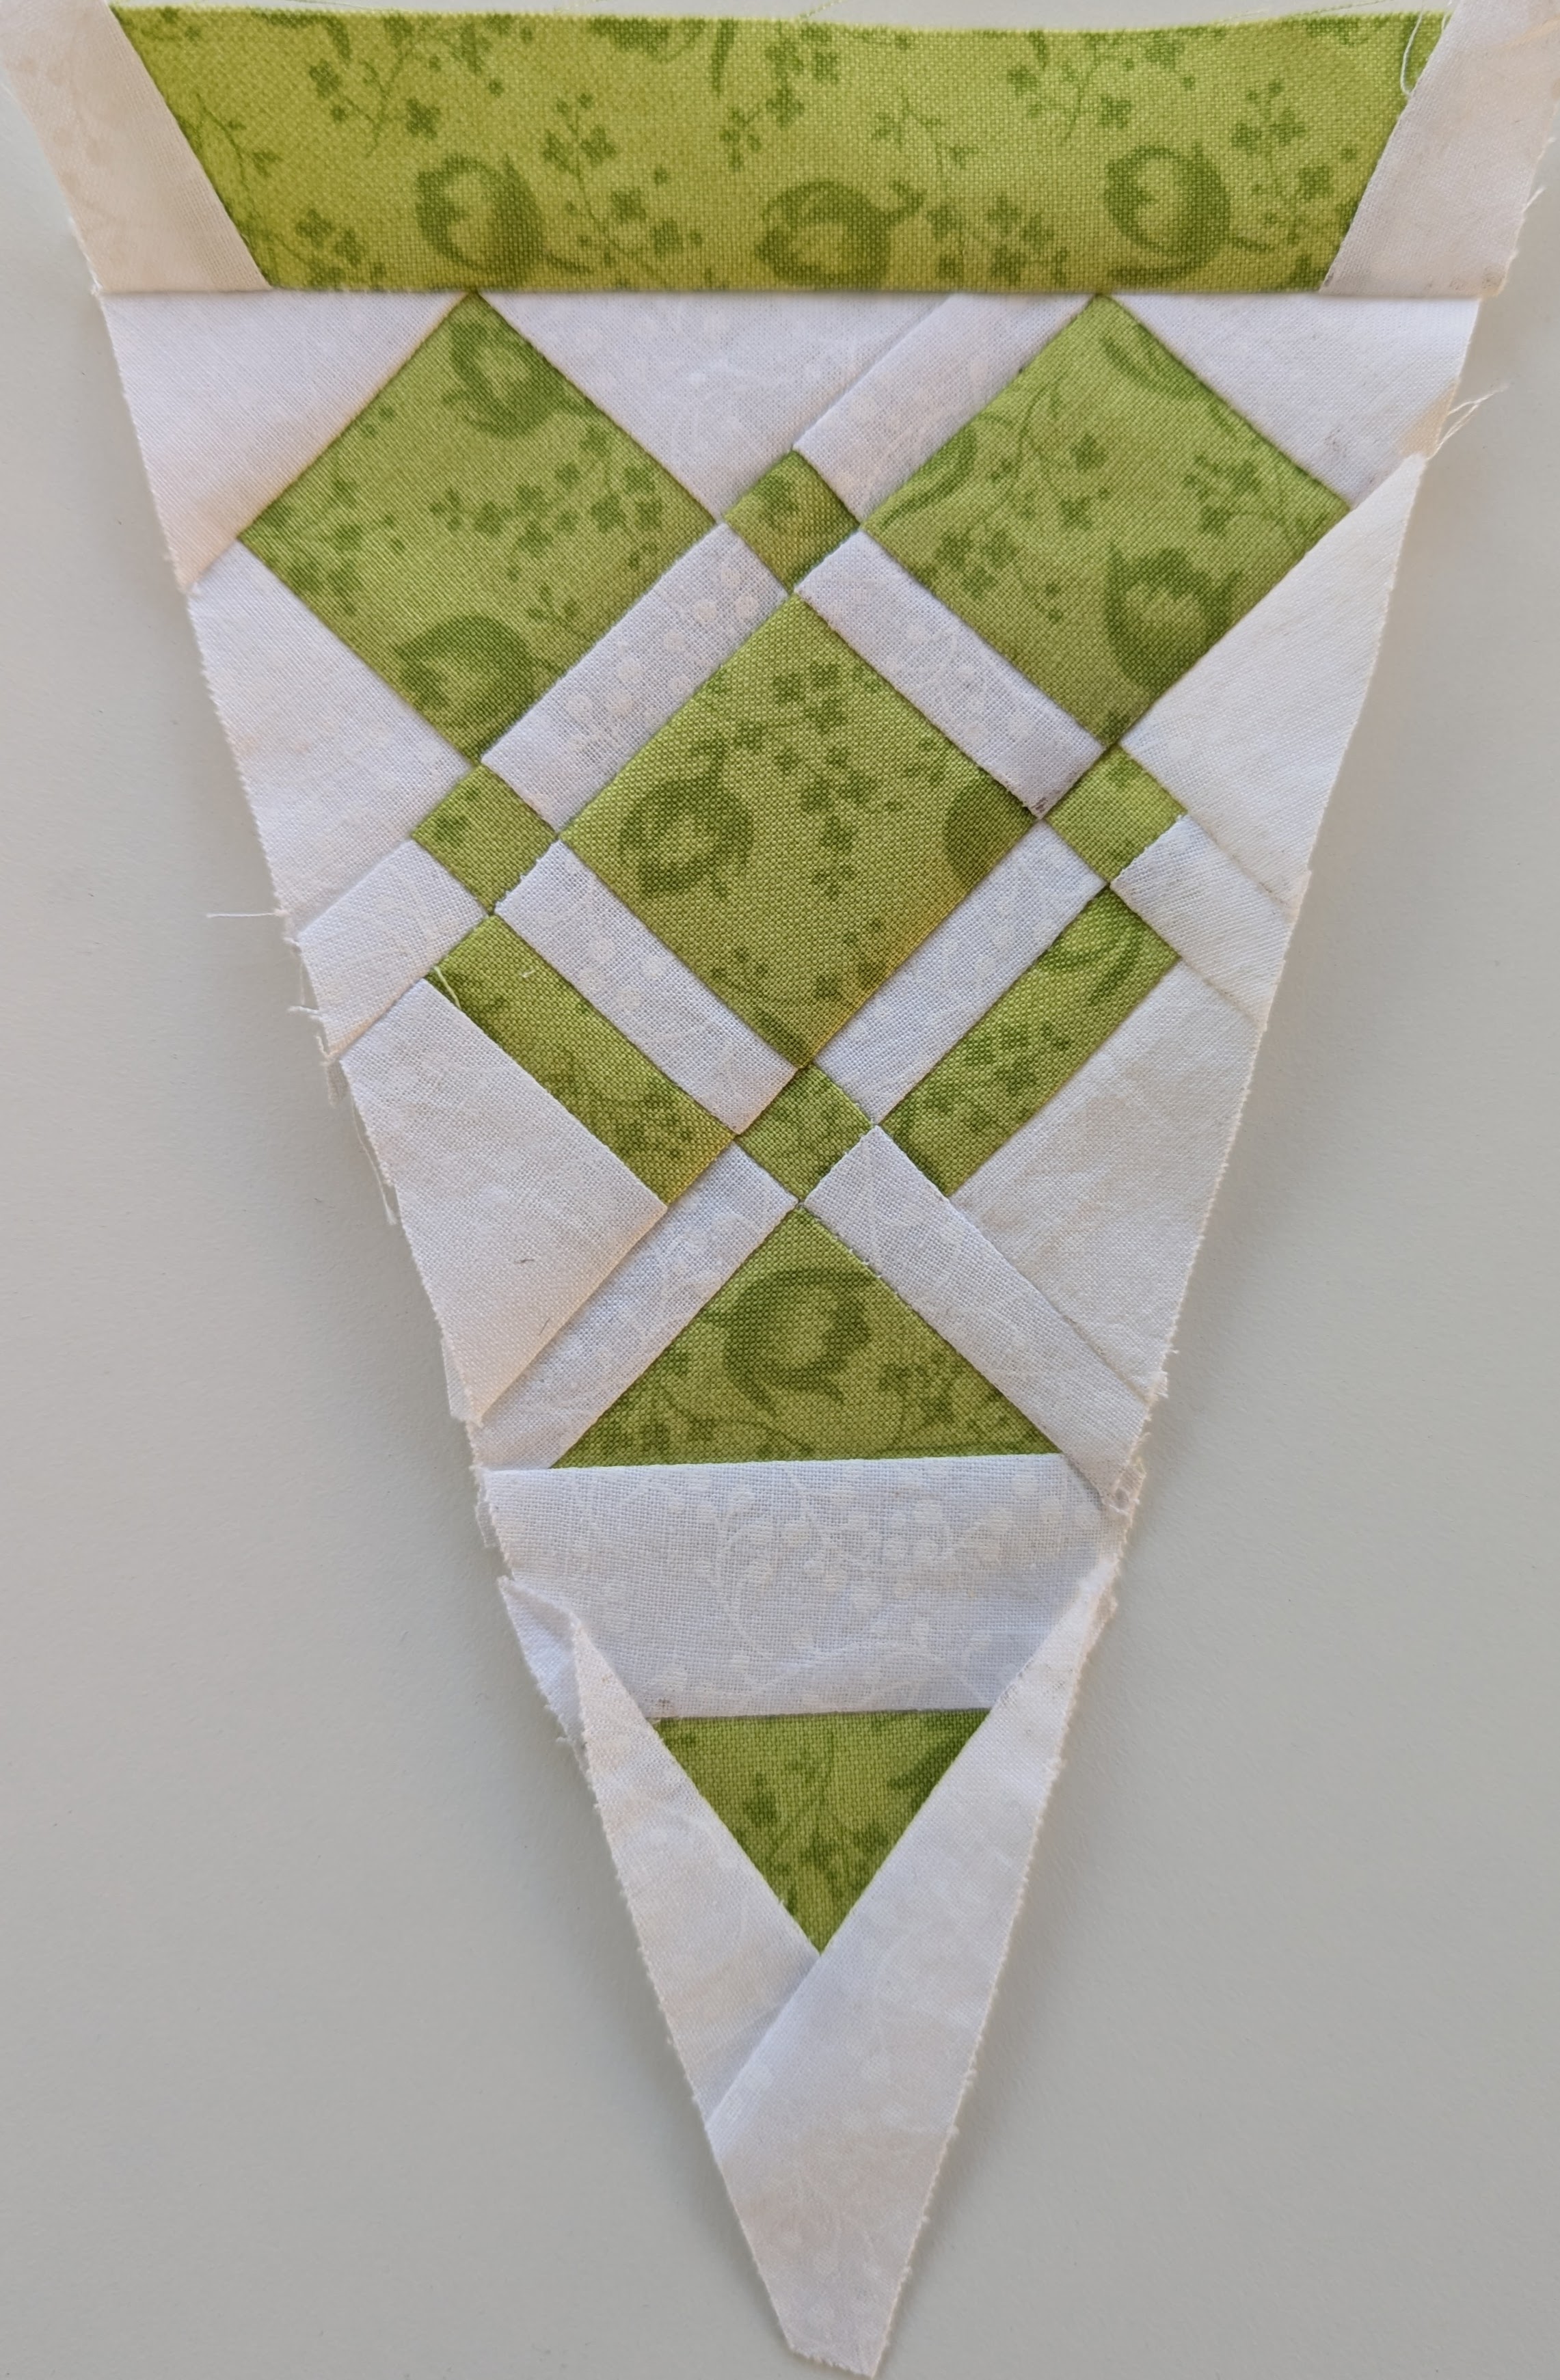
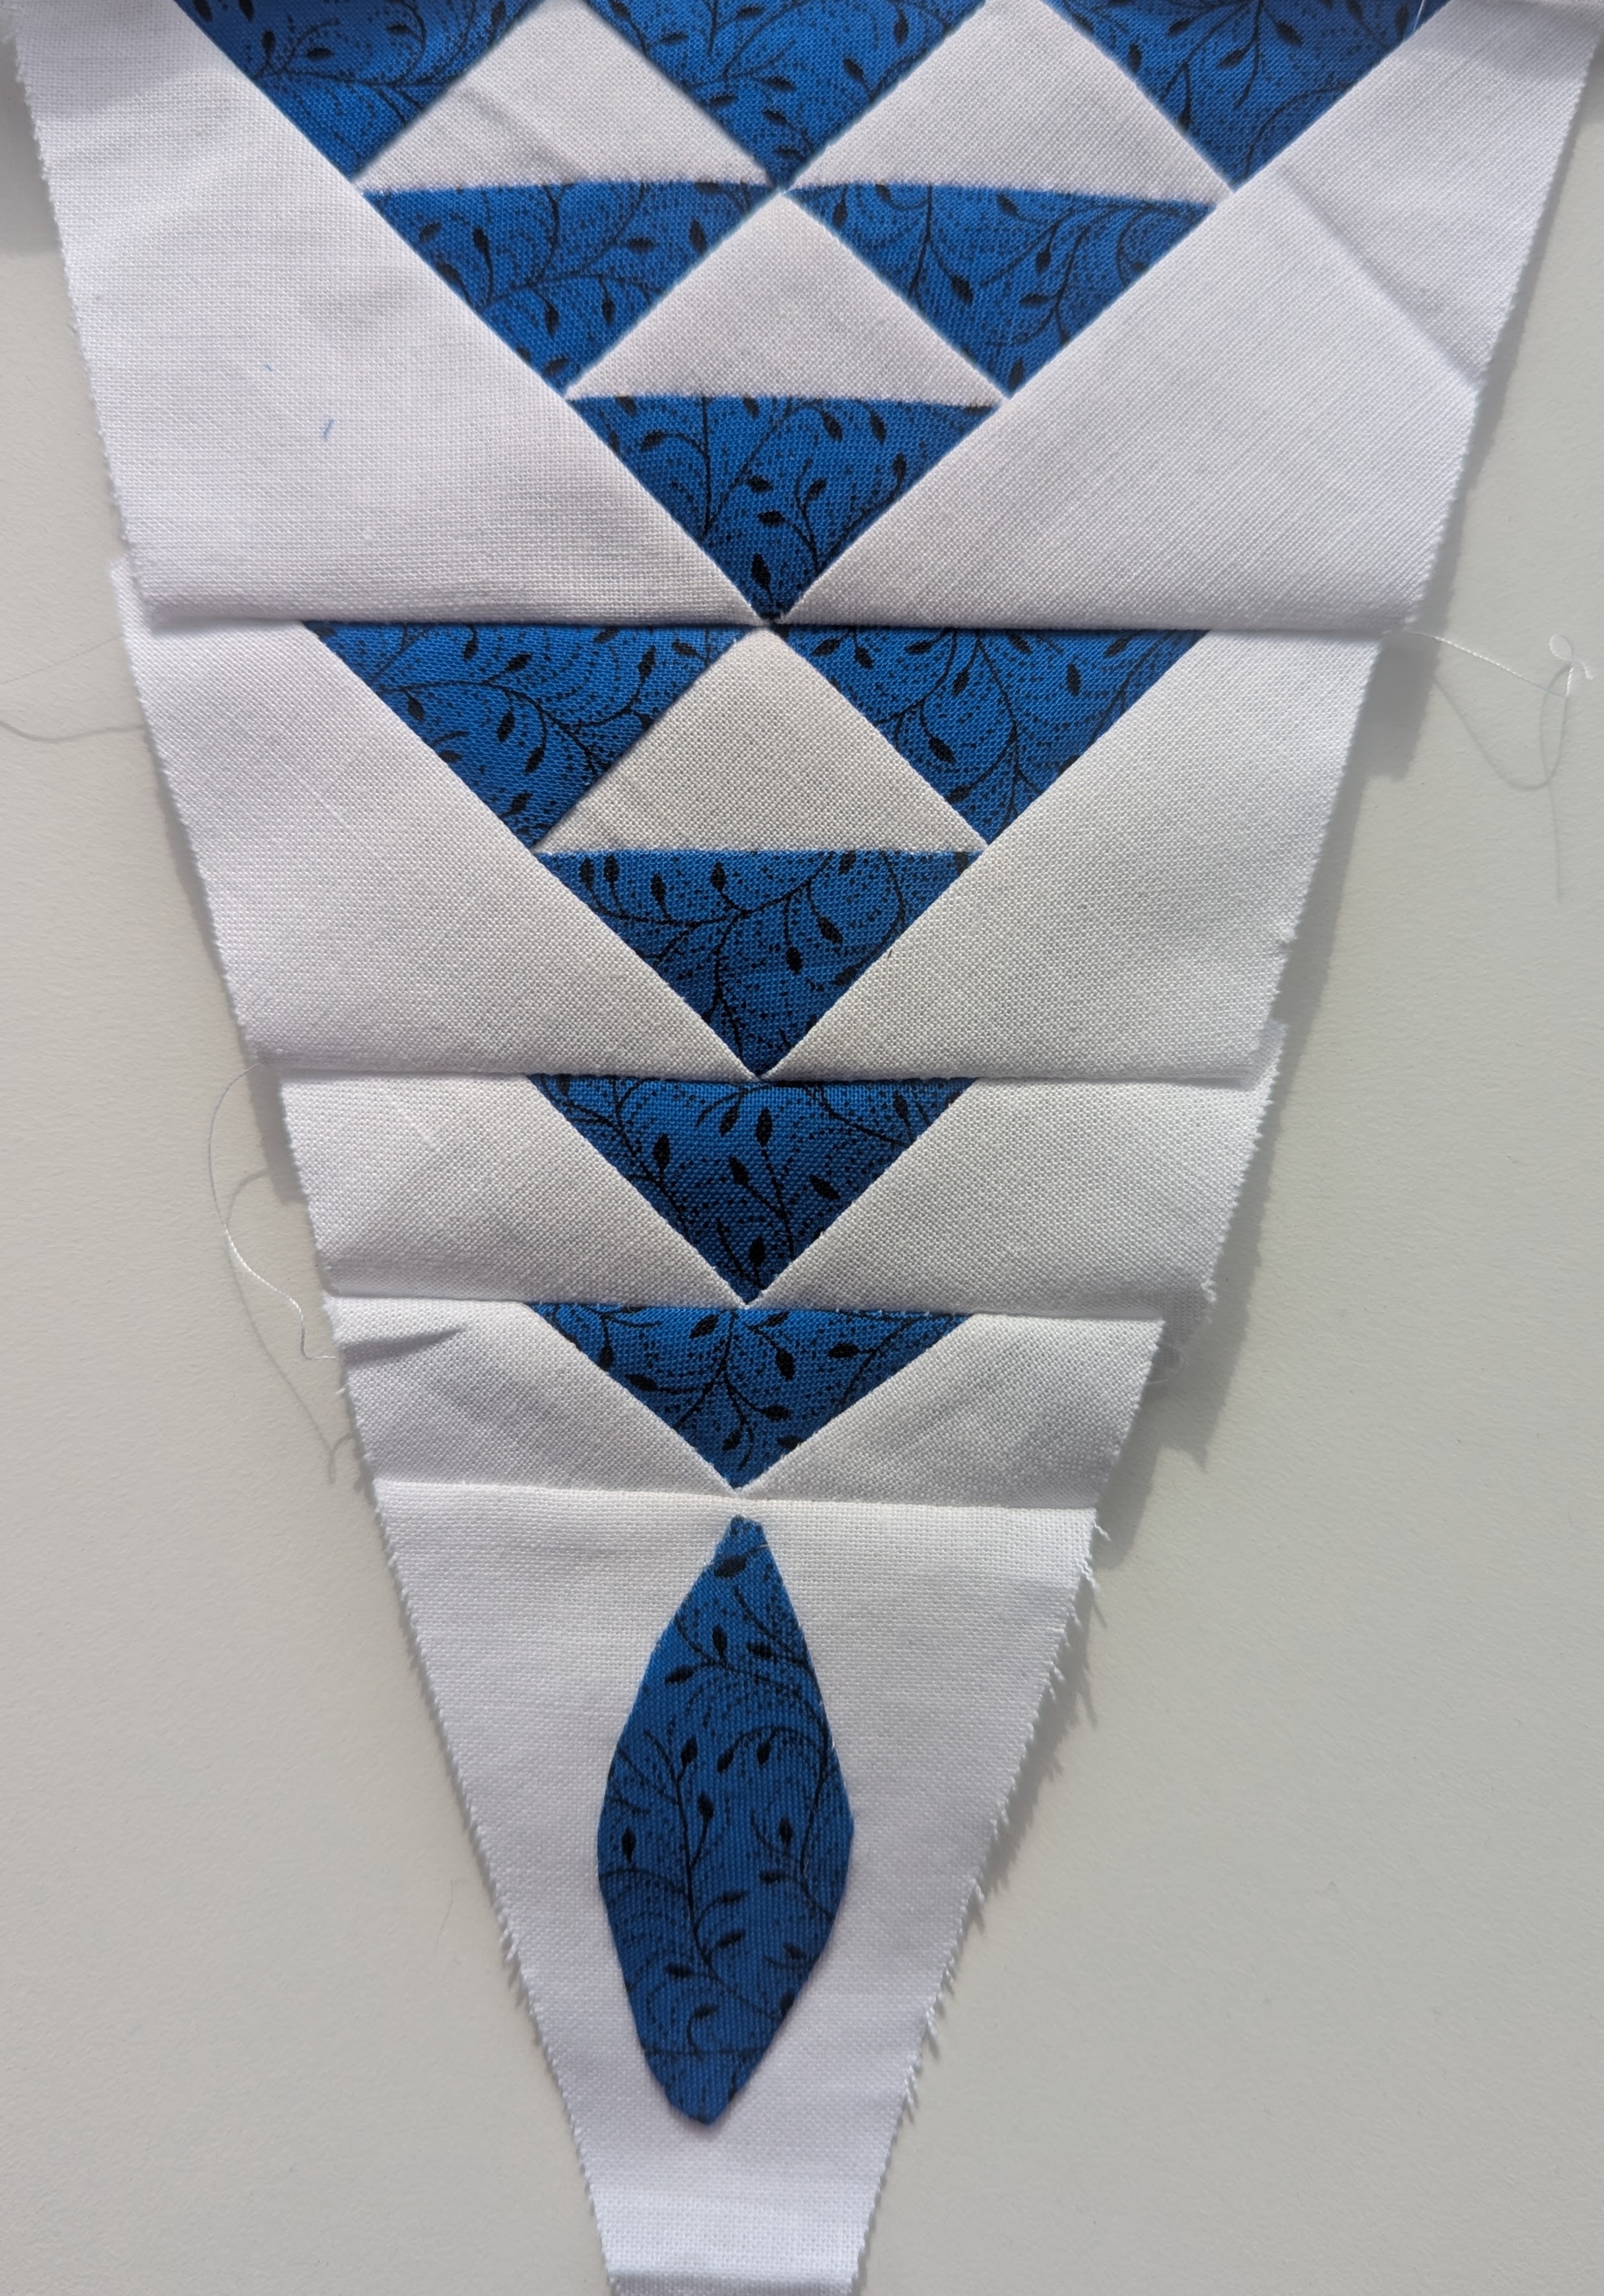
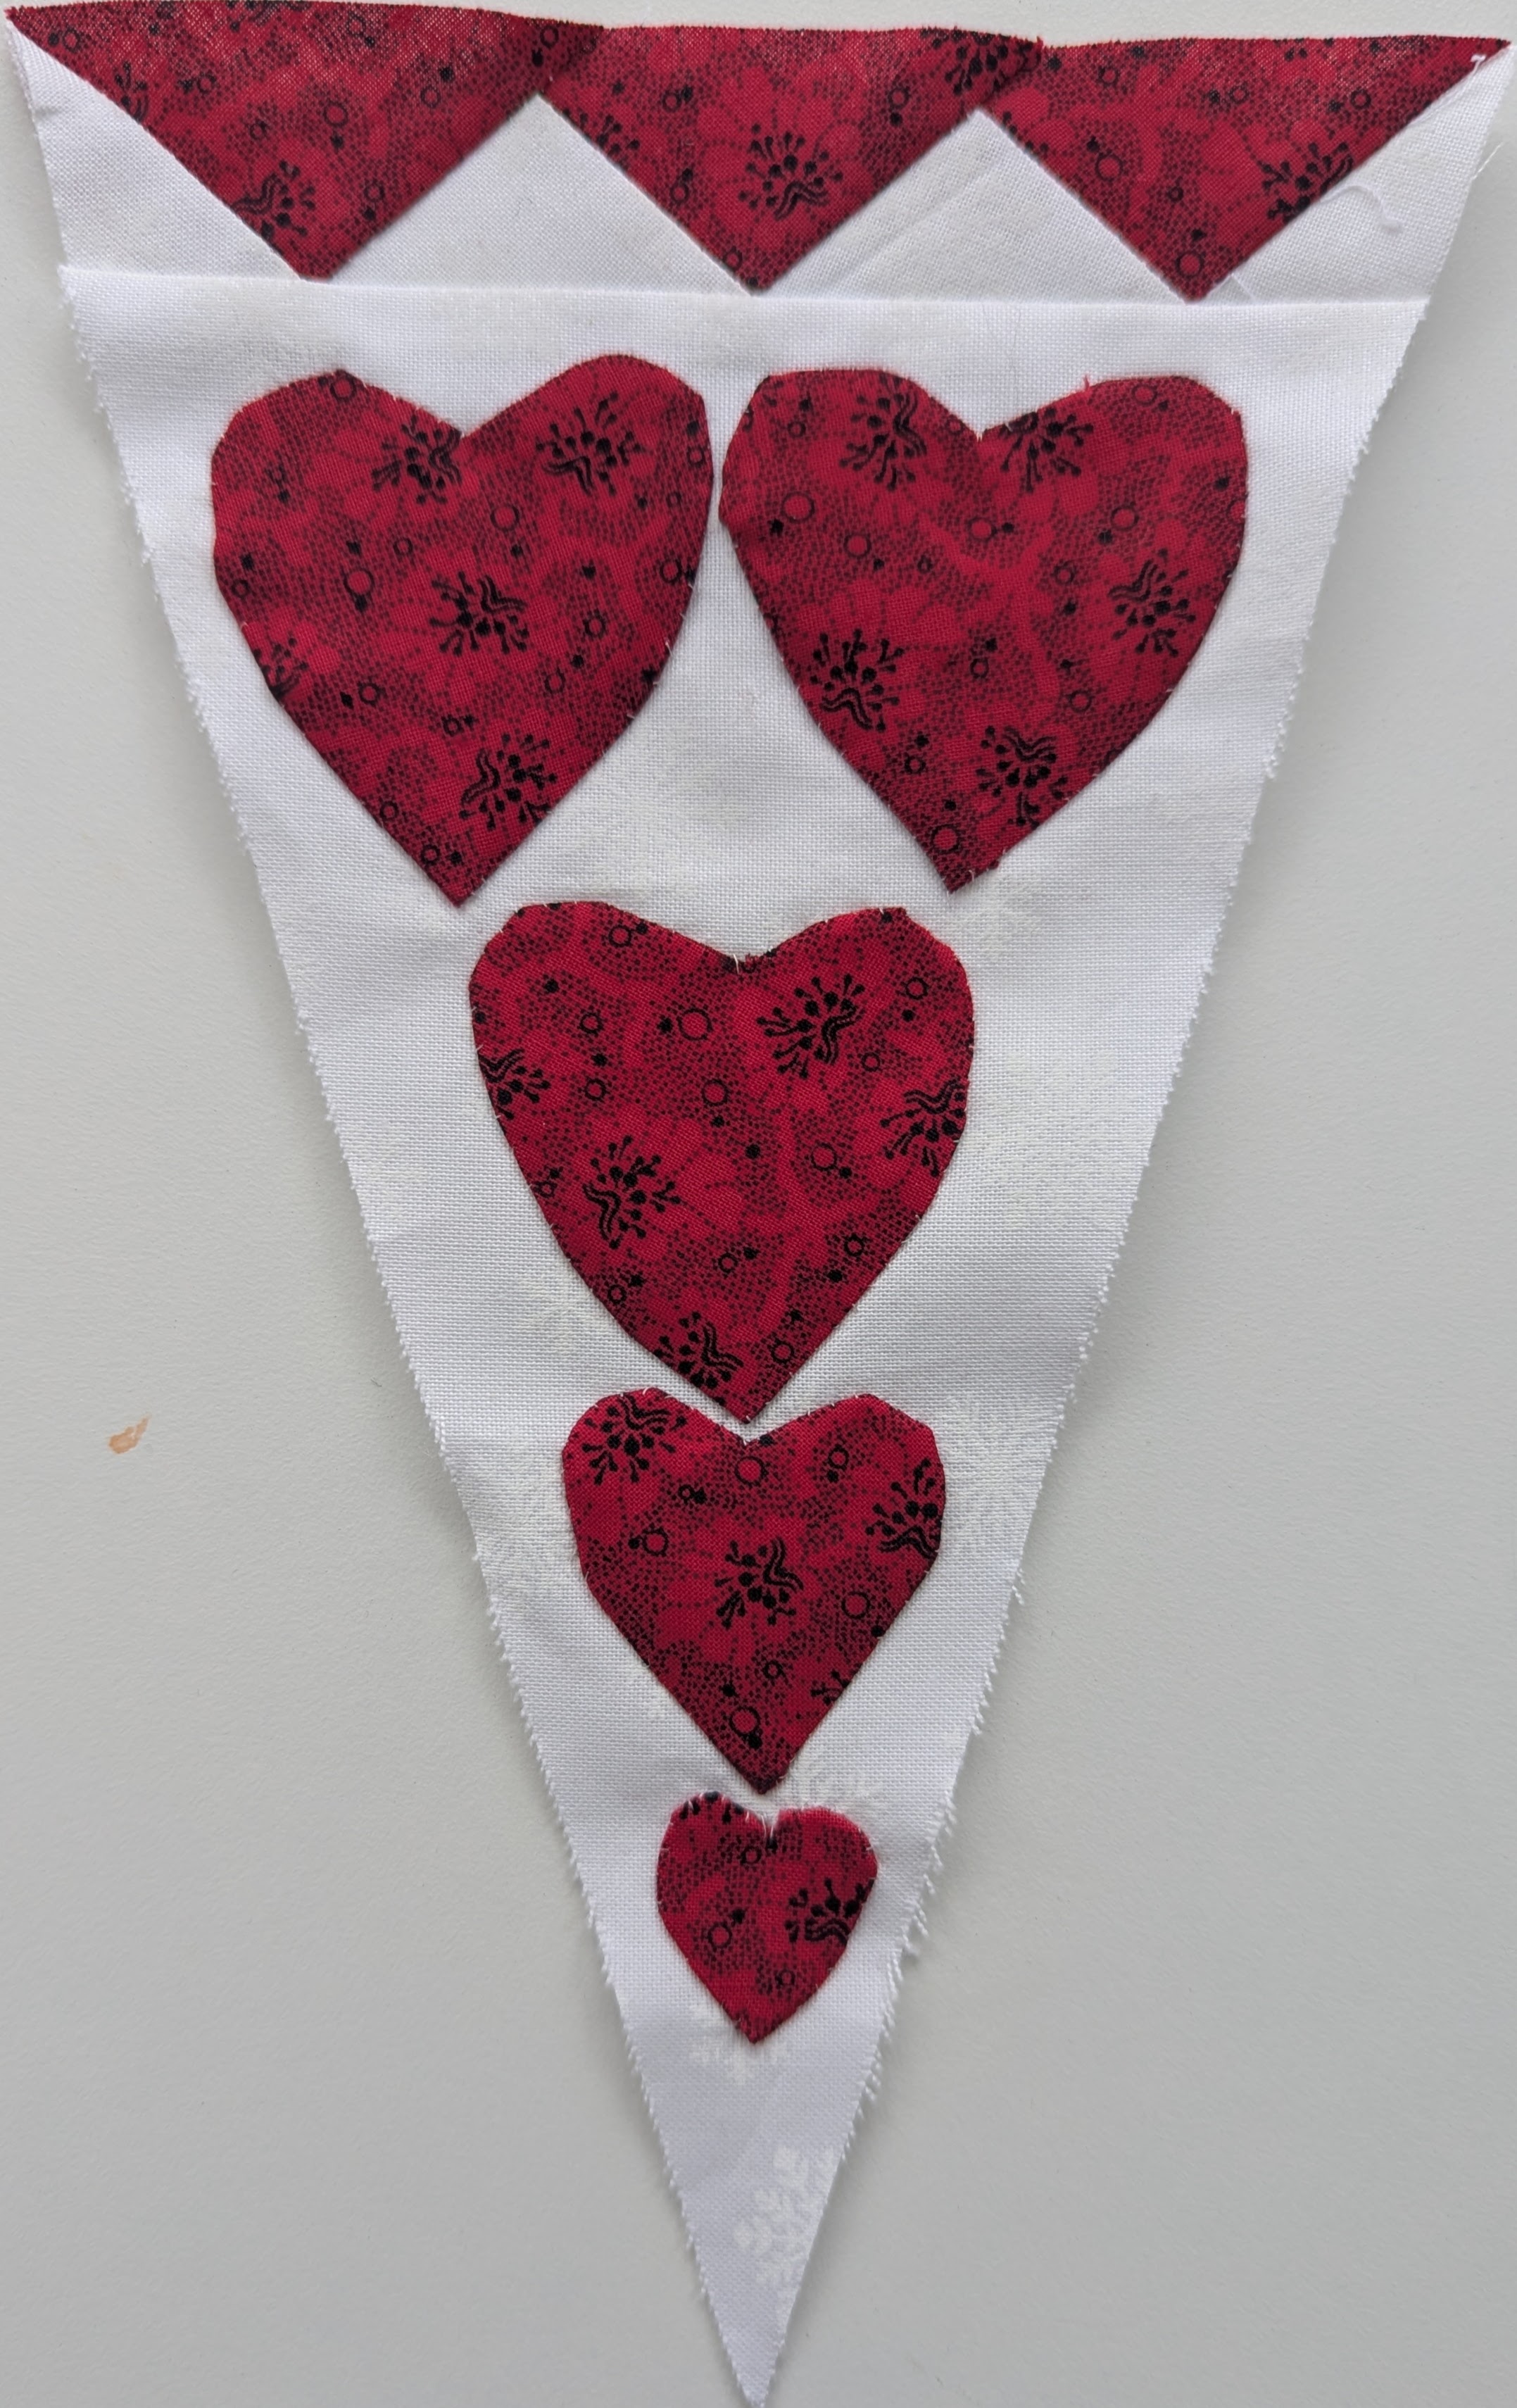
Just to shake things up, I was inspired to begin one of the border blocks. These triangle blocks will alternate with solid blocks, to create a border around the entire quilt. The solid triangle blocks will have a shallow semi-circle on the outer edge, creating the signature “ice cream cone” look.
This design lent itself to Foundation Paper Piecing, so I printed the pattern, and started in this morning. I guess I wasn’t awake yet, because the first five or six seams each had to be ripped out and redone. I didn’t tear any of the paper, thankfully, so I was able to cleanly resew each seam. I’m not yet in the rhythm of placing the first piece good-side-down, and all the rest good-side-up. Of perhaps it’s the fascinating audiobook I’m listening to that has me distracted!
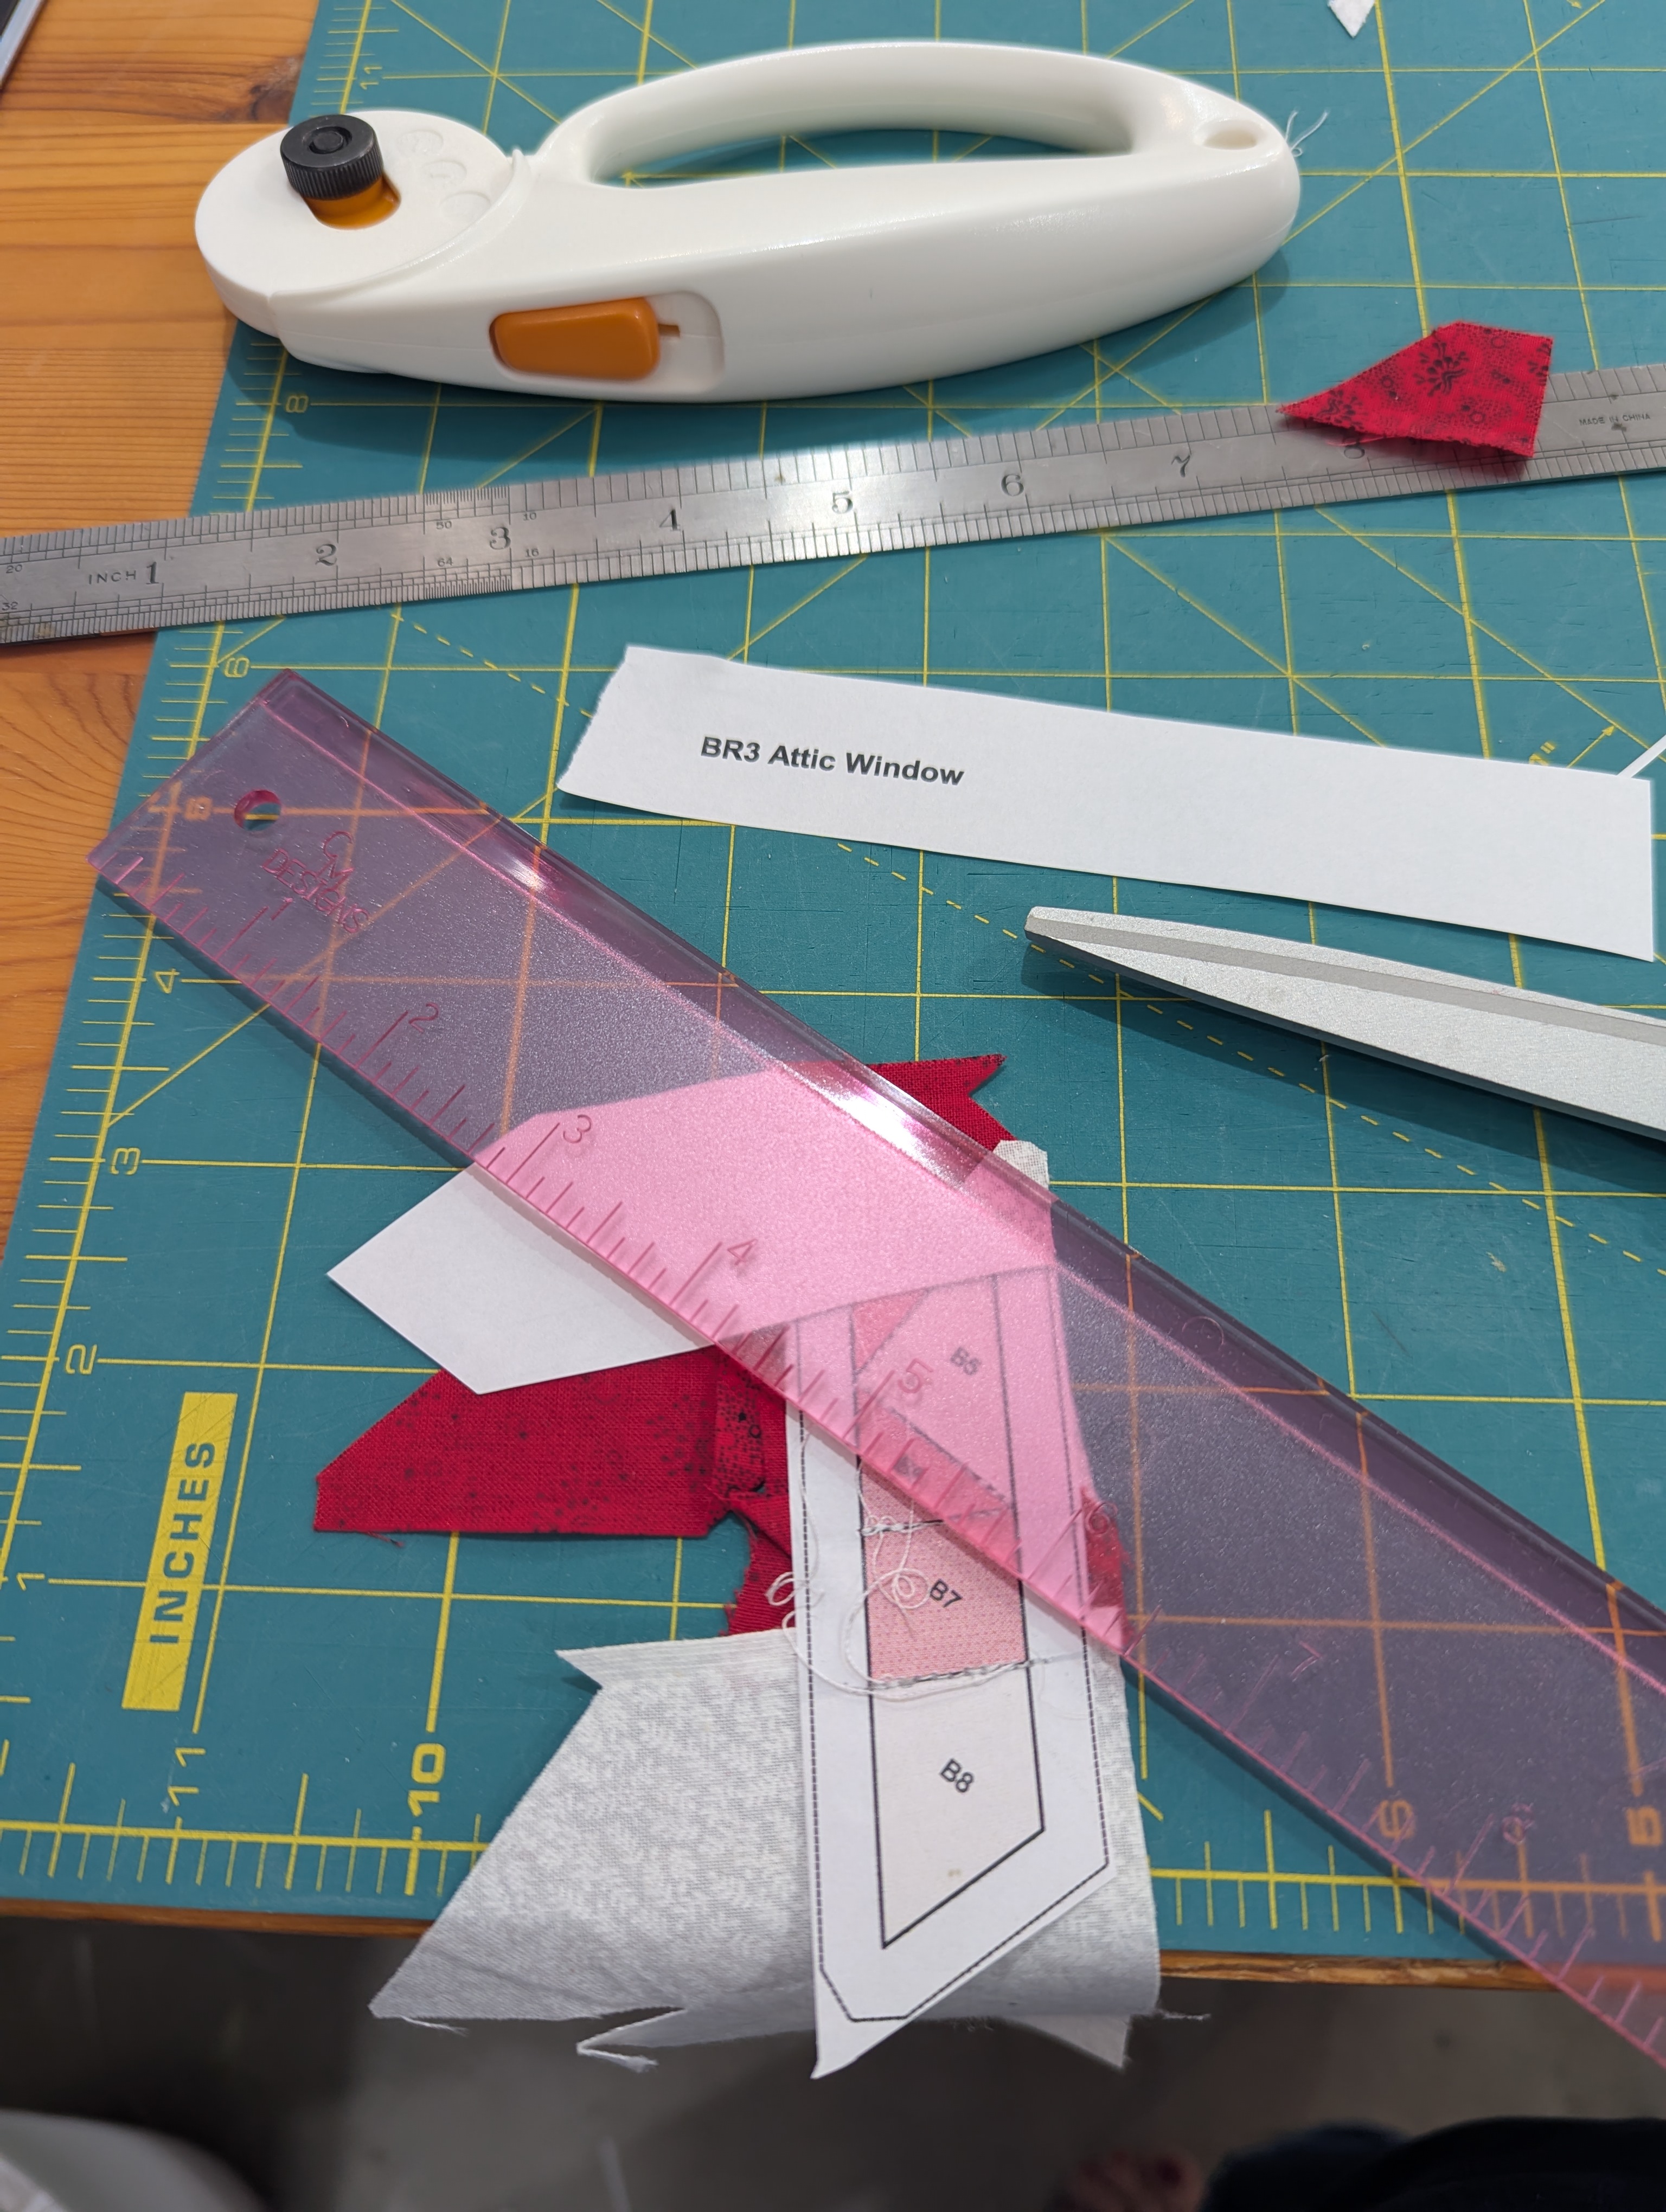
My latest purchase is an “add-a-quarter” ruler, and this one is 12″ long. Unlike the 6″ “add-a-quarter-plus” ruler, which I have misplaced, this one is full thickness and much heavier. It’s great for cutting the quarter-inch seam allowance, but useless to fold back the paper. I’m finding my metal ruler works well for this, though I dislike having to change tools. I have a replacement 6″ ruler on order, and look forward to its arrival.
Successes:
I love the precision of the FPP technique
I am getting better at fabric placement, so my waste is getting to be less
My tiny tweezers (or forceps) that I purchased from Lee Valley are perfect for removing the tiny bits of paper. At $7.50 CAD for a set of three, they are an inexpensive addition to my toolkit.
I am going to completely use up a colour, before moving on to the next. So expect at least two more red and white blocks
Challenges:
I need a mnemonic or a song to remind me that the first piece of fabric faces down, and the next and following pieces ALL need to be “pretty side up”
The tiny stitches that make paper removal so much easier, make seam-ripping much more difficult.
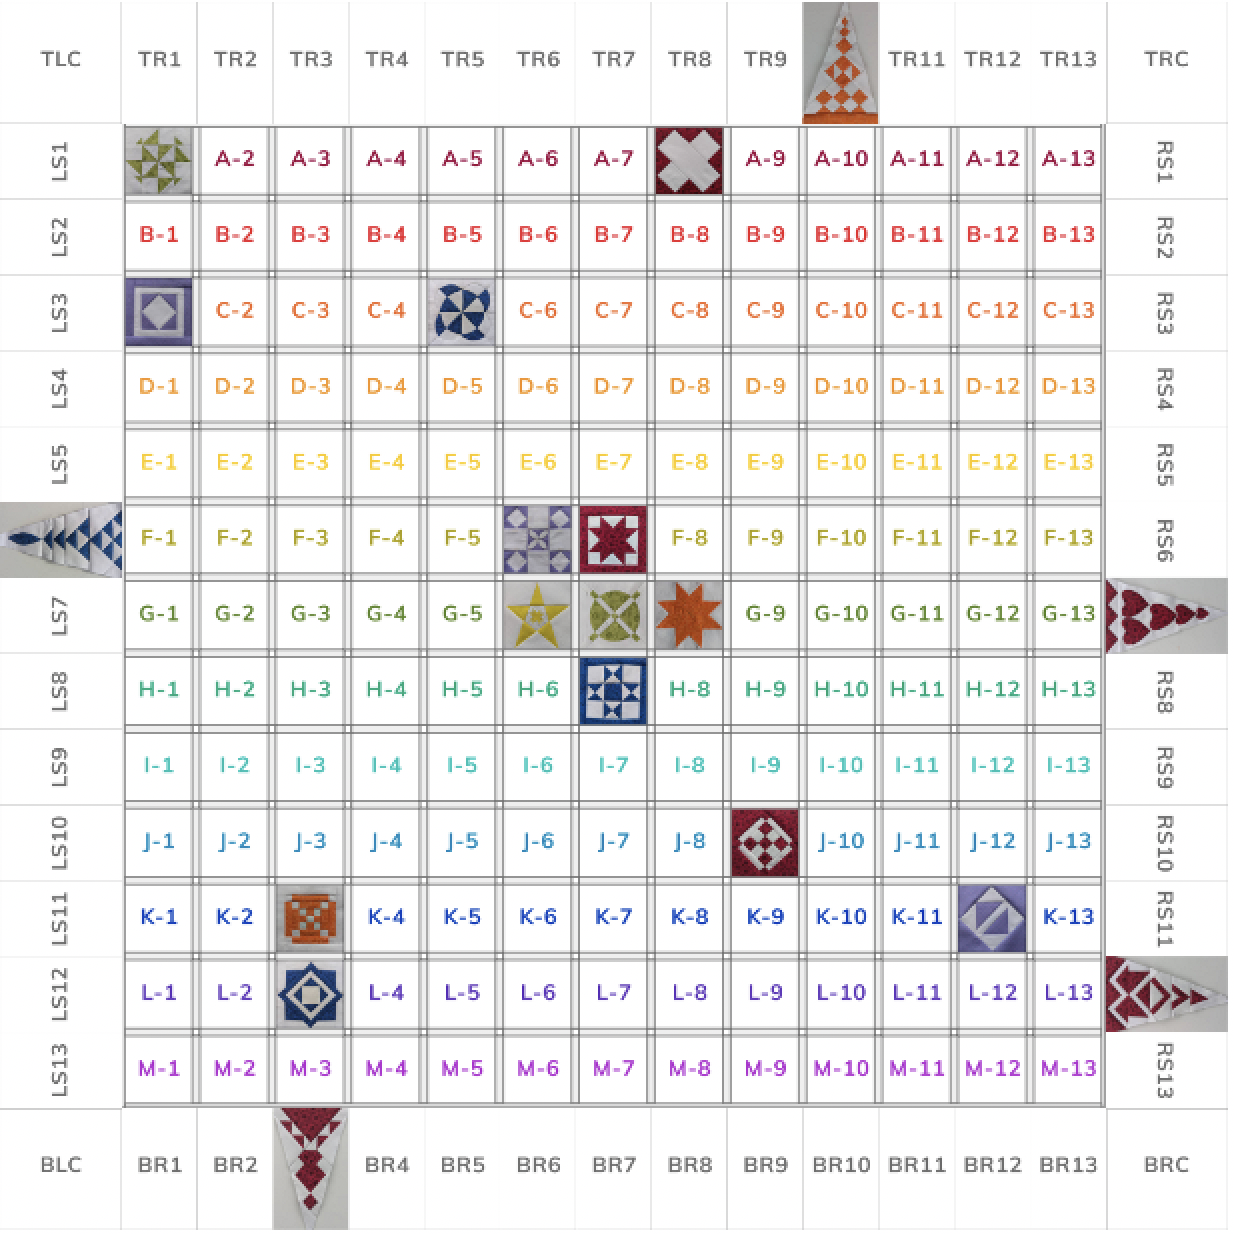
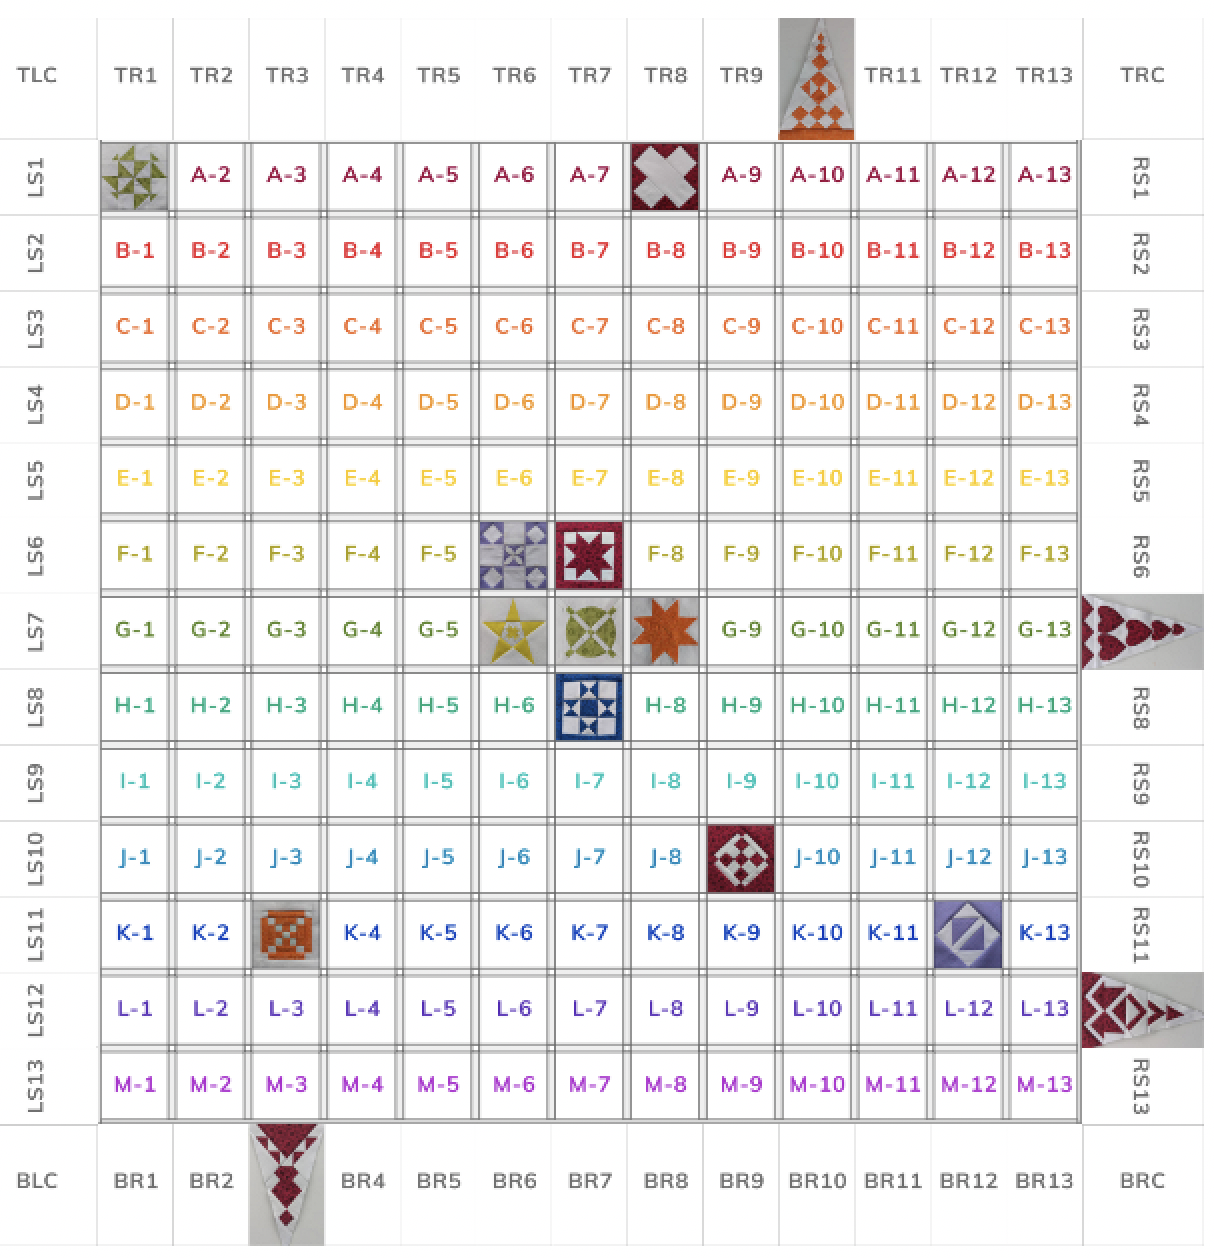
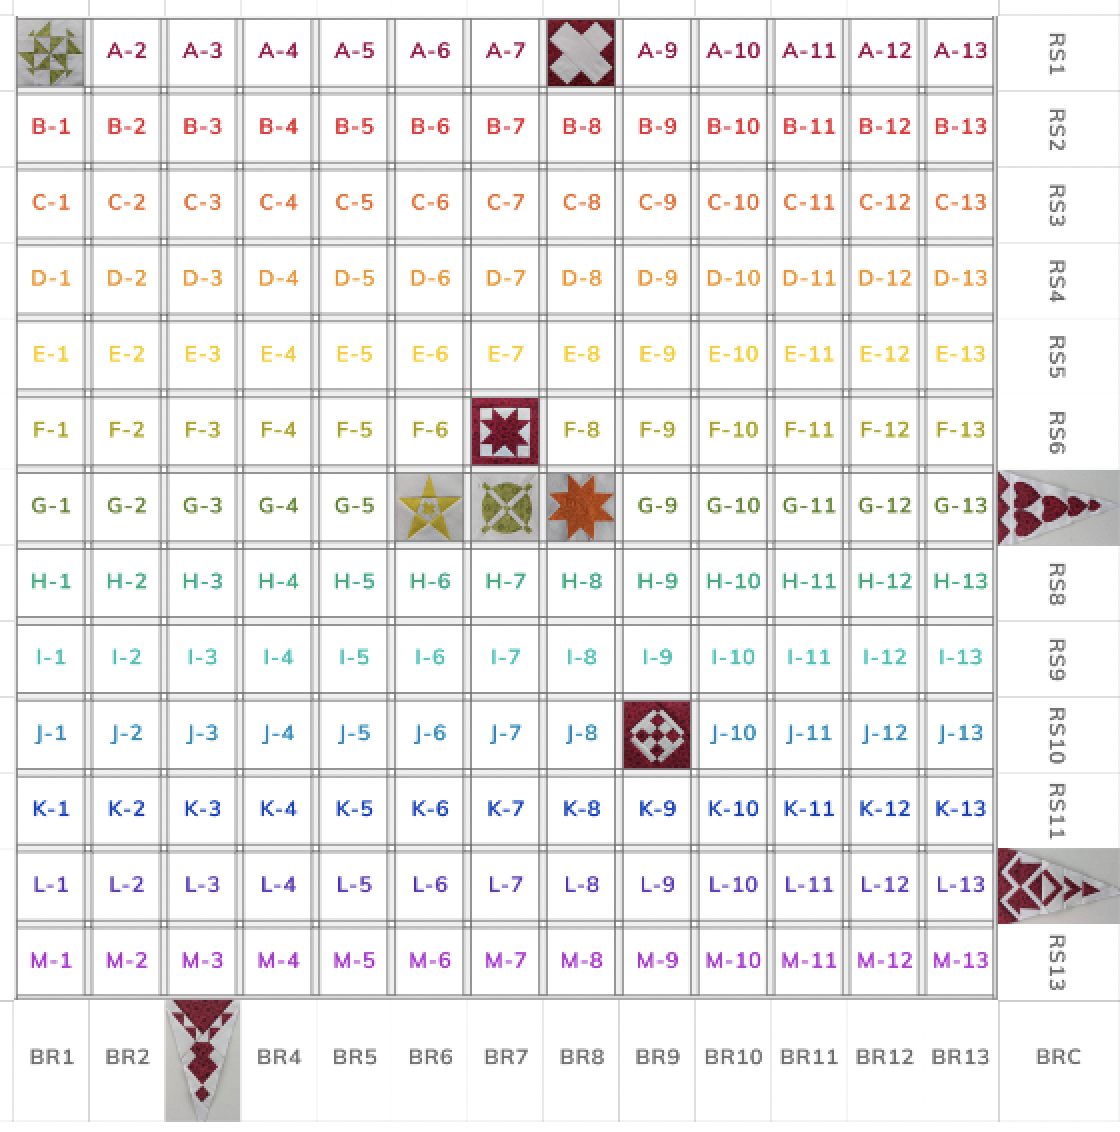
Here’s the new look of the quilt, with one border triangle added:
This looked like a block that would lend itself to traditional piecing, and it did!
Successes:
Straightforward sewing, with seams that nested beautifully
Finished just a few threads smaller than 5″, so will sit nicely with the sashing in the final quilt
Challenges:
All the measurements in EQ8 are in inches with decimals. I think I need to print myself a table of measurement equivalents down to 1/16″, so that I can more accurately cut.
I think I need to look for my next red block to be placed in the lower left quadrant, to balance this strong colour.
A friend who visited today said “You really aren’t going to make much of an impact on your stash with such tiny blocks!”